Are you searching for an interesting way to pass your free time without allocating many resources? Then Minecraft Apk is everything you need. You must have known about the Minecraft computer version and the pleasure one can have in playing that. Minecraft Apk is nothing much different from it. But just a replicative pocket version of it. You can enjoy every feature of Minecraft in this, from unlocking the massive creativity of your own to bypassing boring times.
Well, Minecraft has something for every gamer. With this Apk version, you can enjoy the unveiling of creativity on your own terms. But what is it actually, and what it has to offer you? How to download and install it? Will it be safe for your data privacy? If these questions have also jumbled your head, then this article is what you need. In this article, we have covered everything about the Minecraft Apk version. You just need to read it all the way through its conclusion and get your Minecraft pocket edition on your device.
Minecraft is a game that unlocks the creativity of creative heads like you. If you have played Minecraft on your computer, then you must know the pleasure of playing Minecraft. So, Minecraft Apk is just a pocket edition of Minecraft that you play on your computer. You can play Minecraft Apk from anywhere in the world with guaranteed smoothness of play. It is easy to download and play. You can simply download the game from the play store and app store. Well, it has been played by millions of users daily, and its unique features are the reason for its vogue.
You can use its different modes to explore the limitless possibilities in building blocks: survival mode, hardcore mode, adventure mode, creative mode, and observation mode; with these modes, you can play the game with more capabilities. Moreover, it offers a unique feature of its realisticity. You can feel a true and real feeling while fighting with monsters and taming animals etc. As it offers your a 3D sound and animation effect.
What Are Minecraft Apk Features?
You have got to know what Minecraft is and how much popularity Minecraft is getting around the world. But why has it gotten so much popular in the last few years? Well, in this section, we are going to see why it is so popular and what features attract users too much. So without further ado, Let’s get started with the features.
3D Graphics and Animation: Its graphics and animation are truly commendable. You can enjoy limitless creativity through blocks. You can create anything and let your creativity roam in the meadows of Minecraft world. Its 3D animation provides you with a higher frame rate. You can also change your character’s skin through various tools. You can use Skindex, the most popular among them all.
Background Music and Sounds: Another contributing feature that makes it more realistic is the background music animation. Through these soundtracks, you can feel the realisticity of the real world in the game. Moreover, it also comes with foggy animation, which enables you the feel the real world.
Limitless Exploration: Minecraft mod Apk world provides you with limitless exploration as its graphics will enable different terrain around the world. Its map is too large, thus, many people use cheats and mods to roam into the world completely. You can also use script hook v to execute Minecraft commands; this will allow you to play the game with more potential. You can use the feature of teleporting, fighting with only weak competitors, etc.
A Lightweight Game: This game is very lightweight and takes up no space on your device. You can simply download this game on your device. No high-end Ps and devices are required to play the game. It is also possible to play the game without the internet. You can play the game even while traveling via flight.
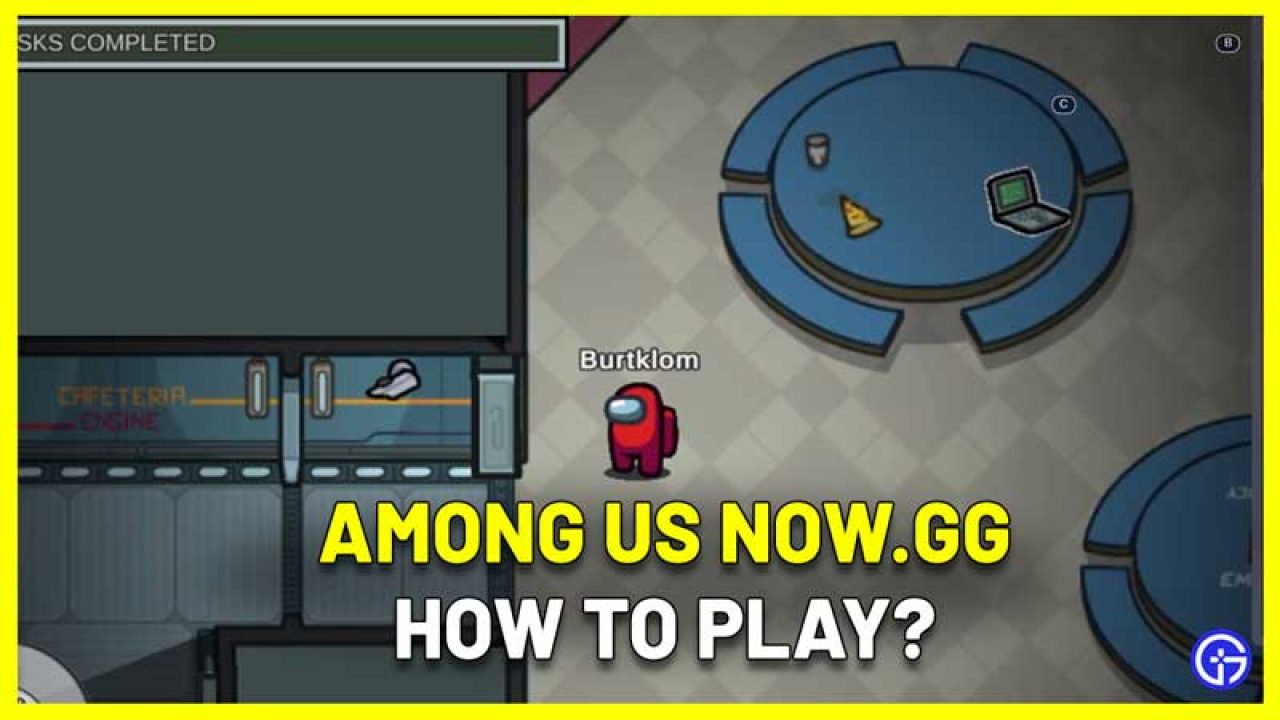
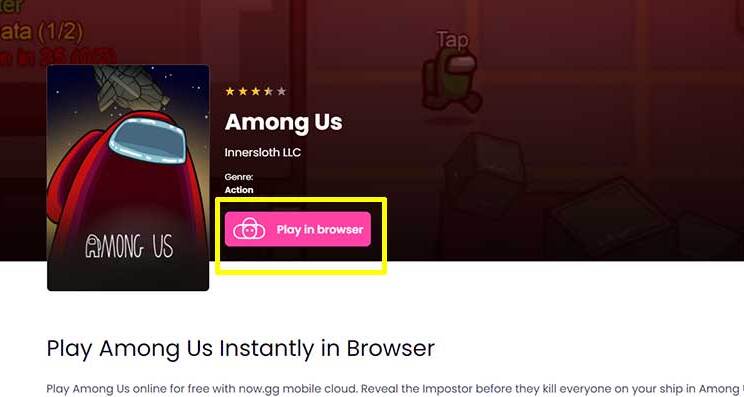
The Minecraft free Apk Version is Available Too: You can enjoy the Minecraft free Apk version on your device too. The best part is you can play it online without compromising any space in your device. Well, it is a very lightweight game but requires you to subscribe to it with its subscription plans. However, you can play it for free on the Now.gg platform.
User-friendly Interface: The interface is quite user-friendly. You can play Minecraft without any technical glitches, as it is very easy to use. Everything is right in front of your eyes. You can play and create anything in the game through blocks without much effort.
How To Download & Install Minecraft Apk?
If you have made up your mind to Minecraft Apk download on your device, then this section will be going to help you a lot. In this section, we are coming up with easy steps through which you can download Minecraft 1.17 Apk version on your device without getting any virus bugs and unwanted threats to your data. You just need to follow the below-written steps.
Click the above-coming download button. This button will redirect you to the official page where you can download the game.
Click the latest version and let it download. It will take a few minutes of yours.
After completing the download, you will need to install the application.
Installation won’t consume you much as you are just required to open the downloaded file and get along with the on-screen steps.
Before you go for Minecraft download Apk free, you must ensure that you tweak some changes in the settings. You just need to change the downloading source options. You have to make it allowable to any source. Moreover, you are not required to worry about the malware and bugs attack coming along with the game. Well, the game is 100% safe and secure to download until you don’t perform Minecraft Apk download from some unwanted source.
Is Minecraft Apk Paid?
The game is exceptional. It provides you with both versions. It’s up to you which version you want to play. If you are an avid gamer, then you will definitely like the paid version, as it has a wide array of features. You can do a lot of stuff with the paid version. Well, one can avail of a free version of Minecraft through the Now. gg platform and enjoy the ultimate gaming experience there.
Moreover, there are various launchers available in the market that you can use to launch multiple gaming versions together free of cost. The best launcher that we would like to suggest is the T launcher. You must check how it can power up your monotonous gaming experiences.
Is Minecraft Worth Playing?
Minecraft is worth playing for anyone as it consists of multiple features that any game would enjoy, no matter if the person is at the beginner level or a pro gamer. It has something for everyone. Well, Minecraft’s unlimited features allow your creativity to unlock. It has block graphics through which you can make anything.
Moreover, it provides you with daily rewards if you get back in the game on a daily basis. Its 3D gaming graphics is something that every avid gamer searches for in the game. All in all, you can enjoy the game in your free time first, and after that, you will get addicted to its wide array of features and limitless creative entertainment.
Frequently Asked Questions
Q1. How to get Minecraft for free Apk?
If you want to play Minecraft Apk for free, then you can play its various versions now.gg Minecraft. This platform will provide you with the free and with all the latest versions of the Minecraft pe Apk.
Q2. Can I download Minecraft for free?
Minecraft is a paid game, but you can play Minecraft for free without even installing and downloading it. You just get into the now.gg platform for playing Minecraft. It will provide you with the free version of Minecraft from your level of comfort.
Q3. Is Minecraft 1.20 out?
Yes, Minecraft 1.20 version is out, and you can take advantage of this version too. This version has been released all over the world, and anyone can download it from their place.
Conclusion
Minecraft Apk is a game full of fun and amusement. One can easily get into the game and enjoy their free time to the fullest. In the above article, we have provided you with every piece of information about it, from its downloading and installation steps to the risks associated with the game. We have covered all about it. If you are still left with any confusion in your head, then you can connect us anytime.
You can join a PlayStation party chat on your mobile phone by using the PlayStation app or playstation app party chat, but if you want to use it on your PC, then what? Well, we have an answer to that question. “PS Remote Play app” by using this app you can access your gaming console remotely on your PC, work laptop, etc. It helps you in a lot of ways, PC monitors have a high refresh rate, and the FPS rate helps a lot while playing shooting games.
PS remote play app was launched by sony in 2016, both for Windows and Mac OS. It’s a complicated process to install and enable the console on your app, but we have broken down the steps into small and easy steps in this article. Hopefully, after reading this article, you will face no problem joining PlayStation party chat on PC.
System Requirements for Installing PS Remote Play App
If you want to access your PlayStation console remotely, then PS remote play app can be helpful for you. With this app, you can control your PS4/PS5 console from a different location. For example, if you want to use your PS4 console from your college or office for some updates or join a group chat, you can do it by using this app from anywhere. However, you should have a high-speed internet connection, including the following requirements:
Your PC should have a 7th-generation Intel processor and a Windows 10 or 11 OS.
You should have a PS 4 or PS 5 gaming console.
To access your console, you will need your controllers, DualSense or DualShock 4. Depending on your console.
To connect your controller to your PC, you will need a USB cord.
Your internet speed should be above 5mbps, both download and upload speeds.
Download and Install
If your Pc has met all the requirements and you are ready to install the PS Remote Play app. Then you have to go to the official page on “PlayStation.com” where you will find the link to download the app. After downloading the app, you have to install it.
The installation process includes 3 easy steps.
Tap the downloaded file, then tap next to begin installing.
Select the program file as the install folder.
Now, tap the install button.
Enabling the Remote App on Your Gaming Console
Now that you have installed the application, you will require the knowledge to use it and the expertise to use it well. To begin with, you have to enable the app on your PS 4 or PS 5 console.
Enabling Process for PS 4
Select the settings option on your function screen. To toggle through the function screen press the Up command.
Select the Remote Play Settings
Click the enable option to activate the app.
Again, get to the main Settings screen and click on the Account Management option.
Choose Activate as your Primary PS4 to enable it.
Turn on the Stay Connected to the Internet and Enable Turning on PS4 from Network settings.
Enabling Process for PS 5
Open the main Settings menu by pressing the up button on your home screen
Click the System Option.
Enable the Remote play option.
Get back to the main Settings and click on the Users and Accounts option.
Click on Other, then select Console Sharing and Offline Play.
Enable it.
Get back to the main Settings menu and click on System, then Power Saving. Click on the “Features Available in Reset Mode” option.
Enable the “Stay Connected to the Internet” and activate the “EnableTurning on PS5 from Network” settings.
How to Use the Remote App on Your PC?
After enabling the app on your console, it’s time to start the app on your pc. You have to follow the following steps to access your gaming console remotely.
Click the PS Remote app icon to open it. Then tap on the “sign in to PSN” option.
Sign in with your PSN account credentials, you have to do this only once.
After signing in, you will get two options, modify settings and confirm and continue. If you want to limit data sharing then you can modify it or else you can continue.
If you have a slow net connection or a low specs system, go to the settings and lower your video resolution and FPS rate.
Choose which controller you use. After this, you will have to wait until the app connects to your PS 4 or PS 5 console.
How to Join or Create a PlayStation Party Chat
Now that you have enabled the PlayStation app party chat app on your PC, you will be able to see a similar interface on your PC. You can operate it with your controller, just like the same way you use it on your console. We will explain the steps of creating or joining a PlayStation party chat on PC for PS 4 and PS 5.
PS 4
First, you have to enable the microphone icon by using your cursor.
Then tap the Up button on the PS4 controller and go to the main Settings page, select devices, and then audio devices.
Change the output device and input device to Remote Play Device.
Then, get back to the Home Screen, go to the main settings page, and select party chat.
You can join ongoing party chats or start a party chat, which will create a new party chat.
PS 5
When you are about to start the Playstation apps party chat, ensure that the microphone unit is unmuted.
Open the Quick menu to select the Mic option and set it to Remote play device.
Get back to the home screen and open the setting menu select party chat
You can select ongoing party chats to join it or select start a party chat which will create a new party chat.
Benefits of PS Remote Play App
PS remote play app allows you to experiment and enhance your gaming experience. These are its advantages:
You don’t have to keep the TV on to stream the console on your PC.
This app allows you to play your favorite game remotely. You can join the playstation party chat on pc without PS4 console being near you.
You should not worry about playing your favorite PS game on your PC. You can even play it on full screen.
PS remote play app allows you to minimize the party chat which helps you to focus on other work while being connected to a party chat.
PS Remote Play App has no issues like the Discord fatal Javascript error which happens a lot of times in Discord.
How to Exit a PS Remote Play App
When you are done with your gaming session, you can exit the app. An option will pop out “put the connected console in rest mode” select the option and click on ok. When you are going to start again, just click on the console you want to use and use it. You can add a new console if you want to.
Frequently Asked Questions
Q1. How to use PlayStation party chat on PC?
Assuming your PC has a 7th-generation Intel processor and a Windows 10 or 11 OS. You should install the PS remote play app and enable the PS console on your app. Then, open the setting menu and click on party chat to use it.
Q2. How to get PlayStation party chat on PC?
You have first to download the PlayStation remote play app on your PC, then install it. You have to enable the PS console on your app to use it. With the help of the controller, open the setting menu and click on party chat to use it.
Q3. What is PlayStation Party Chat?
It is a feature that is present on PlayStation enabling you to talk to your friends directly while playing the game. You can join a party chat on your console directly, or you can join it on your PC by using PS Remote Play App.
Q4. What is the alternative to PlayStation Party?
There are multiple alternatives to PlayStation Party, such as Mumble, Slack, and Discord. They all provide a platform to stream your game and talk to your friends while playing the game.
Conclusion
If you have been joining Playstation party chat on PC without remote play, it’s time to utilize the full potential of your PS console. With the help of this app, you can join a party chat remotely. You can access your console from work, college, school, etc., you just have to have a high-speed internet connection.
The user interface on your PC will be exactly like your gaming console. To use the app, you will need PS 4 or PS 5 controllers, depending on which PS you own. In this article, we have tried to take you through the installation and setup process in easy steps. Hopefully, this will allow you to join a PlayStation party chat on PC with ease.
Minecraft is a game of customization and creativity. When it comes to the skin of your character then, people usually can’t do much. But here we are, ready to make your game more engaging with new & customized skin options. If you are also tired of playing with the same skin every day, then the time has come to transform your boring avatar into a fascinating character. Changing your character and editing is not as difficult as it may seem to you.
What if we say that you can do a Minecraft skin download for free? You must be amazed. Well, it is possible with the fantastic website called Skindex; through this, you can make your character completely on your terms without a penny. So let’s explore what you can actually do to get your game more creative.
Skindex is a popular app used for the customization of Minecraft characters. Minecraft Skindex will help you to customize your character’s skin with unlimited customization options. You can go for a completely new look for your character, completely edited by you. If you are not much good at editing, then also there is a way out that you can use community-made characters too. Also, one can make slight changes in the community-created characters. Before you get into any further details about Minecraft skins in the Skindex app, you must rectify each and every issue related to your game Minecraft. If you are facing any issue, such as Minecraft failing to download or Minecraft error 1, you must rectify it first.
Features of Skindex com
In this section, we are going to examine all the related features of the Skindex app. Well, there are so many options for customizing your skin floating on the internet, but how will you choose the best for yourself? You have to do nothing as our experts have done all the research, or you can say the difficult part is done for you. So that you will get an easy solution for why you must use Skindex for changing and customizing your skin look in the game Minecraft. Let’s look at them in the below pointers.
Easy To Use: Minecraft Skindex is a very easy-to-use website. One can easily get into the website and fulfill all their needs. The interface is so straightforward that everything is right in front of your eyes. If you are not very technical, then also you can use this website without any hassles.
Unlimited Skin Customization: It implies a wide range of customization in every sense. You can customize skin with unlimited options of colors, costumes, and much more. It is not only limited to customization; you can select community-created avatars too. If you don’t won’t have to get into customizing your character. Then you must go for any eye-catching character design already available in millions on the website.
Uploading feature: One of the best parts of using this app for editing your skin is that it allows you to upload your previous skin or someone else’s skin, too, by their username. It enables you to download the different skins and edit them as per your preference and choice.
Editing tools are easy to use: All the tools available in the app and the website are easy to use. You don’t need any technical knowledge to use those tools in your game. When it comes to the curve with editing tools in the app, most people get confused, but with this app, one can get into it effortlessly, as all the tools have clear labeling of their names, and the color options are wide too. You can select your favorite skin color from the color wheel.
Free to use: Various apps are floating on the internet, providing you with free customizing options, but what about the safety of malware and viruses? Well, with Skindex, you don’t need to worry about it. This app is completely free, and you can use its customization option to its full potential without paying a single penny for it.
How to Download Skins for Minecraft
Now that you are all aware of the features and their meaning, it is time to learn how to download skins from Skindex Minecraft. Let’s see in the below pointer how one can actually do Minecraft skin download free on their device.
Click the above-coming button it will redirect you to the official page of the Skindex website, through which you can download your customized skins.
On the page you have been redirected to, you will see a lot of options for different skins on the first screen; navigate to the website and select your favorite screen.
Open the skin you like. You will see a download sign on the next screen. Click that.
The skin will be downloaded into your system in PNG format, which is a very low-quality format, don’t worry. Installing it will give you a different result.
How to Install Skins on Minecraft Bedrock Edition
If you have completed the download steps, you must be thinking about how you can use this in your game. Well, it is also effortless. You just need to follow the below-written steps and get the skin live in your game.
Lunch your Minecraft game. On the first screen, open your profile by clicking your character.
By clicking it, you will be redirected to another screen where you can change or edit your character.
Click the edit character option coming on the screen.
In the left pane, click the second tab.
Here you need to press the owned option and then import.
By clicking import, you can import the PNG in the game that you have downloaded.
A prompt will come up asking you about which kind of skin you want, a slim or a classic model. The only difference in both characters is the broadened shoulder.
How To Edit Skin in Minecraft Skindex?
Another question that would be jumbling in your head is how one can edit or customize their skin on the website. Well, as we have already told you that the website is very easy to navigate, which implies that editing and making a skin is also very straightforward.
However, there are two ways through which you can edit and make your character. If you want to indulge more in the editing part and your editing skills are good too, then you must get into the first process, which will require you to edit through photoshop. You must use equal dimensions to your game’s character. Moreover, you also need to use transparent and a PNG format as you will have to upload it further on the Skindex editor for editing.
Let’s check the other way through which you can edit or make your character via Skindex com. Look at the steps below.
Get into the website and click a character that you want to make yours.
You will see an editing option. Click it.
Now you can edit your character here with easy navigation windows and tools.
You will get a paint option for changing the color of your character. This coloring tool is as easy as MS paint. You just need to fill the boxes with the color bucket of your choice.
Once you complete the editing part, you can get into the downloading. For this, you just need to press the download icon coming from the bottom of your screen.
And here is the skin editing is complete. Now you can use the downloaded PNG format as per the installing steps given in the above section. Moreover, there are Minecraft commands too that you can use to improvise your games easily.
Is It Safe to Download Minecraft Skins from Skindex?
Skinde is quite a popular site among all the other Minecraft customizing apps. Also, it has been used for so many years by avid gamers. You can also download and customize your skin easily with this app. But there is a lot of confusion among young users about whether it is completely safe or not. So, the answer is yes, it is completely safe till the time you don’t download it from some fake website. You must download the website from a trusted source so that it won’t come with any kind of malware. One more thing that you can try is anti-malware apps to avoid the invasion of malware in your system. You must try downloading with a trusted source, and you must enable your antivirus to avoid further.
Frequently Asked Questions
Q1. What is the best website to download Minecraft skins?
If you want to download Minecraft skin, then the best website available for it on the internet is the Skindex app. You can download the app from its official website. Moreover, you can use its website as well. It is free to use and provides you with unlimited customization options.
Q2. Why is Skindex not working?
Skindex is quite a popular app used by so many people around the globe. This may be the reason why Skindex not working on your device. Maybe the server and the traffic of a website are causing the error. Hence, the app is not working on your device.
Q3. How to use Skindex Minecraft?
Using Minecraft Skindex is a very easy and straightforward process. The website comes with an easy user interface. Everything is right in front of your eyes. All the tools are easy to use. And the color selection is also effortless.
Conclusion
In a nutshell, we have given each and every insight about Minecraft Skindex, from how you can download & install it to how to use it. Well, the above guide has definitely made everything easy for you. We hope you have enjoyed customizing your avatar with our guide. Our experts have made everything very clear to you in every way; if you still have queries and questions in your head, then you connect to our experts anytime and get your query resolved.
Do you want to enjoy a new magical 3D gaming experience? Well, Oculus Quest 2 can be a very interesting way out of it. This literally provides you with a high-end gaming experience at a reliable price, with respectable battery life, and its comfortable design makes it the best VR headset around. But most people find difficulties in connecting it to their PC as the software is still in the experimental phase. If you are also in the same boat, then keep calm; you are not alone. However, we are here to help you out with the straightforward steps to connect oculus quest 2 to PC.
If you want to know how to connect oculus quest 2 to PC with a link cable and how to connect oculus quest 2 to PC wirelessly, then you just need to be with our article and get your magical gaming experience of your games back.
How to Connect Oculus Quest 2 to PC?
There are two ways through which you can oculus quest 2 connect to PC. One is the link cable, and the other is the wireless mode. We have compiled them both in the below sections. However, both of the methods are good in their own ways. If you really want to enjoy a wireless connection, then there are various things that you need to consider, such as a good and efficient internet connection; otherwise, it won’t work well. On the other hand, while connecting with the link cable, your cable has to be on point for a perfect connection and efficient use. So, you must choose a method that is suitable for you.
Connect Oculus Quest 2 Via Link Cable
This game does not require any wired connection to connect to your PC. But if you connect Oculus Quest 2 through a link cable, then you can unlock too many advanced capabilities in the game. Also, connecting with a link cable can lower the risk of random connection errors. You are not even required to move too much in the game, so this can be a straightforward and convenient solution for you to connect oculus quest 2 to your PC. Let’s check how to connect oculus quest 2 to PC through a link cable in the below steps.
The first step is to have the app on your device. For that, you will require to download the Oculus PC app on your PC; you can download the app through Oculus’s official website.
Use a Compatible C-type cable and insert it into the matching port of your CPU. It is advised that you must connect the cable in the front inserting ports as it will be easy for further use of the headset in the game.
Now, you just need to capitalize all the cables to their full length.
Insert the cable into your Oculus Quest 3 headset.
Now, a prompt will come up asking you for permission to use your data. You must deny that permission. In case you have granted, then you must detach the cable from the CPU and insert it again.
After completing the above, you will get another prompt asking you to enable the oculus link. Here, you will require to link it and press enable. And get further with on-screen instruction.
The above steps will give you new Windows access through which you can play any game to its full potential, and you also are done with the oculus quest 2 connect to PC steps. Moreover, this method is the easiest way to resolve the question of how to connect oculus quest 2 to PC. However, if you don’t want a wired solution, then you can jump on the following method through which you can establish a wireless connection.
Connect Oculus Quest 2 Via Air Link
Connecting oculus quest 2 to PC without wiring hassles is all you need when it comes to the comfort of playing the game. A wireless connection is quite hassle-free, but it comes with a few lacks too. You can enjoy a wireless connection only when your wifi connection is quite fast. You can enjoy a fast internet connection by using an ethernet cable to improve your connectivity and avoid any latency in your connection. Let’s see how you can connect oculus quest 2 to PC wirelessly.
Get into Oculus settings and click the experimental option coming in the menu.
Now, you can see the Air link option that you will require to toggle on.
If a prompt comes asking you anything, click continue and allow you to get into the process further.
Check your right-hand side screen, where you will see the quick settings menu, click it.
Here, you can see the air link option next to the wifi; select that.
You will see all the available PCs; select yours from the list and start pairing.
Confirm your PC and the headset pairing by the coming codes.
Instructions You Must Keep In Mind
There are several things that you are required to keep in mind for the efficient connect oculus quest 2 to PC. Well, the process is quite easy and straightforward, but still, some things can create problems. Let’s check them out so that you won’t face any problems while establishing a connection.
Internet Connection: If you are connecting your PC to oculus through Air Link, then you must have a strong internet connection. You can use ethernet splitters to make your connection reliable and firm.
Turn off Airlink: If you connect your PC to Oculus through a wired connection, then you must ensure that you have turned off your Air link, as it can create confusion for your system about the connection means. Hence, you must keep this in mind while establishing a connection.
No Audio issues: If you connect oculus quest 2 to PC and you find no audio in the headset, then you must get frustrated first, but you can resolve this simply by rebooting your headset. Well, this error is the most known and commonly faced by a lot of people. Moreover, this problem is also associated with the router. You must try connecting your router with the ban 5 Ghz network.
High-End PCs: These headsets are quite high-tech, so they require a high-end PC to work well. If your system is not very high-tech, or we can say if your system is not compatible with the high-end headset, then you are more likely to face errors in audio connection. For this, you will require to increase the configuration of your system.
Frequently Asked Questions
Q1. Why won’t my oculus quest 2 connect to my PC?
There can be various reasons responsible for it. Maybe the issue is with the wires that you have connected. If this is not the case, then there are other technical glitches too that can also result in an error while establishing a connection.
Q2. How do I connect my Oculus Quest 2 to my phone?
You can connect your phone to the Oculus Quest 2 easily. You just need to download the app of oculus quest 2 on your device. Launch the app and get into the menu option. Click the device and look for pairing options. You will require to enter the pairing code and then get into the process further. Now, check if you get successful in establishing the connection. Also, you must make sure that you and your phone are not too far from each other.
Q3. Where do screenshots go on mac?
The screenshots simply go and save on the default as it is the default location for saving the screenshot. Moreover, you can change this default location. You can also drag the thumbnail icon to the folder where you want to save the screenshot.
Conclusion
Oculus is considered to be experimental. You can maximize your gaming experience with this easily. Moreover, it does not require much configuration and effort from you to get it connected. Well, we have given the top two ways through which you can connect oculus quest 2 to PC. You can try any of the above-written ways. We have both the option of link cable and air link. Also, you must read all the instructions before you go to establish the connection. If you are still left with any queries in your head, then you can connect us anytime.
Do you want to be on top of your games all the time without spending hours on them? Well, you can do so with an incredible software called TinyTask. Through this modern technology, you can automate all the tedious tasks in your game and avoid spending hours. Well, it is like a superpower to any avid gamer, as it can eliminate all the unwanted grind from the game. This tool will help you to customize your game and to unlock the advanced capabilities in the game. Moreover, you can use this software in other daily tasks, too. Let’s know how you can add more flair to your virtual appearance in the gaming world with the superpower Tiny Task.
TinyTask is an incredible software that will enable you to record and play all the events and actions whenever you need them. It is an ideal tool if you want to create macros and play them on a loop. This way, you can simply get into your game and edge over your competitors. You are not required to spend hours in front of your PC to power up the basic level. With this tool, you can simply record all the actions of your keyboard and even the mouse cursor and make its replica action. With a single tap, you can repeat the actions easily.
Moreover, this tool is very easy to use. You can simply download it and start using it. Its user interface tab is very descriptive. You can simply recognize the icons and execute them accordingly. It is specifically designed for Windows, but you can use it on os devices as well. You can use this in max and albeit too. The best part of using this, it is entirely free to use. This software will allow you even to customize your scripts in the game. With this tool, you can get more control over your gameplay in every sense.
Features of Tiny Task
All in all, the software is quite commendable and useful. Hence, we are coming up with all the essential features of the tiny task that you must know before you go to download the software on your device. So, let’s have a look at the features of TinyTask For Windows & Mac.
Light Software: There are various software alternatives to Tiny tasks, such as TgMacro, but they are not as compatible as Tiny Task. This software doesn’t take up too much space on your device. It is very lightweight and can be stored in a bit of space on your computer. Hence, you must not get worried about the lack of storage space.
Record Minimal Actions: This software is very fantastic in terms of its functions as well. It records every minimal action made by you on your system. It even records the action of your mouse and cursor movement, which is quite difficult for any software, but it does so easily.
Less Response Time: Response time is too less; this is another feature that will let you download this software. You can simply start executing your replicating tasks in no time. Well, low response time is quite a needed feature in automation tools; if it takes longer to execute the repeating tasks, then it won’t work well.
No Installation Needed: This is the only automation software that doesn’t require any installation process. It is good to go when you are done with the download. You can start using the software as long as you complete the download.
Regular Updates: This software comes with regular updates. Regular updates are important as they will help you and the software to work well. Its regular updates enable the software to function more efficiently. Also, you are not required to update it regularly; it gets updates on its own.
Free App: The app is entirely free. You are not required to pay even a penny forTinytask Roblox. This is why this tool is quite famous among avid gamers, as they are required to pay even for the simplest scripts too. Its free access has influenced the users too much.
What are the System Requirements?
In this section, we are coming up with all the needed system configurations and settings. You must make all these arrangements prior to the download. These requirements are important to make. Otherwise, Tinytask Minecraft won’t work well. Without further ado, let’s check what you need to prepare in your system.
Windows 7, 8, 8.1, 10 (64-bit only).
At least 4 GB RAM
CPU must be Intel Core i3-3210.
GPU must be Intel HD Graphics 4000.
Display: 1024 x 768 screen resolution
Network: Internet connection required for installation and activation
These all are too basic system requirements that one has to fulfill. Suppose your system creates any problem with graphics or SD cards, such as GoPro SD Card Error or any other error affecting your system’s efficiency. Then you must try to resolve the issue first and then get into the process of downloading Tiny Task. Moreover, as we have already told you that it is lightweight software; hence, it won’t demand too much from your system.
How To Do Tinytask Download on Windows PC?
The Tinytask Download process is very simple and straightforward. You can simply click the above button to perform a Tinytask download. This button will redirect you to another website which is the original and trusted website for Tinytask download. You just need to download the latest version of the software, and you are all set to start using the software.
As you are done with the downloading process, it’s done. The tiny task won’t require any kind of installation process to start working. You just need to get into the downloaded folder and right-click the recently downloaded file now, cut it, and paste it on the desktop. Here, the process is den. You just need to click the icon on your desktop, and you are all set to use the software.
How to Use Tinytask Auto Clicker? Understanding All Tabs
When you are done with the download procedure, you must be getting the question of How To Use TinyTask? Well, you will be getting this question resolved in a further article. So without wasting much time, let’s get into the use process.
Creating A Recording
The very first thing when it comes to using any automation tool is how one can create a recording in it, as we have already told you that it comes with the too easy user interface. Thus, you can simply click on the software to launch it and then click the “rec” tab in the prompt. This way, the recording will start. Moreover, another way through which you can record your action is by clicking the shortcut keys combination. The combination is ‘Ctrl + Alt + Shift + R.’ Pressing this combination will trigger a tiny task to stop the recording.
Stopping A Recording
When you are complete with the action that you want to record, then you must think of the way through which you can stop the recording. Well, intrusion of any third-party software will stop the recording, but it is not the ideal process to carry on with. Hence, you can simply reopen the tab and click the stop icon to stop recording. else, the shortcut key combination is also valid to stop the recording ‘Ctrl + Alt + Shift + R.’
Saving The Recording
Another thing that is maybe worrying you is how to save the recording you just made. Well, there is a button in the user tab through which you can save the recording that you are making. Once the recording is completed, you just need to press the save button. Pressing the button will trigger a prompt asking you to name the recording and then save it.
Playing The Recording
Playing is a very easy yet tricky task for anyone who is less technical. However, you just need to click the ‘open’ button on the user interface tab, and the library of your tasks will be open. You can choose whatever task you want to play.
Is it Worth using the Program on Your Machines?
The tiny task is the most revolutionized way to automate repetitive tasks. It does not require any prior experience in coding programming to execute the tasks. It comes with an easy user interface and doesn’t require much effort from the user end. This automated software has become the most popular choice for avoiding the grind of day-to-day repetitive tasks in the game. Hence, there is no doubt about the efficiency of the software. You must download this software if you are looking for an automated tool. This software will be the best software to suit your needs.
Frequently Asked Questions
Q1. How do you get TinyTask on Roblox?
The tiny task is a game-based automation tool. You can use it on any game, such as Minecraft and Roblox. You just need to download the version suitable with Roblox (The version is already visible on the website.) As you omplete the download, you are all set to execute the repetitive tasks in a click in your game, whether it’s Roblox or Minecraft.
Q2. How can one stop recording in Tinytask?
If you want to stop recording in Tinytask, then it is not a difficult process. You can simply click the stop button in the user tab, and the recording will stop automatically. Another thing that you can try to stop the recording is pressing the combination keys ‘Ctrl + Alt + Shift + R.’
Q3. How do I stop its playback?
If you want to stop the payback combo, then you can simply stop it by pressing a hotkey combo Ctrl + Shift + Alt + P. This will trigger the tiny task to stop the playback function (if playing).
If you are a tech geek, then we have found a way to make your life easier. Well, if you are looking to manage multiple apps together, then Tlauncher can be a very good solution for you. It is a third-party launcher that can help you to organize your system and its efficiency. You can download the launcher and launch multiple games together. From managing multiple applications, personalizing your home screen, and using different instances of the same application at once. In short, we can say that this app is going to make your technology life easier. But what exactly is it? How can we download it? Is it really worth a shot? Well, we have covered everything in the below article. Let’s check the below article and get the t launcher.
Tlauncher is the perfect software through which you can launch multiple programs together in a click. Well, if your system lacks when you start using multiple programs, then Tlauncher is a way for you to resolve the hassle. Through this application, you can launch multiple programs together; even you can launch UI tabs for the same software. The best part of using this app is that you can launch mine craft’s paid game for free. It is a third-party launcher that enables you to unlock various hacks and cheats without even compromising your data.
Features of T Launcher Minecraft
In this section, we are going to cover all the reasons why you need to download the T launcher on your device. We are too sure after reading this section, you will definitely jump into the downloading section to get the software and its advantages.
Free: The best part of using this software is that it is free to use. You are not required to pay even a penny to use this software and take advantage of its exceptional features. You can use this app and enjoy all its features without even buying a subscription.
Customization: Another feature of this app Tlauncher is that it allows you to customize the apps you want to use. You can select the apps as per your requirements, and then clicking launch will get you launched with all the apps in a single click.
Highly secure: The app is highly secured and fully encrypted. You are not required to worry about the security of your system. Well, you are required to give it access to have a little control over other apps. This way, only you can launch the apps together.
Easy To Use: The app has a very easy user interface. A non-techie person can easily get onto the app and use it without any hassles. You can easily select the apps that you want to launch and carry on launching them together with a single click.
Lag-free: another reason why you should download this launcher is that it is lag free. It doesn’t come with major lags. You will never encounter lagging, buffering, or hanging issues with this launcher. Hence, you must get rid of the worry about its quality work.
Compatible: The app is compatible with every other device. You can download the app on any device. Moreover, you can use the app without much restriction on device configurations.
System Requirements to Download (Both Windows and Mac OS)
When it comes to launcher download, then there are certain system requirements that every other person has to fulfill before downloading it. Well, the requirements are too basic; let’s check them out in the below section.
The operating system must be Windows 7 or more.
CPU must be Intel Core i3-3210.
AMD A8-7600 APU or better.
GPU must be Intel HD Graphics 4000.
4GB of RAM is important.
How to Download and Install T Launcher?
Tlauncher download is quite an easy task to do. You just fulfill the requirements, and then you are all set to download tlauncher Minecraft. After doing so, click the above button and start the downloading procedure. This button will redirect you to the official website of tlauncher Minecraft. Here, you need to download the latest version of the T launcher and wait for a few minutes.
When you are done with the download process, it is time to get the launcher installed on your device. In the below pointers, we are going to examine what you are required to do to install T launcher Minecraft on your device.
Open the file. Located in the recent download folder.
Here, you will encounter an installation tab. Click it.
After completing this step, you will encounter a prompt asking you for permission to make some changes to your device.
Another prompt will come asking you about the shortcut on your desktop.
Now, you can launch multiple programs single-handedly.
Note: Many people face the error while downloading. If you are also facing the GoPro SD Card Error, then you must resolve it first.
Is Tlauncher Safe?
Suppose you are confused about the safety and security features of Tlauncher. Then, you must not worry about it, as it is completely safe and secure. It has been developed by trusted developers and has been trusted by many users over the years. Also, you can check the ratings and reviews. One thing that you must keep in mind is that you must download it from a trusted source or the original site. For this, you can click the button above. There are too many fake sites floating on the internet, ready to get into your system with viruses and bugs. Hence, you must download that from a trusted source. Also, you can use other mods as well to power up your games such as Script Hook V.
Do We Need TLauncher Download?
Yes, the T launcher is worthwhile. If you are too much into gaming or on your computer, then this will be the best solution for you to get into your system more easily. All in all, it can make your virtual gaming life very easy and efficient. If your system always lags and hangs while launching multiple applications, then the T launcher will be a savior for you. Thus, you must download it. We have already given the complete guide about it above.
Frequently Asked Questions
Q1. Is it illegal to use TLauncher?
Yes, the T launcher is completely legal to use. One can use the T launcher without being hesitant about its legality. It is a legitimate app, and anyone can use it; it is not a kind of hack and cheats; it is just a launcher through which you can customize your apps and launch them together when you need them to be launched.
Q2. How does T launcher make Minecraft better?
T launcher can make any game better. It is not just limited to Minecraft only. However, this launcher manages all the apps quite well, and it never comes up with lagging and hanging issues.
Q3. Is Tlauncher allowed in the US?
Yes, the T launcher is allowed in the US. If you live in the US, then you can simply download the app from the Mojang website.
Are you an avid gamer? If so, then we have found a way for you through which you can transform your boring gaming session into incredible and leveled-up gameplay. The way is Script Hook V, a modding tool that will allow you to add some more flair to the game. You will get the freedom to change speed using exclusive codes. It provides you with the ASI plugin that will enable you to have advanced capabilities in the game. Let’s see how it actually works. How to download it and all the important tricks and tweaks that you can do while using Script Hook V.
Script hook V is a software that enables users to unlock different levels and new possibilities in the game grand theft auto. It allows users to create and apply new scripts. Well, it is a free plugin package developed by “Alexander Blade,” who has made all other well known cheats and hacks for virtual 3d games. Its library offers multiple features a user can examine, easy teleporting, Custom keys, and camera options. It also allows users to bind their personal control schemes. Moreover, you can modify your weapons, costumes, maps, police presence, money, and other minigame activities.
If you are a GTA5 geek, then it will be an incredible tool for you to edge over your competitors. You can simply heat up your game through this, and you can unlock many limitless possibilities with this mod.
System Requirements to Use the Modding Tool: Script Hook V
This section consists of all the possible requirements that one needs to fulfill before one may go to download the mod. Well, these basic requirements are too basic that can be applied to other game-enhancing software such as TG macro. You are already having GTA 5 on your device, which means that the device is quite high-end. But this script executor is quite heavy; thus, you must look at the requirements.
.Net Framework Higher or Equal to v4.8
Visual C++ Redistributable
Visual Studio 2019 x64
At least 4 GB RAM
At least 500 MB of free space
Windows 7, 8, 8.1, 10 (64-bit only)
Script Hook V Download
Script Hook V Download is not a hectic task to do, as we have made it easy for you. Click the above download button and get started with the process. Must keep in mind that you have made your system compatible with the modding tool by meeting all the requirements written above. If you are done with them, then you are good to go for the download proceedings. Well, you just need to click the above button; it will redirect you to the official and trusted website for Script Hook V Download. Here, you can download the latest version, wait for a few minutes, and let the download complete.
Method to Install ScriptHookV
Done with the download, click and open the downloaded file.
You will require to unzip the downloaded file as it is in the zip folder.
Launch the GTA 5 folder and paste all three downloaded files into it.
Three files are: ”Dinput8.dll, NativeTrainer.asi, & ScriptHookV.dll”
If you also encounter the issue of not finding the GTA folder. Then you must right-mouse the shortcut of gta5 and click to open the file location to get into the folder.
Point to Note: while installing, many users found the issue of the AMD driver not working. Thus, if you are encountering the same, then you must rectify the issue first and then again perform the steps to install it.
How to Use Script Hook V without Getting Banned?
Using ScriptHook V comes with so many risks too. If you don’t use script hook V with care, then you can get banned for using it without doing anything. Although it is a mod and hack which can get you banned also, it can enhance your overall gaming experience and heat up your gameplay. Hence we are coming up with a section that consists of top tricks that can help you to avoid getting banned.
Know When to Delete ScriptHookV: You must delete the software when you start playing. As playing multiplayer online can recognize you doing cheats, in that case, you are required to delete the mod. Otherwise, you will get banned. This majorly happens when your system is using an anti-cheat system.
Remove the dinput8.dll: Dinput8.dll file is the file that contains all the cheats codes. Hence, deleting this file only can help you to avoid banns for playing gta5 using cheats. Hence, it is another way that you must keep in mind while playing GTA5 with script hook V.
Be Cautious During the Download: You must download it from a trusted source or from the original site. This way, you can avoid getting banned, as the original software is safer and more secure than the software downloaded from any third-party website.
Regular Updates: Updating the application regularly can be another trick through which you can make yourself detached from the virus bugs and from getting banned as well. Old versions of the app are more susceptible to viruses and malicious things through which your system can get hacked. Hence, you must keep updating your app regularly.
How To Update ScriptHookV for GTA 5?
Now, you must be getting the question of how one can do script hook V update. Well, in this section, we are going to look into it. It is not a typical update that you can do easily. For updating this, you will require to delete the old files of the application present in the GTA folder.
Now, Download the latest version of the application on your device. The latest version that you can download is 1.0.2612.1. Also, make sure that you download it from a trusted source. When you are done with downloading, unzip the downloaded file and paste it into the GTA folder.
Here, when you are done with all these things, you just need to launch your game. Everything is already set for you in the game. You can use your scripts and codes to power up your gameplay.
Is Script Hook V Worth It?
Script hook V is a fantastic tool, especially for those who want to get a level up in the game. You can customize your gameplay sessions easily. There are various advanced features that you can use through the software, from teleporting to customizing maps and many more things. However there are so many mods available on the internet, but it has something different from others. It will not come up with too many errors and coding problems. Hence, we would love to recommend this software to have exceptional gameplay.
Frequently Asked Questions
Q1. Are there any risks with using Script hook V?
Yes, there are risks. Enjoying mods in the game can be fun, but there are many risks too. You must consider all the risks while downloading. Well, there are ways through which you can save yourself from getting banned or any other malicious attacks.
Q2. Which is the Latest Version of Script Hook V?
You can check the latest version of it on the official website of the mod. However, the latest version of script hook v is 1.0.2612.1, which you can download. Keeping the software updated is quite important as it will protect you from unwanted bugs and viruses.
Q3. How to Disable Script Hook V?
Disabling script hook v is another easy-to-do task. You can simply delete the files of the application that you have pasted in the GTA folder.
Are you too much into games? If so, then we are coming up with a fantastic way to go for you. What if we say you can level up your games and get into all the new levels of your game without spending hours in front of your PC? Well, this is possible with the revolutionary software called TgMacro. With this software, you can not only level up your game but also enhance the overall gameplay session by customizing new avatars and much more. So, without getting into further ado, let’s get started with the guide.
Tg Macro is an incredible tool developed by TRKSYLN. Since its release, it has become one of the best tools in the market to outrun everyday boring tasks. You can use it to revolutionize your gaming sessions easily. Through this tool, you can record your keyboard and mouse actions and play them again when you need to. This way, you can simply edge over your competitors when it comes to the speed of doing the replicating task.
Moreover, you can manage the speed of repeating the task too. The best part of using this is that it is free of cost and doesn’t require many hassles in order to use it. Moreover, it comes with zero restrictions and zero ads. This feature of Tg Macro makes it more efficient to use.
How to Install & Download TGMacro For PC?
When it comes to downloading and installation of the software Tg Macro, one can get easily confused about it. Well, you are not required to get confused about it. As we are coming up with an easy procedure through which you can actually download the TG Macro on your device. But before you get into the downloading and installation process, you must know the basic system requirements as you are required to fulfill them. These requirements are so basic that one can simply get them into their system. These general requirements can help you to have another software like KRNL.
System Requirements
You must have a Windows 7 PC or any upper version.
You must have a stable internet connection.
Required Configuration: minimum 32-Bit
100 MB of free space is a must.
Tg Macro Download
Tg Macro is free to download; you can simply download Tg Macro from the below-given button. Before you press the button, make sure you have completed all the system requirements. Then you must press the download button. It will redirect you to the official page where you need to download the latest version of TG Macro and then get started with the downloading procedure. You will need to wait for a few minutes as the downloading is getting done.
TG Macro Installation
Tg macro is one of the software that doesn’t require many installations to get done before using it. It is a lightweight tool, hence won’t cover much space on your PC. You can start using it as you are done with the downloading procedure. It comes in a zip format. Thus, you must have the Winrar application in your system previously installed. Launch the downloaded file and start with the on-screen steps to get into the installation process.
How To Use TGMacro?
Now, when you are done with the download and the installation, it’s time to get into the use process. Well, the software is quite easy to use. It has an easy user interface window. However, it can perform various kinds of functions, from recording your keyboard’s action to recording the action of your mouse. Let’s check everything step by step in the following part.
Macros Creation
The first thing that you must get in your mind while downloading the TGMacro for PC is how to create a macro in it. Well, creating a macro is quite an easy task to perform. You just need to launch the newly downloaded software and click the + sign coming on the first screen. Now, you are required to add the name of your Macro. Then save it. Here’s the macro created.
Adding Action in Macro
Adding action in macro is the next thing that you are required to do. You can simply add actions in the macro. Click + in the and select a created macro in which you want to add actions. Open it up and click the record action icon. Click the record icon and start doing the actions you want to record. Here, actions will be recorded. Click the recording icon again to stop recording.
Key Status
Key status stands for how you want to play your action when you press the key. Hence, setting these status keys is important. You must set a specific key to perform the recorded action. You just need to open the macro that you want to play. Here, you will see an option “Click here to set key” press that and enter the key name. Also, you must choose the status key from the drop-down menu in the key action editor prompt. Up key, down key, and press a key to execute the action.
Setting Playback loops
Setting playback loops is the most important thing that one should know. Well, setting the playback loop will allow you to set a default limit of how many times you want to execute the recording. To do so, open the macro, click edit, and now tap on the key toggle option. Click save to execute.
Playing Actions
Last but not least is playing the actions. You must know how you can execute the replicating actions. However, it is very easy to do. If you have set the key status key, then you are only required to press that key wherever you want to play the repetitive actions. Well, you can enhance your gaming experience with another mod like script hook V.
Is TGMacro Worth Using?
No doubt! Tg Macro is worth trying. You must use this software if you actually want to edge over your competitors in your normal gaming sessions. With this extraordinary tool, you can simply experience recording the minutest of actions from your keyboard even to the mouse. Moreover, it is free to use and comes with too many features. Hence, using this software will be worth your time. You can use other software, too, to save time, such as T launcher to launch multiple apps together.
Frequently Asked Questions
Q1. What is TG Macro & how to use it?
Tg macro is a software widely used for doing replica actions. It is a tool used for recording and playing repetitive actions automatically. Using it is not very difficult. You just need ti to create the macro first and then add your action, don’t forget to save it. After doing so, you can simply play the actions whenever needed.
Q2. How can I get Macros on PC?
Getting macros on a PC is too easy. You just need to download the Tg macro software from the link given above and get started with it. Launch the program and start recording your actions, and now you are all set to perform the repeating actions easily.
Q3. Can I get a Ban on using Macros?
No, you cannot get banned for using macros on your PC. Tg macro is a legal tool used for automotive actions. This tool does not only help you to power up your games but also in doing replicating actions. Hence, this tool will not get you banned.
Are you frequently struggling with the issue of PlayStation network sign in? Well, you are not the only one who is encountering the issue. Many people come across this and get freaked out when they are in the full mood of playing their favorite game but encounter the error while logging in. However, we are coming up with a guide that will tell you everything about why your PlayStation network sign-in failed. And how to sign in to the PlayStation network?
Most importantly, we have covered all the possible and tested ways through which you can actually get out of the problem easily by doing some little tweaks in the MTU setting or in the device settings. We have covered all of that; you just need to read the whole article all the way through its conclusion to get your Playstation working again.
How To Sign in To PlayStation Network?
Before encountering the resolving measures, one would need to know the correct way to sign in with the PlayStation network. If you want to sign in to the PlayStation network, then here’s the simple step by steps guide that you are required to follow.
Launch your settings.
Choose account management, and here you can sign in.
You are required to sign in with your email id and password.
Click confirm to get it done.
Getting done with the above steps will resolve your query about how to sign in to PlayStation network. If you are doing the same, then the problem is something else. You must look in the below section; there, you will get more insight into it.
Why My PlayStation Network Sign in Failed?
Various reasons are responsible for why you rae facing the issue of PlayStation network sign in failed. Well, it can really be too exhausting when you make up your mind to play the game but end up having errors while logging in. You must get freaked out and try searching for ways to get rid of it. But before you get into the troubleshooting section for the issue, you must know the actual reasons for it. Thus, in the below pointers, we are coming up with all the possible reasons for why your PlayStation network sign-in failed.
Network Errors: This is the most common reason why your PlayStation is creating problems. If any bugs and malware are present in your network pipe, then it can lead your device not to work well and come up with the issue of PlayStation network sign in failed. Hence, you will require to upgrade your network type and settings to get your PlayStation to work well.
Extra Cache: Extra junk and extra cache on your device will lead you to the issue. If your device has so much junk, then it won’t be able to work efficiently. Moreover, you are required to clean your device timely and efficiently.
Server Problem: If the problem is with their end, such as the server problem from sony’s end, then you can not do much about it; you are just required to wait for them to resolve it. If the problem is at your end, then you can try changing your server.
Outdated System Software: If your system is outdated, then you are more likely to experience the issue of PlayStation network sign-in. As outdated systems and software are unable to get signals from each other perfectly. Hence, you encounter lags while using PlayStation.
Top 13 Ways To Resolve PlayStation Network Sign in
If you are facing frequent issues while signing in to the PlayStation network, then you must get irritated. To resolve this issue, we have sourced 13 ways to fix PlayStation network sign in. You can get it resolved easily with any of the following ways. If one method doesn’t work well for you, then you must jump on the next method to get your PlayStation working again.
1. PlayStation Server Status
One of the major reasons for the error of sign in failed is the server error at the end of PSN. Here, you can not do much for it instead of waiting to get it resolved on its own. However, you can check the server page to ensure that the error is at the PSN’s server end or not. To check, you are required to get into the server’s page and select your region. After selecting a region, you must get into the account management section. If you see any error in this section, it simply means that sony is dealing with the problem. You must wait until the issue resolved from their end.
2. Toggle the LogOut and Log In
If you cannot recognize the issue in the server, then the issue must be at your end. The most common way that you can try to eliminate the issue is to log out completely. And wait a few minutes, then log in again with your credentials. This way, the PlayStation Network will be refreshed. This is the most common troubleshooter that you can perform to rectify the issue of PlayStation network sign in. after doing so, you must check if the issue has been resolved or not. Else, you can jump into the next method if you’re unable to download it from this method.
3. Reboot PlayStation
Another common way is through which you can resolve various technical glitches in every other device, such as the Chromebook screen being black. You can simply try rebooting your system. This way, your PS4 will get a refreshed start so that it won’t run with the old cache and memory. This method generally works when your PlayStation is working for an extended period of time. To do so, get into the power section and click the reboot option. It will take some time. You must wait with patience.
4. Restart Router & Modem
Another common way through which you can actually get your PlayStation working again is restarting your router and the modem. If the issue in your PlayStation is because of the network insurgencies, then you must use this method to restart your router, and the modem will help you to achieve a top-up on your PlayStation. Well, you can do this method in various technical glitches as it clears all the bugs coming into your network. To do so, you just need to unplug your router and the modem and wait for a few minutes and then plug it in again to restart your router and the modem.
After doing so, you will get your PlayStation working again without much hassles in resolving the error. However, you can perform a soft reset to your router to resolve the issue. To do so, you just need to turn off the button present on it and then turn it on to check if the issue has been resolved or not, as it is the most common method that you can use to eliminate common issues of HBO max not working.
5. Delete & Re-add Network
If the PlayStation network sign in failed again after performing the above method, then you must perform this method to eliminate other network-related issues. In this method, you are required to re-add your registered network. Reading can give your network an efficient start. You can have seamless use of your network without lagging. Well performing the below steps can help you to eliminate all the connectivity errors present on your device. Let’s check how one can do so.
Launch settings, coming on your home screen.
Click to choose a network.
Choose settings and then click set up internet connection coming in the left pane.
Here, you can locate the internet option. Click options and then choose to forget.
Now, you are required to add your wifi credentials again to get connected to the internet.
6. Start Using Ethernet or a Different Wireless Network
If you are using wifi, then you are more likely to examine the issue of PlayStation network sign in failed, as Wifi comes with too many glitches. If you want to enjoy your games and chatting sessions, then you must connect your device to a wired connection. Wired connections are meant to be more reliable and fluctuation free. Thus, we always advise you to have a wired connection.
If you can not arrange a wired connection right away, then you can try switching your wifi connection, or else you can use an ethernet splitter as well. You can do this in your network settings by adding a new internet connection. After resetting your network and getting done with the method, you must check whether the issue has been resolved or not.
7. Automatic Login
Setting an automatic log in can help you to have a seamless invasion in the PlayStation. Setting up an automatic account at the start of your device can really be very helpful in every way as you are not required to waste your time in logging in again and again. Let’s see how you can do so.
Launch your settings and click the users and account option.
Now, locate the login settings in the left pane.
See in the right pane and enable the automatic login option.
Here the process is done; you just check to restart your device for efficient results.try logging in and checking if you are required to log in or not.
8. Change to Google DNS
Changing the Google DNS setting can bring you some fruitful results if you repeatedly fail while signing up on the PlayStation. Connecting to the google DNS server is one of the ways through which you can im[rove your internet connectivity. Let’s check how one can do so.
Open set up internet connection.
Click the options button. Na select advanced settings in the options list.
Here, you need to click DNS settings and set it to the manual.
You can add your own configuration, too if you have one. Else, you can use the following in your primary DNS and the Secondary DNMS.
8.8.8.8
8.8.4.4
Click Ok to save the changes you just made.
If you are done with the above steps, then you must test your internet speed to check whether it has improved or not. Moreover, you are also required to re-enter all your details to check whether the issue of PlayStation network sign in has been resolved or not.
9. Rectify MTU Settings
The primary cause of the issue with PlayStation network sign-in is your internet connection and network. Here, you are required to tweak some settings in MTU(Maximum Transmission Unit). But what settings? Well, we have broken it into the below-written steps to make it easier for you.
Launch set up internet connection.
Choose your internet connection. Now, get into its options and click advanced settings.
Choose MTU and then click to set it to manual.
Here you can change your default MTU settings. You must keep it around 1475.
Now, click OK to save the changes.
10. Additional Network Changes
You must check the following settings in your internet connection services so that your network won’t come with lags. You must ensure that all your internet settings are set as per the below-written instructions. If not, then you can simply change them and set it as follows. Moreover, these slight changes in your settings can improve other technical glitches, too, such as the Xbox party chat not working issue.
Proxy Server: Don’t Use
DHCP Host Name: Do Not Specify
IP Address: Automatic
11. System Software Update
The best way to bypass any technical glitch in your system and the device is to update it completely. You just need to update your device and get it working again to its full potential. Furthermore, this method is all about updating your PS4 and PS5. This way, you can achieve seamless efficiency of your device. Let’s check how you can update your system software in easy steps.
Launch your system settings.
Click the system software update and setting in the right pane.
Click the update system software option coming on the screen.
Here, you will be entered in the next screen. Choose whatever option suits you. Whether to update your system from the internet or a USB drive.
Click update now.
Here, you may encounter a problem while updating. If you get a prompt telling you that your console has failed to update through the internet, then you will require another option saying update via USB driver. But doing so will require some additional efforts that you will need to make. We have listed them below; check it out and get your console working again.
First, you are required to format your flash drive in FAT32 format. You can do this with the help on your PC or MAC.
Now, create a folder named PS4 at the root of the drive. Then make another folder inside this naming update.
Now, download the latest version of the updated PS4 or PS5.
You are required to copy the updated file into the subfolder of your USB drive.
Connect the drive to your console.
Repeat the above steps for updating the system, and then choose the option for USB update.
12. Rebuild Database
Rebuilding the database can help you to have a fresh start. One thing that you must keep in mind while rebuilding the database is that you must rebuild and clear all your cache in safe mode. This way, you can have a clear network area for using your PlayStation. Let’s check the easy steps through which you can actually have your Playstation working again without the issue of PlayStation network sign-in.
Turn off the PlayStation device completely.
Now, connect your controller to the console and charge them.
Boot PlayStation by holding the power button. You must hold the button until you hear a beep sound for the second time.
You will have to wait for a few moments till the time the console boots completely.
Here, you can see the option of clearing the cache and rebuilding the database option.
13. Factory Reset
The last and the most powerful way to outrun the problem of PlayStation network sign in. In this method, you are just required to factory reset your device, as this will make your device completely like a new console. If you are confused about how to factory reset your device, then the following steps will help you through factory resetting your device.
First, you are required to boot your device in a safe mode. You can perform booting from the above-written steps. You must select Restore the default setting option while booting your PlayStation.
After booting, restart your device; now, you will be required to sign in with all your credentials.
Frequently Asked Questions
Q1. Why is my PlayStation network sign failing?
If your PlayStation is repeatedly failing, then it must be the issue with the network. Hence, you must try all the possible ways through which you can refresh your network. However, there are other reasons for this error. If you are able to figure out the cause, then you can simply get into the resolving method accordingly.
Q2. How to fix PlayStation network sign in?
There are various ways through which you can eliminate the issue of signing in failing. However, we have listed the top 13 ways to fix the issue. Well, the major cause of the issue is the problem with your network. Thus, you are required to change some network settings, and you can also consider refreshing your network.
Q3. How can I sign in to PlayStation Network?
If you want to sign in to your PlayStation, then you are required to follow the below-written steps.
Launch your settings.
Click account management, and here you can sign in.
Here, you are required to sign in with your email id and password.
Click confirm to get it done.
Conclusion
In the above guide, we have given you a guide through which you can simply eliminate the issue of PlayStation network sign in. We have given tested and trusted top 13 ways through which you can actually resolve your issue as we have also provided you with the proper reasons so that you can resolve the error in a better way. However, if you still have any queries, you can contact us anytime.
Are you losing control over your high-end game? Does your Xbox controller keep disconnecting from the console? If you are too experiencing this terrible issue, then you must be scratching your head, as it can ruin the entire play at once. However, finding a perfect way to rectify it can be complicated and troublesome, but you don’t need to worry anymore as we have arrived to rescue you. Well, we are coming up with a guide that consists of the top 8 ideal ways to rectify “Xbox controller keeps disconnecting.” You just need to read all through its way and get your Xbox controller working back as normal.
Why Does My Xbox Controller Keep Disconnecting?
If you are also stuck with the question, “why does my Xbox controller keep disconnecting” then the time has come to get the answer to this question. There are five possible reasons for this problem. Let’s understand the causes first so that we can get the solutions better.
Dead Batteries: If the battery of your controller is low, then you won’t be able to maintain a proper connection between your console and the controller, and it will start disconnecting frequently. Hence, you will need to replace the batteries.
Huge Distance: If you are playing with the help of a projector, then you are more likely to encounter the issue of disconnection as the distance between your console and controller increases, which tends to disconnect frequently.
Outdated Controller Firmware: If your controller is not updated, then it will find a hassle to work with your updated operating system. Thus, you are required to update it on time. This way, you can avoid random issues as well.
Outdated Xbox Controller Driver: If the drivers of your controller are not updated, then you are more likely to encounter the issue of disconnection. Here, you are required to update your drivers so that you can resolve the issues like “Xbox one controller keeps disconnecting” and “Xbox Controller Not Connecting to PC.”
8 Surefire Ways To Fix Xbox Controller keeps Disconnecting
After knowing the causes, it is time to get into resolving methods. Thus, we are coming up with the top 8 troubleshooters to fix the problem “Xbox one controller keeps disconnecting.” However, the following methods have been prepared with full-fledged research by our top experts. You can try the following methods one by one and get your controller back working usually.
1. Move Closer to the Console
This is a reason-based troubleshooter that comes first on our list. One of the primary reasons why my Xbox one controller keeps disconnecting is the distance between your console and you. Thus, the controller cannot establish a perfect connection with the console. Hence, you must move closer to the console. And check if you are able to establish the connection without random brakes.
Here, a lot of people think that it is possible to play a video game with a distant space between you and your console. Well, the answer is yes, one can play the game via projector to have better gameplay, but it results in the terrible issue of random disconnects. Thus, you must try reducing the space between your console and controller.
2. Check the Battery
Low battery is one of the most common reasons why your Xbox controller keeps disconnecting. A low battery won’t let you connect properly and play seamlessly. Thus, you must check for the battery if it is low, then you must charge it fully, then start playing again. This way, you can eliminate the issue easily. In addition, if your controller has batteries in it. Then you must try replacing them as it no longer provides your controller enough energy to let you play with more smoothness.
3. Power Cycle the Controller
Power cycling your controller can give it a refreshing start, and this way, you can improve the performance of the controller. This will promote a hardware reset in your controller. Let’s see how one can do so.
Well, it’s not tough to do. You just need to press a jewel button present on the Xbox controller until the controller turns off completely, then wait a couple of minutes. After that, you must restart the Xbox controller and check whether the disconnecting issue has been resolved or not.
4. Re-Pair the Controller
Another thing that you must try to eliminate the issue of “Xbox one controller keeps disconnecting” is repairing the controller with Xbox. This is not that difficult to do. You are just required to follow the below-written steps.
Press the pair button on your Xbox and hold it for a few seconds till the flashlight gets on.
Now, press until the jewel button starts to blink on both of the consoles.
After doing the above steps, you must check if the issue has been resolved or not. If not, then you can jump on to the next method to rectify the issue.
5. Use a Wired Connection
Wired connections are always frequent and constant, either in the case of the internet or the case of the console. Thus, you are required to have a wired connection instead of connecting with Bluetooth. It may be annoying at first, as you will need to sit with a limit as you are connected to the wire. However, with the wired connection, you can unlock the experience of playing a 3D game with the ultimate gameplay. Hence, you must use a new and working USB cable. This way, you can check where the problem is actually located.
6. Update the Controller Firmware
If it’s been an extended period and you haven’t updated your firmware, then the time has come to do the task. Sometimes, outdated firmware of the controller is unable to work with the upgraded versions of the console. Then the issue of disconnection comes to light. Thus, the user will need to update the controller for better performance. If you want to know how to do so, then the below steps are for you. Check them out.
Get into the Xbox settings.
Click the Device and connection option coming in the left pane.
Now, select accessories on the screen.
Select the accessory controller and let the next screen open.
Click the three dots coming under the option “configure.”
Here, you can see an option to update the accessory.
Click it and continue with the on-screen wizards.
After doing the above steps, one must restart the console and the controller. This way, you can execute the update in a more efficient way.
7. Update the Xbox
If the above methods don’t work out for your controller, then you will need to update your Xbox. In most cases, your Xbox gives you a prompt to update it. But if you didn’t get one, then you must manually check for the updates and upgrade your Xbox if needed. Confused about how to do it? Well, we have provided you with the easy steps in the below section.
Launch your Xbox settings menu.
Click the system from the left pane.
And now, in the next lift on the right pane, select the updating console.
Click “Update now.”
Wait until the update is completed.
8. Replace the Controller
If your Xbox controller keeps disconnecting, it may be time to consider replacing the controller. This problem can usually be fixed by replacing the battery or using a different USB cable. However, if neither of these solutions works, it is likely due to an issue with the hardware itself and you should consider investing in a new controller. Replacing the controller is easy and inexpensive compared to having professional repairs done. It’s worth trying this solution before attempting more complex methods that may take significantly more time and money. This simple fix could save you a lot of hassle and get you gaming again in no time.
Frequently Asked Questions
Q1. Why does my Xbox controller keep disconnecting
If your Xbox controller keeps disconnecting, then it must be an issue with your signals. You must reduce the distance between yourself and the console. If your device is out of date, then you must update your device.
Q2. Why does my Xbox controller keep turning off even with new batteries?
If your Xbox controller keeps disconnecting even with the new batteries, then the problem is something else. But what can it be? Well, the problem can be virus attacks and other signal problems. You can resolve it with the troubleshooting guide that we have presented above.
Q3. Why won’t my wireless Xbox controller stay connected?
There are various reasons why your Xbox controller won’t stay connected. The possible reasons are– bugs, low charging, and malware attacks.
Conclusion
In a nutshell, we have provided you with the top troubleshooting method to fix the problem of “Xbox controller keeps disconnecting.” You can try any of the above methods to fix the problem. If none of the methods works for you, then you can try replacing your controller, as taking it to the repair will cost you the same as the new one. However, if you are still having any problems, then you can connect us anytime.
A Sims 4 player? Are you currently experiencing the error “script call failed sims 4” on your device?
Well, many players like you have been seeking to access the newly added stuff (as per the latest Sims 4 edition) but have encountered this warning pop-up on their devices and have been complaining about it. As a result, the game is now beginning to malfunction, and the vast majority of players who legitimately like implementing little illegal adjustments to their games, have in fact not been able to apply during the gameplay. So, how can this issue be solved? Is there any solution to get it solved?
Yes, there is. In this article, we will provide you with a number of methods to solve this issue. Try each solution, until it gets resolved.
An Overview On The Sims 4
The Sims 4 is referred to as a community simulation video game. The Sims 4 is the fourth main edition in the series and the follow-up to The Sims 3 from 2009. Maxis created and released this specific game, which is distributed evenly by Electronic Arts. In September 2014, the video game was finally made available for purchase in North America. After then, it is made accessible for the players or users of Windows. Nevertheless, a PlayStation 4 and Xbox One edition was launched in 2017, and later an OS X version was made publicly available. Later, in October 2022, the game was transformed to a free structure.
In the Sims 4 edition, the players may very well create and personalize Sims, simply give them private residences to construct and furnish, and recreate their daily activities. The game debuts a freshly created custom rendering engine, slightly enhanced tools for developing different characters and homes, and richer and better in game modeling with the improved attitude and personality and character systems for Sims. The Sims in this game converse in a made-up language. This is known as Simlish.
What Can Be The Causes Of Sims 4 Script Call Failed Counters?
Well, if you are experiencing script call failed sims 4 error on your computer, while playing the game, the above mentioned points can be the reasons for the occurrence of this error. Therefore, let us take a look into this –
You would not be able to play the game smoothly and efficiently as if any gaming files are prone to corruption or probably missing.
The Sims 4 game will not operate successfully due to the overlay configurations on gaming servers like Steam and Origin. These parameters can be disabled to help assist you resolve the problem “sims 4 script call failed”.
You won’t be able to play the game and the error “script call failed sims 4” occurs effectively if your display drivers are out-of-date or fundamentally incompatible.
The game’s completely corrupted or severely damaged installation files are any that have been specified incorrectly.
The existence of out-of-date or malfunctioning script modifications is the undeniable source of the issue. This could occur as a consequence of modifications being out of date and therefore unable to cope alongside the newest content.
With Sims 4, the mod compliance does not work appropriately. The Sims 4 mods were not updated with the latest to function with the most recent game update, which is why the error script call failed Sims 4 appears.
How Can You Solve The Script Call Failed Sims 4 Error? Easy Methods For You
Now that you know why this error appeared on your device as you commenced playing, you can prevent experiencing a remarkably similar issue in the future. This section of the article will provide you with some solutions to get rid of this problem or some related issues too. Well, not selecting a random solution here might solve the issue, but you must try each solution until the issue totally gets removed. So, without making any further delay, let’s start digging into the solutions.
Solution 1: Conduct a Computer Virus Check
Well, performing a virus scan on your PC can help fix the “script call failed sims 4” problem. To find and eliminate any associated consequences and to assist you if you continue to run into some of these sorts of problems, you cannot, however, acquire a virus scan online. Well, you are totally aware of how to scan the computer. If your device doesn’t provide an in-built antivirus software, you can buy one and install it in your device and then can scan it to find out any error and fix it.
Well, if this simple method won’t fix this error from your device, try out the next method that we have provided below.
Solution 2: Repair Sims 4 Game Files
Well, repairing the Sims 4 games file might make you get rid of the error “script call failed Sims 4” that you have been experiencing right now. Well, this error might probably occur or display on the screen when you try to play, if the download and the installation process of the game ran through a poor internet connection. Hence, the Sims 4 in-game specific items might well be partially corrupted or get automatically deleted and thus will result in this error you are facing right now.
Therefore, below we have mentioned the steps-by-step instructions for repairing the Sims 4 games file. We have provided separate instructions for the users on Steam, on Origin as well as for Epic Games Launcher. Just you need to read them properly and then apply them.
For the Stream Users
The game files can indeed be repaired by following the instructions clearly indicated below when you are playing Sims 4 just on the Steam platform –
At first, the Task Manager may be opened by pressing the Ctrl, shift, and ESC buttons at the same time.
Secondly, select all of the superfluous tasks by switching to the Processes tab, then click the End task button in the upper right corner to finish the process.
After that, launch the Steam application and simply select the Library.
Next to that, go to the Home, then directly choose The Sims 4. Well, after that just select the right-click option.
Then, select Properties at this point.
Now, continue by selecting Verify integrity of game files after switching to the Local files tab. Just wait until the verification process is finished before confirming any prompts on the next screen.
Hence, launch Sims 4 and attempt to interact directly with any varieties of furniture. Last but not the least, examine whether the error actually still occurs any further or not.
For Epic Games Launcher Users
The game files can indeed be repaired by following the instructions clearly indicated below when you are playing Sims 4 just on the Epic Games Launcher platform –
First of all, close any running applications that are now active and engaged on your computer by navigating to Task Manager.
Secondly, do get the Epic Games Launcher opened.
After that, select the Library option from the list on the left.
Next to that, find The Sims 4 there under “Games” in the list.
Now, the Sims 4 should be selected with the right mouse button.
Well, now just choose “Manage” only from the menu. After that, select verify from the menu.
It won’t take long for the files to be fixed, and when it is done, the launcher will just let you know as to whether any totally corrupt or probably missing files will need to be replaced soon. Then, check that the issue “script call failed sims 4” does not currently continue to display by opening up the game.
For Origin Users
The game files can indeed be repaired by following the instructions clearly indicated below when you are playing Sims 4 just on the Origin platform –
At first, open the Task Manager, then navigate to the Taskbar and choose the Task Manager.
Secondly, you need to navigate to the Processes tab. Then, simply select the superfluous tasks, and then click the End task button in the top right corner to finish them.
Now, start by opening the Origin launcher after that, and select the My Game Library option located in the left corner.
Then, select “Right-click” after seeing “The Sims 4” in the list of games that are readily accessible.
Next, as soon as you are fully ready, simply click the Repair button.
After that, just start your computer again one time after the repair is completely finished.
At last, simply check to see if this approach still works or not on your behalf by opening up the game in the Origin.
Solution 3: Temporarily Disable Script Modifications and Custom Content
The second solution you can try is disable the script modifications and the custom content temporarily. Well, Some online customizations and Custom Material may sometimes be corrupted or damaged and incompatible. These improper adjustments can ultimately cause a number of more significant complications in regard to the game you’re playing. This is the case with The Sims 4, where a script call failed Sims 4. The Sims 4 usually requires certain procedures to disable Custom Content (CC) and modifications/customizations. As a result, you need to strictly adhere to the instructions here below to get fixed the Sims 4 script call failed –
First of all, open The Sims 4 on your Windows computer by navigating there.
Secondly, in the Start menu, select the three-dot Options button.
Then after, choose Game Options from the left menu and easily navigate to the Other area.
After that, uncheck the enumerated choices too in the right menu – Permit Mods and Custom Content and simply allow Script Mods.
Now, to preserve the most recent changes you made, next click the Apply Changes option.
Well, after that, start the game again on your respective device.
Hereafter, once the game has restarted, just place the furniture or stuff available or as required in your scene accordingly.
However, after doing so, if this irritating issue stops or gets removed, then you can recognize that this is just due to the activated script modifications and the custom content. But, if it doesn’t get solved, then the error script call failed sims 4 might be occurring for some other reason. Hence, you can try other methods provided here.
Solution 4: Upgrade Modifications and Custom Content
Well, this is another most effective method to solve “script call failed sims 4” from your windows computer, if none of the above methods works for you. Well, whenever the Sims 4 upgrade becomes available for their users, you must indeed update to the most latest edition of the game software. Directly after that, you must therefore upgrade Basemental and the Adult modification. They can result in a few faults in games, including the one you’re playing right now, if not finished in the right time. Hence, you can complete the process with the assistance of the next set of instructions mentioned below.
Instructions
First of all, to start launching File Explorer, press Windows + E. After that, find Electronic Arts by opening My Documents.
Secondly, open the The Sims 4 folder now, and then click the Mods folder within it.
Now, the screen will provide a list of the modifications and Custom Content that are presently available. However, the GameVersion.txt file and localthumbcache.package should be deleted from this folder.
The next step is to see if the mods have received any modifications.
This time, check the mod creator’s website to see if any current updates are forthcoming. You can look for these in the The Sims 4 mod and Custom Content boards.
Afterwards, start by looking up and download the most current edition of the mod or Custom Content.
Now, extract all compressed files from the inside of the Mods if the mod file you got is a compressed/ Zip File.
After that, just copy and then paste the files into the Mods subdirectory if the mod file you received is in.package or TS4SCRIPT standard format.
Well, until all of the CC updates and modifications have been downloaded to your PC, repeat these instructions. Next, access The Sims 4 on your Windows computer.
Once you have done that, select one of the Start menu items with the three dots.
After doing so, select the Other area from the left menu by selecting the Game Options button.
Then, just choose the Enable Custom Content and Mods button from the right menu.
Restart the game once you’ve successfully completed all the specific instructions. Then, see whether interacting with furniture pieces in your environment does not cause you to encounter the problem.
If you still face the issue, try another method from the solution section.
Solution 5: Restore the Electronic Arts Documents Folder to Default
Next comes this effective method. Moreover, destroyed, distorted, or completely broken documents in the Electronic Arts Documents folder could also be the reason for the issue “script call failed sims 4” along with some few other associated problems with the gameplay. In light of this, you should indeed restore the Electronic Arts Documents file folder. This will ensure that the issue’s likely major cause folder’s unused cache files—will be completely eliminated. This method might solve the issue.
Note:
Just before you reset/restore the Electronic Arts Documents folder, set up a backup that you can fully leverage even if something unexpected happens.
Instructions
In order to restore the Electronic Arts Documents folder and continue to generate a backup of it, carefully follow the instructions that are provided below –
First of all, all processes connected to The Sims 4 game should be immediately terminated. Additionally, shut off the Epic Games Launcher, Steam, and Origin.
Now under File Explorer, documents should now be opened; then choose Electronic Arts.
Then, click Copy from the context menu when you right-click on it.
Next to that, make a new folder called Electronic Arts Backup in the Documents folder.
Now, copy each file, then paste it into the newly formed folder.
Well, the reset of this folder is now secure. Make sure The Sims 4 game, Steam, Origin, and Epic Games Launcher are closed, as well as any associated processes.
After that, rename the Electronic Arts directory by selecting it from the context menu of the right-click menu in the Documents folder. Hence, the folder should be renamed Electronic Arts Old.
Next, restart The Sims 4 game, and when it starts up, be careful to shut it down. Consequently, the Documents folder will gain a new Electronic Arts folder.
At this point, open the Sims 4 on the tray in the Electronic Arts Old directory. After that, duplicate every file in the Tray subfolder and put it into the newly created Electronic Arts folder.
Well, follow these instructions once again to save data, mods or CC, and the snapshots/screenshots.
Once all the required files have been put into the new Electronic Arts folder, start The Sims 4 and load it.
Now, when dealing with the furniture objects, you should not run into any problems, including the sims 4 script call failed counters.
Solution 6: Re-install The Sims 4 Game
One of the most effective solutions comes here. However, if none of the above mentioned methods of the article can help you out, then you can surely try reinstalling the Sims 4 to completely eliminate the “Sims 4 script call failed fix” issue from your device. According to observations, the installation directory for the game occasionally includes cache files that are corrupt or broken. Additionally, neither the File Repair tool for Steam, Origin, nor Epic Game Launcher can recognise and resolve the issue. Consequently, a thorough clean reinstallation of the application will undoubtedly resolve this issue permanently. The installation process is totally easy for the users of Origin, Epic Game Launcher or even for the Stream. Hence, to install The Sims 4 completely from scratch, adhere to the instructions that are listed below –
Reinstall the Sims 4 on Origin
The instructions listed below will assist you reinstall Sims 4 if you are using Origin –
First of all, launch the Origin Launcher instantly.
Secondly, from the menu on the left, choose “My Game Library.”
Next to that, find The Sims 4 under “Games” in the list.
After that, the Sims 4 should be selected with the right mouse button.
At last, simply select the Uninstall from the menu.
Reinstall The Sims 4 On Epic Games Launcher
The instructions listed below will assist you reinstall Sims 4 if you are using Epic Games Launcher –
First of all, open the Library by selecting it in the Epic Games Launcher.
Secondly, go ahead and select The Sims 4 by clicking the three-dot symbol.
Well, following that, select Uninstall.
After the game has been removed, restart your computer and open the Library page in the Epic Games Launcher.
Next to it, The installation directory may then be selected by clicking the Install icon next to The Sims 4 game.
At last, restart the game when the download has completely finished.
Reinstall The Sims 4 On Stream
The instructions listed below will assist you reinstall Sims 4 if you are using Stream –
First, open the Steam app, then navigate to the Library.
Secondly, the Sims 4 game may be managed by performing a right-click and selecting that option.
After that, simply click Uninstall.
Then, click Uninstall as shown to confirm any prompt.
Now, start Steam after the PC has restarted.
Then, install it by selecting the right mouse button on The Sims 4.
Now, install the game on a PC according to the directions displayed on the screen.
Finally, with the game that has just been installed, you will no longer experience any problems.
Well, that’s all about it. We have mentioned every possible solution in the article. You just need to keep trying every solution until you get rid of the error “script call failed sims 4” totally. We are sure that any of the provided solutions will definitely hit it and fix it by no means. If you still cannot get rid of this irritating error, directly reach back to us at any time. We will definitely help you out reach out to get it solved anyways.
Frequently Asked Questions
Q1: In Sims 4, how can I enable script files?
Ans: There is an option to allow your script modifications if you navigate to your in-game settings and then click on the final choice there under the options menu.
Q2: Are Sims 4 script modifications safe?
Ans: Downloading modifications and CC is completely secure. In their downloads, manufacturers won’t include malicious software or viruses.
Q3: How can you get rid of “script call failed sims 4” completely?
Ans: Well, there are many solutions for you to get rid of script call failed sims 4
Completely. Those are as follows –
By running a computer virus scanning.
Temporary disable script Modifications and Custom Content.
Repairing the Sims 4 game files.
Reinstalling the Sims 4.
Resetting the Electronic Arts Documents folder.
Updating the Mods and Custom Content.
Q4: Are Sims Freeplay games suitable for 10-year-olds?
Ans: Warning: This application is rated Mature because of its coarse humor, partial nudity, sexual/suggestive material, and fantasy violence. Even though this program is suitable for preschool-aged children, parents should have the ability to determine whether their child is mature enough to play on this computer game.
As a result of Minecraft’s rapid growth since its first release more than ten years ago, many of you who are reading this are already familiar with it. The game’s quality has improved throughout the course of years of constant updates, and each update sees the introduction of a new type of material. Have you been experiencing problems with Minecraft exit code 1 in the meantime? No need to spend too much time worrying, though. Exit code 1 in Minecraft is a typical problem encountered by many other players here as well. But how would you solve this problem? Is there a method for resolving it? Yes, there’s a solution to this issue.
In this article, we have provided not a single solution for it, but many methods to solve Minecraft exit code 1. You can try each and every solution until you get it fixed completely. Start reading without skipping a single line.
An Overview: Minecraft Exit Code 1
The code 1 exit in Minecraft is the game’s most common crash error. It occurs when the game stops running unexpectedly, leaving players with a black screen and no other indications of what went wrong. When this happens, it’s important to act quickly so you don’t lose any progress or data. The cause of Exit Code 1 can vary from hardware performance errors to software compatibility issues.
What are the Potential Reasons for Minecraft Exit Code 1?
Well, we have already mentioned that this is not any unique error (Minecraft exit code 1) in Minecraft, but is very common to most of the players of Minecraft. This error code occurs due to some specific reasons. Want to know about it? Just read below. We have mentioned the possible causes of this exit code Minecraft –
1. Route of the Launcher Seems Broken
The launcher route for the game always comprises the user ID. Therefore, if your user id contains a peculiar character, the launcher pathway will cause a lot of trouble and prevent the game as well from starting play.
2. Defective Mods
The usage of modifications is widely used by users. However, occasionally your game mods did not support the game when they encountered any significant problems, which can adversely influence how well it operates. In order to determine whether an issue occurs, remove the offending modification from your computer.
3. Completely Ineffective GPU Drivers
Visual lagging or game stalling for time may be eventually brought on by obsolete graphic drivers. The visuals in Minecraft are within their complete control. As a consequence, an error occurs and the game stops functioning whenever the GPU drivers are obsolete and irrelevant.
4. Deleted or Damaged Files
Minecraft data files are destroyed if your system contains technical faults or malfunctions. Moreover, the installation procedure might cause encrypted files to be eventually lost. As a result, the game is immediately terminated, and later, the exit code 1 error is displayed on the interface.
5. There Might Be an Error With Java
Minecraft’s traits and characteristics, such as maximum speed and attack power and control are severely influenced by Java configuration errors and experience factual errors. Install Java again by employing the most current edition, then see whether an error still occurs frequently.
What Are The Top Solutions for Fixing the Minecraft Exit Code 1
Since we have reached this point, let’s start conversing about the most recent and efficient solutions for fixing the “exit code 1 minecraft” fault on your system or device. Therefore start studying the best methods to swiftly and decisively repair it right away.
Method 1: Disable Mods
Exit code 1 Minecraft as well as other problems can prevail due to Minecraft modifications, regardless of the fact that they make the game more entertaining. In addition, Mojang frequently in the past releases Minecraft news updates that certain modifications might not be capable of being used. Start by removing modifications using the instructions in below to determine whether they are to put the blame for this problem in Minecraft –
Firstly, to launch the Run software, navigate to the Start menu and input Run.
Secondly, in the Run window, enter {50afa256e6562afb2cd7837d8db3fd71ce947f26b53ffff72a77bb9141ae121a}AppData{50afa256e6562afb2cd7837d8db3fd71ce947f26b53ffff72a77bb9141ae121a} and then hit OK or Enter.
After that, access the Minecraft folder on your smartphone by navigating there.
Choose the logs folder.
The Latest.txt file opens up.
Next, determine whether any modification issues were actually discovered.
Then, navigate to the Minecraft folder and then enter the mods folder if you discover the problem.
Eliminate the mod that is responsible for the issue. As soon as you’ve completed it, start Minecraft and evaluate whether the problem is still present or not.
If the error is still present, you can definitely try our next method.
Method 2: Reinstalling Java
Minecraft Java Version Exit code Error 1 generally results from a misconfigured Java installation. Minecraft’s actual assault processing capabilities and speed of movement are significantly affected by it. Deleting Java from your machine will enable you to install the most recent version. Therefore, to proceed, adhere strictly to the instructions as we have mentioned below –
Firstly, just perform right-click on the Windows icon, then you may access the Start menu by selecting Apps and Features.
Secondly, scroll down to the Java section of the following window’s content.
Then, select Java, then carefully select Uninstall. To confirm the action, if necessary, click Uninstall there.
Next, go to this website to download and run the newest version of Java after just eliminating the previous version from your system.
Finally, determine whether exit code 1 vanishes by playing Minecraft once again. If this method also does not work, there are more methods in our list, you can try those to get rid of the error.
Method 3: Upgrade the Graphic Driver Software
The presentation of most of the game from Minecraft now.gg to Fortnite now.gg depends entirely on the GPU drivers, and as a result, they must be recent. When the visual drivers are out of date, Minecraft stutters and strange problems show up on your screen like Minecraft exit code 1. Consequently, to plan to upgrade the GPU drivers, just adhere to the instructions mentioned by us below –
Firstly, find the Device Manager by going to the Start button and entering it.
Secondly, click the right mouse button on your graphic drivers and open the Display Adapters option.
On the menu, carefully select the Update Driver.
Then, simply select “search automatically for drivers” and then “search for updated drivers on windows update” to continue.
Install the update on your machine if it’s readily available.
Lastly, in order to see whether the problem still occurs, restart your computer and start the game again.
Method 4: Adjust the Minecraft Launcher’s Route
The Minecraft game may not successfully start on your device if you are logging in with a Windows account that usually contains special symbols. By radically altering the Minecraft Launcher Path, you may determine how to resolve issue 1 in Minecraft. The user account or launcher Path usually causes the game to stop functioning. By switching to a launcher route without any special characters, you may overcome this issue with the Minecraft game.
Firstly, right-click the Minecraft shortcut on the Desktop by going there.
simply click the Properties button now.
Secondly, from the menu bar, select the Shortcut section.
Then, select the Target menu item. Add -workDir{50afa256e6562afb2cd7837d8db3fd71ce947f26b53ffff72a77bb9141ae121a}ProgramData{50afa256e6562afb2cd7837d8db3fd71ce947f26b53ffff72a77bb9141ae121a}.minecraft to the directory you will find here.
Now, please select “Ok” from the menu.
Lastly, relaunch Minecraft at this moment to determine whether the problem still persists.
Method 5: Update the Xbox Application on Your Computer
The Xbox app, which explains what Minecraft exit code 1 actually means, is a relatively frequent reason for the problem. In order to resolve the Minecraft exit code
1 issue, you may thus attempt upgrading the Xbox app and fixing the problems with the application just before going on to more sophisticated procedures. Simply follow the instructions mentioned below –
Firstly, go to the Start menu and select Xbox Game Bar.
Secondly, select the Settings tab and then select the App.
Scroll down and select the Repair option from the Xbox Windows Settings menu.
This method may also solve the issue. But, if it does not resolve it, step forward to the next method.
Method 6: Reinstall Minecraft
Reinstalling the game typically resolves a variety of problems, regardless of the nature of the mistake. In addition, you may try reinstalling the Minecraft game from scratch to resolve all of the game’s troubles, including the Minecraft exit code 1. Well, if none of the other solutions work for you. Due to this, strictly adhere to the specific instructions that we have mentioned below –
Firstly, to launch the Windows Settings App, simultaneously press the Window key and I.
Next, click Apps & Features after choosing Apps. After that, fill up the search field with Mine Launcher.
Select the Uninstall command.
Well, once you have removed Minecraft, confirm any prompts that may have shown and restart your computer.
Go to the Minecraft download page that is legally authorized.
Choose Download for Windows from Need a Different Flavour? selection as prominently displayed.
To install the program, click the Setup file right away.
Click on the Microsoft Launcher Setup Windows Next button.
This time, click Next once more, and then just choose Install from the window that opens up.
The Bottom Line
Therefore, we are certain that this guide has helped you with solving the “Minecraft exit code 1” real issue. By reading our specific suggestions or the methods present, you may surely get rid of this error. Still, if you have any related questions or if you still cannot fix the issue from your device, you can let us know of your problems anytime.
Frequently Asked Questions (FAQs)
Q1: What brings about Minecraft exit code 1?
Ans: The Minecraft error code 1 is caused due to some particular reasons. They are:
The route of the launcher seems broken.
Mods that are defective or harmful.
Completely Ineffective GPU Drivers.
Files that are deleted or damaged.
There Might Be an Error With Java.
Q2: To resolve issue code 1 in Minecraft, can I restart Windows?
Ans: The system actually should not typically be reset to resolve this issue. In the actual event that nothing works, you could genuinely think at all about restarting your desktop computer.
Q3: In Minecraft, what does error code 0 mean?
Ans: Conflicting apps on your PC may potentially be the cause of the Exit Code 0 potential problem. The compatibility difficulties in Minecraft persist despite going through multiple iterations over the years.
Q4: Is Java dangerous to your computer?
Ans: However, Java downloads from other websites might not have the latest security updates or bug patches. By downloading unauthorized Java updates, you increase your computer’s susceptibility to malware and other dangerous threats.
Q5: What are the methods to fix exit code 1 Minecraft?
Ans: The methods you can use to fix the exit code 1 Minecraft are mentioned below –
Upgrade the Graphic Driver Software.
Update the Xbox App.
Reinstall Minecraft
Disable Mods
Reinstall Java
Adjust the Minecraft Launcher’s route.
Many gamers today find themselves endlessly entertained by the wide variety of online gaming platforms available. Whether you enjoy competitive FPS games like Call of Duty and Overwatch or strategic battles royale games like Fortnite and Apex Legends, there is something for everyone in the world of online gaming. One popular platform that has been gaining a lot of attention recently is Now.gg Stumble Guys Online, a real shortcut way to play this beloved multiplayer game online. So how do we play Stumble Guys online? In this article, we will cover everything you need to know.
Unlocking the Craze Behind Stumble Guys gg
What makes Stumble Guys now.gg gaming platform such a sought-after go-to online is the whole gameplay. The entire foundations are simply fun to play for.
A large-scale multiplayer game incorporates around thirty-two players into one game. There is, besides, the visual aspect of the gameplay in 3D. The online version the game certainly maintains the same graphics.
Stumble Guys now.gg Overview
One of the largest online gaming platforms now.gg has a lot of advantages. Supposedly you’re playing now.gg Stumble Guys on the platform. You will be provided with the same gameplay and version and graphics as the downloaded version.
How playing Stumble Guys online will help you? Well, simply playing will result in saving space. You are skipping the time and space of downloading by playing Stumble Guys online.
Other than this it allow you to share the game with people and friends you want to play with. There is a lot of attention paid to the fact now gg Stumble Guys doesn’t lag at all while the game is on.
The common suggestion is to make sure you have to steady internet connection. This will make sure there is no chance of bugs and lagging.
The platform now gg Stumble Guys also allows in-game purchases.
To tell you in short, now.gg Stumble Guys are the same version of the download. You’re simply going to their site to play Stumble Guys online and everything else is taken care of.
As a gamer, you will also be able to enjoy the real time gaming experience. Stumble guys now.gg allows it to be played pretty much on every device. It is also kept in mind now.gg is mobile cloud storage. This means alongside now.gg Stumble Guys you will be able to access plenty of other similar online games.
How To Play Now.gg Stumble Guys?
As you have probably gauged by now, Stumble Guys now.gg has been receiving a whole warmth of love from online gamers.
Do you want to join the community of players playing Stumble Guys online? Here is how.
1) First start by whatever device you’re going to start playing.
2) When done so, you have picked the device to activate the internet connection. Make sure you have a strong internet connection before playing.
3) The next step of playing , go to the official site of now.gg.
4) Select the option Play in Browser.
5) A search tab will appear, type Stumble Guys and do Enter.
You have now entered the arcade of Stumble Guys.gg. An app player will appear on your screen now.
The entire process hardly takes up a few seconds and the process as we wrote before saved all the ordeal of downloading. This will keep your system free from taking up game space. Invite whoever you want and enjoy your adventure of playing Stumble Guys online.
How To Download Now.gg Stumble Guys?
Stumble Guys has attained the level of being a cult game these days. It is no surprise now.gg Stumble Guys is amongst the most played games on the platform.
The number of players playing now gg Stumble Guys has only been increasing by manifolds. There might be the mentality of you making yourself a better now gg Stumble Guy player by playing in the downloaded version.
So the next time you are trying out now.gg Stumble Guys by playing Stumble Guys online against other gamers. You give them a run for their money. This is psychology shared by all of us gamers. Here is a list and ways to download Stumble Guys gg on your device.
For Android Users, download the Stumble Guys Application from the Google Play Store. If you want to play in Browser, the best option we still suggest would be via now.gg Stumble Guys platform. While using Steam, simply go to the Steam official website and enter Stumble Guys. You will find the application.
iOS users can download and play Stumble Guys by downloading From App. While for playing via Windows the best options remain either by downloading Stumble Guys Apk. If you want to save yourself the hassle simply play on now.gg Stumble Guys.
Discussing Stumble Guys now.gg In-game Benefits
Just as the Now gg Among Us, this version of now.gg Stumble Guys offers plenty of advantages and more concentration towards entertaining the gamer. The version currently being played on the Stumble Guys gg has unlocked footsteps and emotes. Sounds interesting?
Wait there is more, there are unlimited gems and money. The mod version of now.gg Stumble Guys block ads with a premium unlock feature and provide full security.
Overall providing gamers with a great in-game experience this mobile cloud storage now.gg will have you longing to play a minute more.
A good point to note is you’re using Windows and trying to access the features of unlimited diamonds through Stumble Guys hack apk. This won’t work, the hack apk version of Stumble Guys does not provide the option of unlimited diamonds.
Jumping and Grabbing to Break Momentum in Stumble Guys
Jumping and Grabbing in Stumble Guys online is a good strategy to go through the rounds. The more you play Stumble Guys online you will find yourself more accustomed to the process.
Say your opposition has garnered a lot of flow in their gameplay. There is a need then to break that flow of momentum and grabbing or punching is certainly a good strategy for that.
Use the left joystick by running toward your opponent. This will break their game flow by performing the task of grabbing. They simply can’t then breeze past the rounds.
To try double jumping use the left joystick along with the speech bubble emote button. This will be there on the bottom end of the screen.
A total of thirty-two players are allowed for every gameplay. The options of grabbing or double jumping or diving, the more you find yourself at ease with the buttons. The better your chances of winning.
Conclusion
Stumble Guys gg can be played for hours. We say this from experience. Maybe after writing this we will go to Stumble Guys now.gg and play a few rounds. What’s stopping you?
We have even provided you with the hack of becoming a now gg Stumble Guy player. Go beat your opponents or share the game via now.gg Stumble Guys with your friends. Maybe even your colleagues.
Tomorrow after a few sessions now.gg Stumble Guys you will have something to talk about other than work.
Frequently Asked Questions
Q.1) Is Fall Guys a copy of Stumble Guys?
No, Fall Guys came first. Then it was followed by Stumble Guys. Stumble Guys is a cloned version of the Fall Guys game. However this needs to be said, Stumble Guys have developed a great gaming following of its own.
Both Fall Guys and Stumble Guys can rightfully stake their claim as the best Battle Royale Game.
Q.2) Can I play Stumble Guys without downloading?
Yes, you can play Stumble Guys online. Simply go to the official site now.gg, choose the Play in Browser option, search for Stumble Guys in the Tab and an app player will direct you to the game.
Q.3) Which is the best emulator for Stumble Guys?
BlueStacks app player is simply leaps and bounds ahead as the best emulator for the Battle Royale Game, Stumble Guys.
If you are also fond of playing online games then you need to know about now.gg Cookie Run Kingdom and its amazing features. Nowadays now.gg is becoming very popular as it is extremely speedy and much simpler to use like people wish that they do not have to face any obstacles while playing the game. Now.gg is based on the cloud service that contains multiple games like Super Sus, Left to Survive, Dynasty Legends, Mafioso: Mafia PvP online and so many others. You will be even happier to know that now.gg cookie run kingdom download PC is free. If you use now.gg, you will not be bothered by downloading and installing the files or apps for playing any of your games. To play online games for free, you just have to use the browser on your device.
Is Cookie Run Kingdom now.gg Available on PC ?
Playing games, it does not matter which device you are using because, besides the mobile, you can use it on other devices like your PC. It means you just have to focus only on playing your favorite games. It will give you a full idea of how users feel while playing original games. All functional versions are managed with it. You should use a good internet speed so that while playing games you won’t face any obstacles.
Download now.gg Cookie Run Kingdom PC through BlueStacks Android Emulator
Don’t delay in playing the game now. now.gg cookie run kingdom is very safe as it has virus-free games. We will recommend you follow these steps if you want to download cookie run kingdom now.gg through the Android Emulator BlueStacks. Moreover, the Android emulator is the universal method to download any of the famous now.gg games from Now.gg Minecraft, Now.gg Among us to Now.gg Roblox. Here is what you need to do.
First of all, visit the BlueStacks website.
Download the Bluestacks’ newest version.
Open the download file of Bluestacks.
Click on the Installation tab.
Accept all the mentioned terms and conditions.
You need to sign in now.
Then, go to the Play Store.
Download Cookie Run Kingdom.
Now, you can efficiently play your game on a PC.
Steps to Play Cookie Run Kingdom now.gg on Browser
We have cleared above how now.gg will work for your games, now you should think about playing it. If you have doubts regarding it then focus on the given tips to play cookie run kingdom pc easily to have fun.
Tips:- You want to play smoothly then make sure you are using the newest version browser and the internet connection should not be poor.
Select the device on which you want to play now.gg cookie run kingdom.
Now, go to the now.gg website.
Click on the Play in Browser.
Search for Cookie Run Kingdom.
Press the OK or Enter button.
Very soon, the option of playing cookie run kingdom now.gg will be there on your screen automatically. Enjoy this game as it is free of cost.
Play Cookie Run Kingdom PC for Free
If you know how to play now.gg cookie run kingdom pc online then it is a good thing because you will soon become the one who has a strong hold on it. By the way, it is very fast and simple. You do not have to go through any kind of downloading process to play the game.
With this, the storage of your mobile is also good as well as your time because cookie run kingdom pc and the installation process also takes a lot of time. If you play the cookie run kingdom download pc, then you will not have to face any problems like virus attacks, it will be very important for you to stay updated. You can also invite your friends or family members while playing this game, this feature makes this game even more interesting.
Conclusion
Now, you need to be even more excited because there are many such games that are going to be uploaded soon through now.gg., and definitely that too will be free of cost. As now.gg cookie run kingdom will be completely new to you, it may take you some time to understand it. So if you have any doubt due to this then don’t delay anymore. We would be really happy to assist you on time.
Frequently Asked Questions (FAQs)
Q.1- Is Madeleine cookie a guy?
Ans- Madeleine Cookie is a boy and he is the son of Grand Madeleine Cookie. He has 3 aunts. As per his aunties, Madeleine cookie cannot eat anything excluding the sweet thing because he has a sweet type of tooth.
Q.2- Is GG free to use now?
Ans- Yes, you can easily access now.gg without paying anything else. As now.gg cloud server is purely for free mobile games.
Q.3- Which cookie is the strongest in the Cookie Run Kingdom?
Ans- In Cookie Run Kingdom, you should go for having the following cookies because these are the strongest, most popular, and best choices in the defense class.
Vampire Cookie
Wildberry Cookie
Sorbet Shark Cookie
Cream Unicorn Cookie
Financier Cookie
Q.4- Is clover cookie a boy or a girl CRK?
Ans- In cookie run kingdom, there are three budgies: Clover, Biscuit, and Cookie. They have a very good connection with each other. Biscuit and cookie both are boys and clover is a girl.
Q.5- How old is the cream puff cookie run kingdom?
Ans- Cream Puff cookie is an innocent and softhearted cookie. This cookie was released on 30th November 2016 along with Owlcorn who is her pet. To make conjured dessert jellies, she produces magic tricks in order to get points.
Today in our series of gaming blogs we will talk about now.gg Among Us entailments. Talks about now.gg Among Us have garnered much attention in the gaming community over the past time. If you are new to the Among Us now. gg community we will help you with how to play the game online.
By saying now.gg Among Us what does now.gg mean? How to play now gg Among Us on the platform and the rest of other details? Shall we get started then?
What is now.gg Among Us?
The now.gg is a mobile cloud service offering users the chance to play a whole range of games for free. So as we say now.gg Among Us. You can play this on the now.gg platform. We are writing this for the absolute new bees.
The older ones will be familiar with the enticing graphics of the Among Us game. We have the chance to play the game for free thanks to gg.Among Us benefits. To talk more about the Among Us game is based on the storyline of the imposters and the crewmates.
The imposters in the now gg Among Us gaming world will try to kill the crewmates while the crewmates will try to stop their bad fate. Among Us now.gg is played freely online without the need for any download. It can also be played on any platform besides mobile phones.
Benefits of Among Us now.gg
Just like now.gg Fortnite, the now.gg Among us can also be shared with your friends or other online teammates. They also provide the option of in-game online purchases. Everything you might vie for.
We will be able to play with the same 3D version graphics in the Among Us now.gg as the downloaded version. As a benefit of playing online and not downloading, there will be no issue with storage space. We would suggest having a steady internet connection.
The gg. Among Us does demand a strong connection to the internet else the game would stop and lag. Then it simply won’t be that much fun?
The controls of the Among Us now.gg are customizable per your wishes. There is special attention gg.Among Us, platforms will be given. This special thing was fixed previously in Roblox now.gg and now there is no problem with the system or mobile phones becoming heated anymore with the now.gg platform.
So now go and play now gg Among Us with friends and people you know to strangers if what you want is a new challenge. Challenge with sets of people you will never meet outside of the platform.
Method of Playing now.gg Among Us
We will now go over the steps that you will need to do to play now gg Among Us online.
1) Do the Google search of Among Us now.gg
2) Select the official site offering now.gg Among Us online play
3) Select the option Play in Browser and wait for the game to finish loading.
4) Similar to every other game, the controls need to be remembered. Take a picture of it if that’s what suits you.
Among us now.gg is a straight-up good version of the original. So there is no fear of missing out on any of the features now.gg Among Us version.
Step 5) Join an original game once you’re in the now gg Among Us arcade. You can even join an already existing one.
This is all there is to it really to play now gg Among Us online from any device you use.
How to Download now.gg Among Us?
Sometimes even when the online version gives us every feature that is basically in the game. Something now.gg Among Us does provide, we gamers still can yearn for the downloaded original version to try our hands on.
We don’t know if this is the case for us and almost all the people that we know. Or this includes the increasing number of people playing the Among Us now.gg game every day on the platform.
The free easy-to-access version of the now.gg Among Us has certainly made the game quite popular among us gamers. Here, quite popular here is quite an understatement.
So how to go one step further in Among Us now.gg increasing interest and downloading then?
If you’re an iOS user, you have to download the Among Us application From App. While Android users download the Among Us App from the Google Play Store.
In the case of using a Browser, Among Us now.gg is the best way to access and play the game. While using Steam, go to the official website of Steam and search for the Among Us application.
If you’re using Windows, either you can play Among Us by downloading the Stumble Guys Apk or simply play it now.gg Among Us platform.
Among Us is a Classic Game Now
Among Us has almost gained a cult status in the past few years. Even to this day after being in the business for so long. Among Us still attracts the attention and play time of new gamers. The cloud storage space helps us play the game online and for free without the need of downloading. Now gg Among Us even provides a real-time gaming experience.
If you want to download the Among Us game, we have provided you with the details for that too. Hope you have a great time playing Among Us. Happy gaming folks!
Frequently Asked Questions
Q.1) Can you play Among Us on Now GG?
Yes, now.gg Among Us can be played online without the need for downloading thereby saving storage space. Simply go to the official site now.gg, select the Among Us game option, and wait for the game to finish loading.
As you complete this, it will take you to the gaming circle of Among Us now.gg join any existing game that is already being hosted. You can even join a new one.
Q.2) What does GG mean in Among Us?
GG is an online gaming vocabulary meaning Good Game. Similar Among Us GG is often said on a variety of similar online games.
Q.3) Is Among Us free on PC?
Among Us is indeed free to play on PC. You can either play Among Us on the browser. This provides for playing the game online.
You can notch it up a step further and download the Among Us game and play. In both cases, it is free to play.
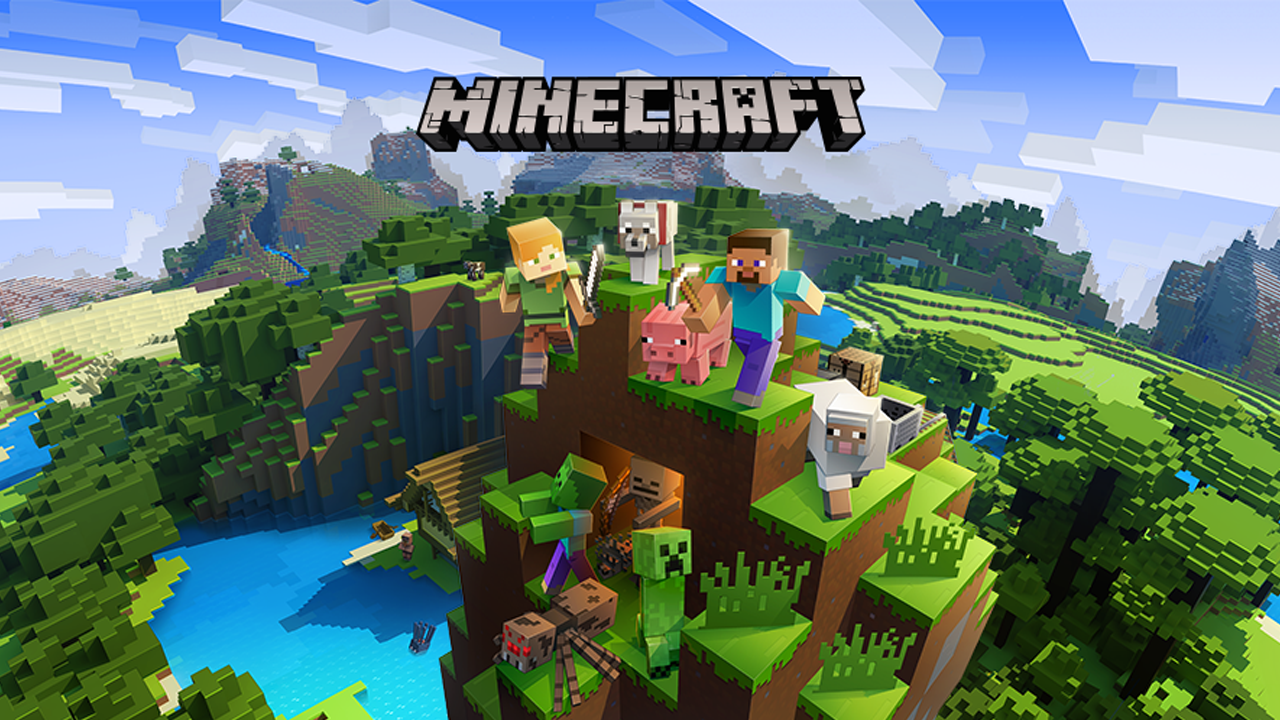
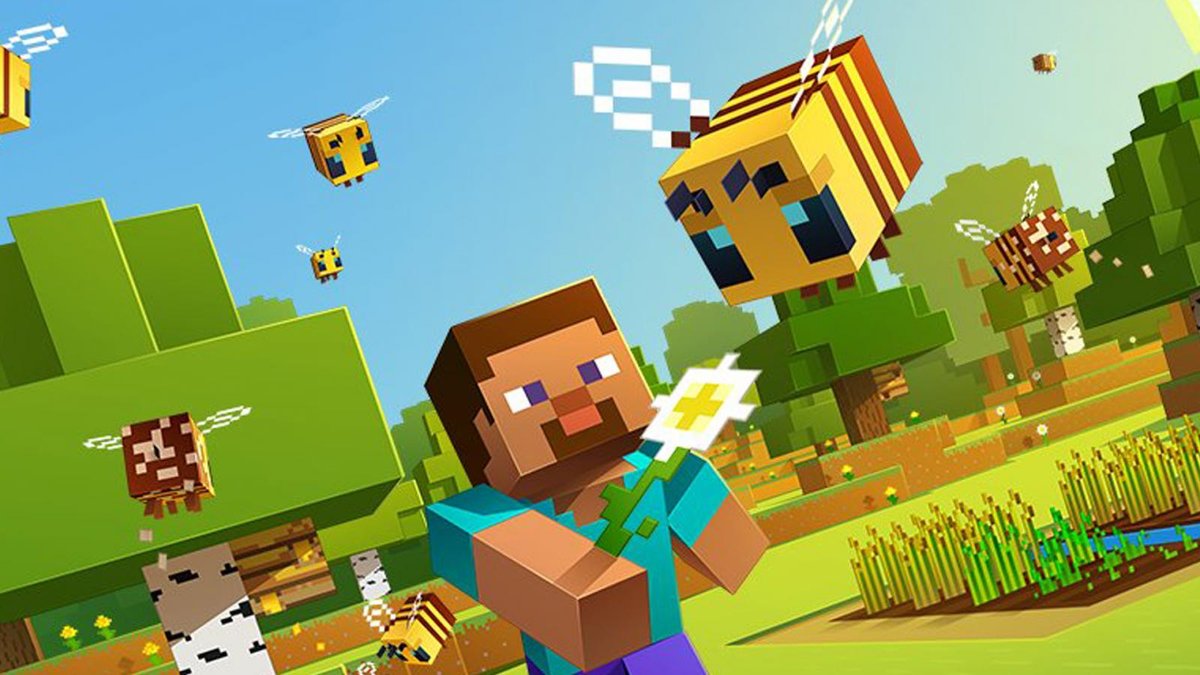

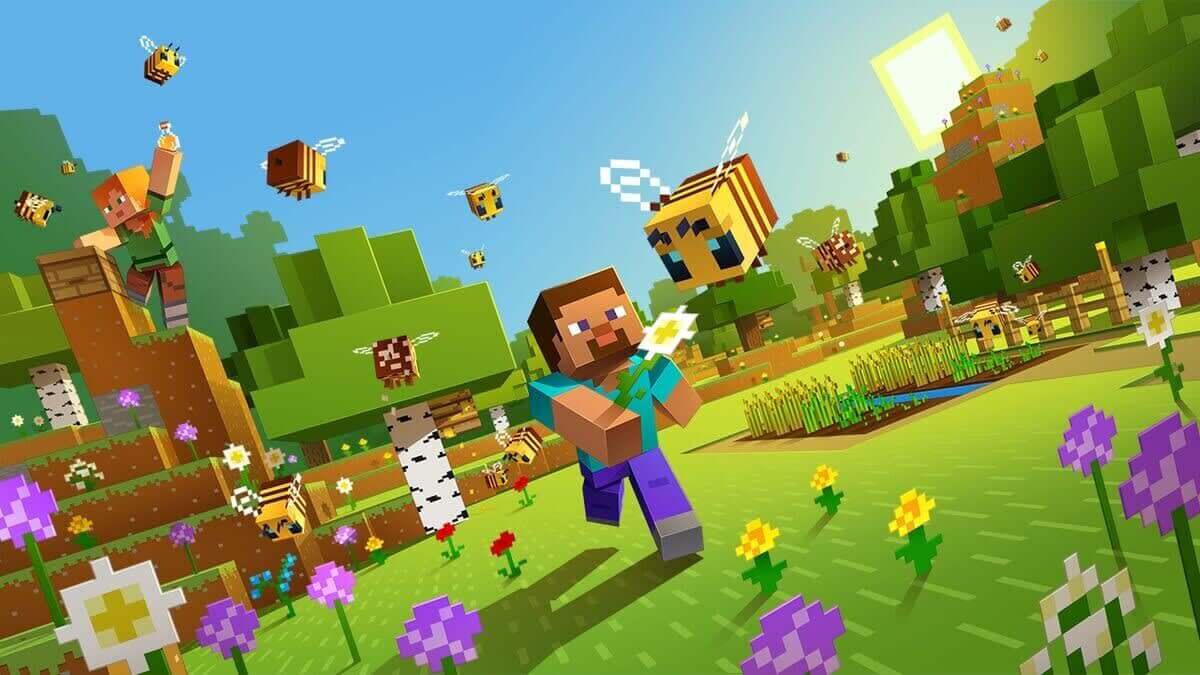

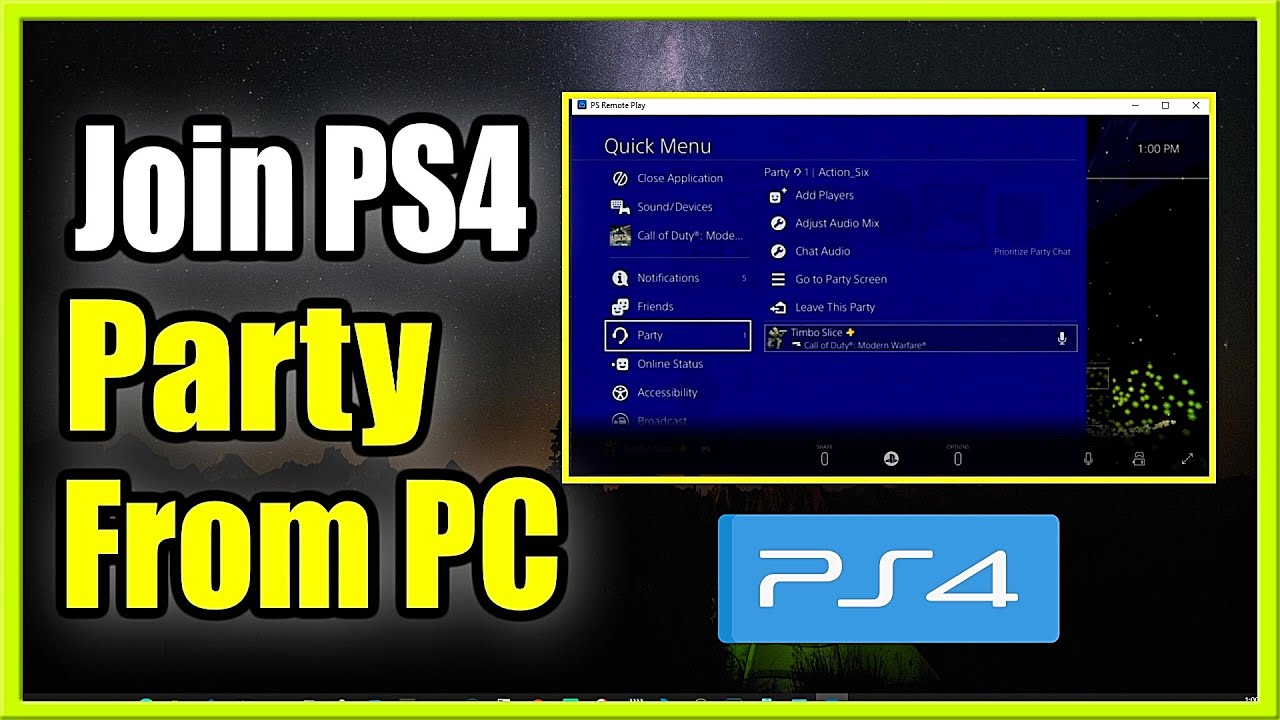
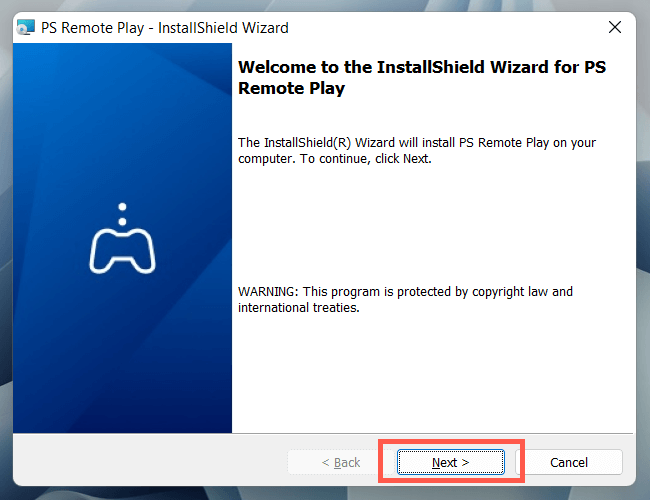
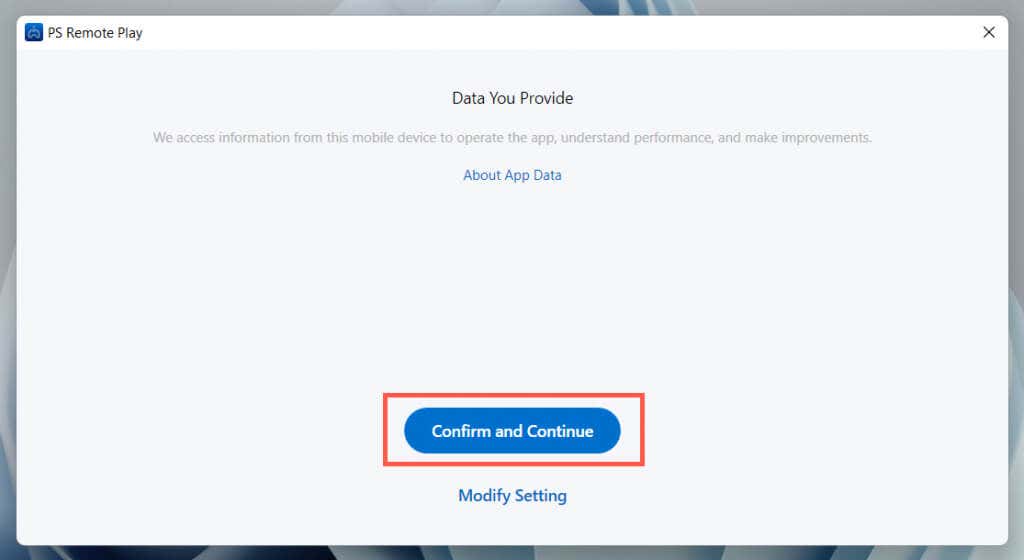

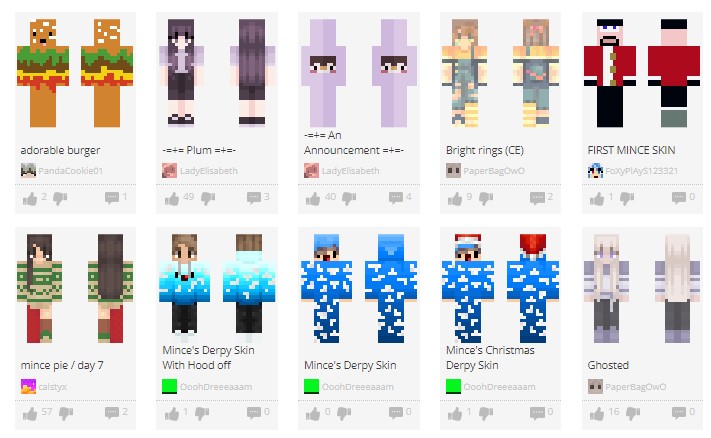
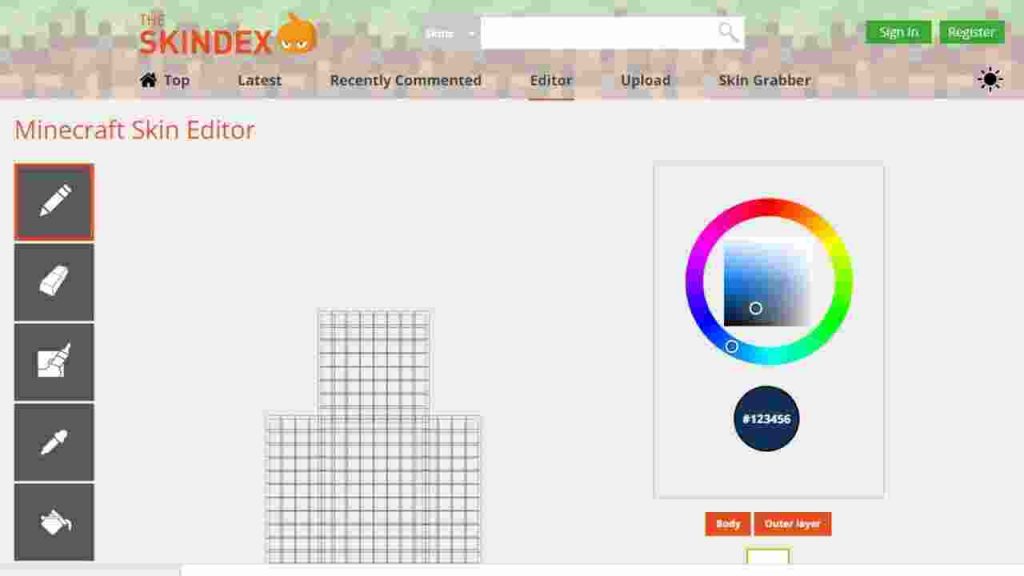
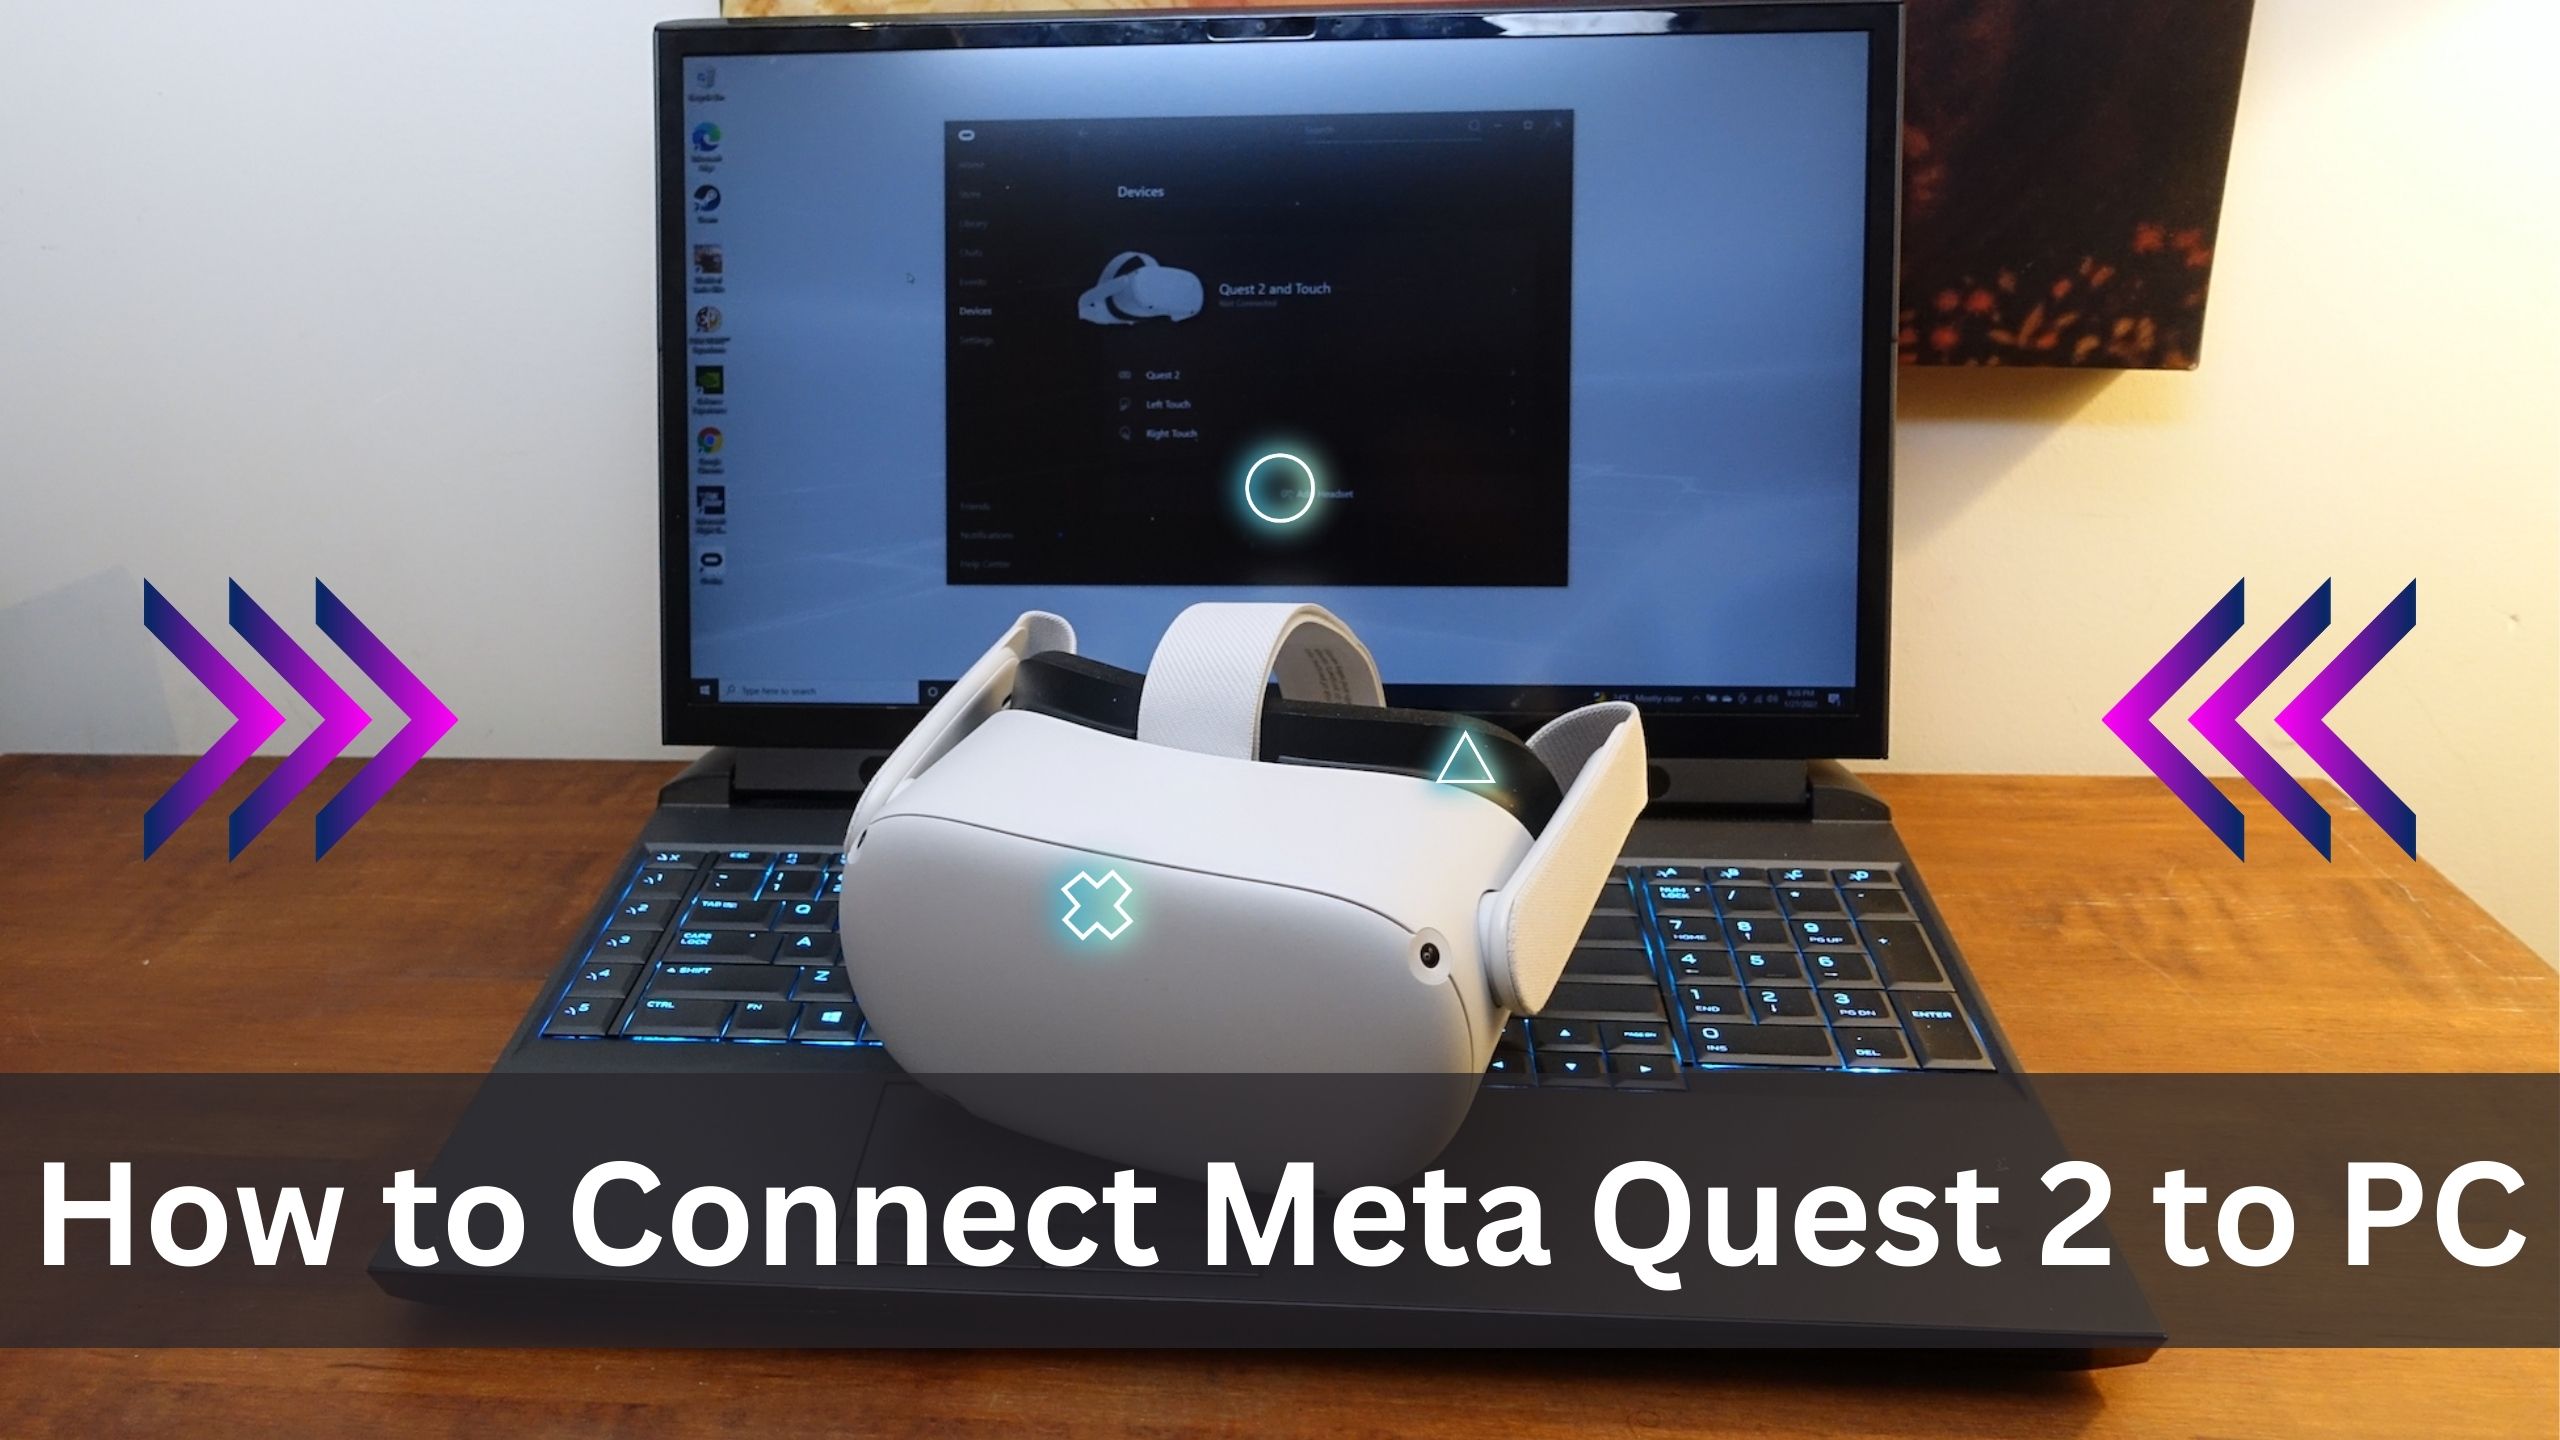
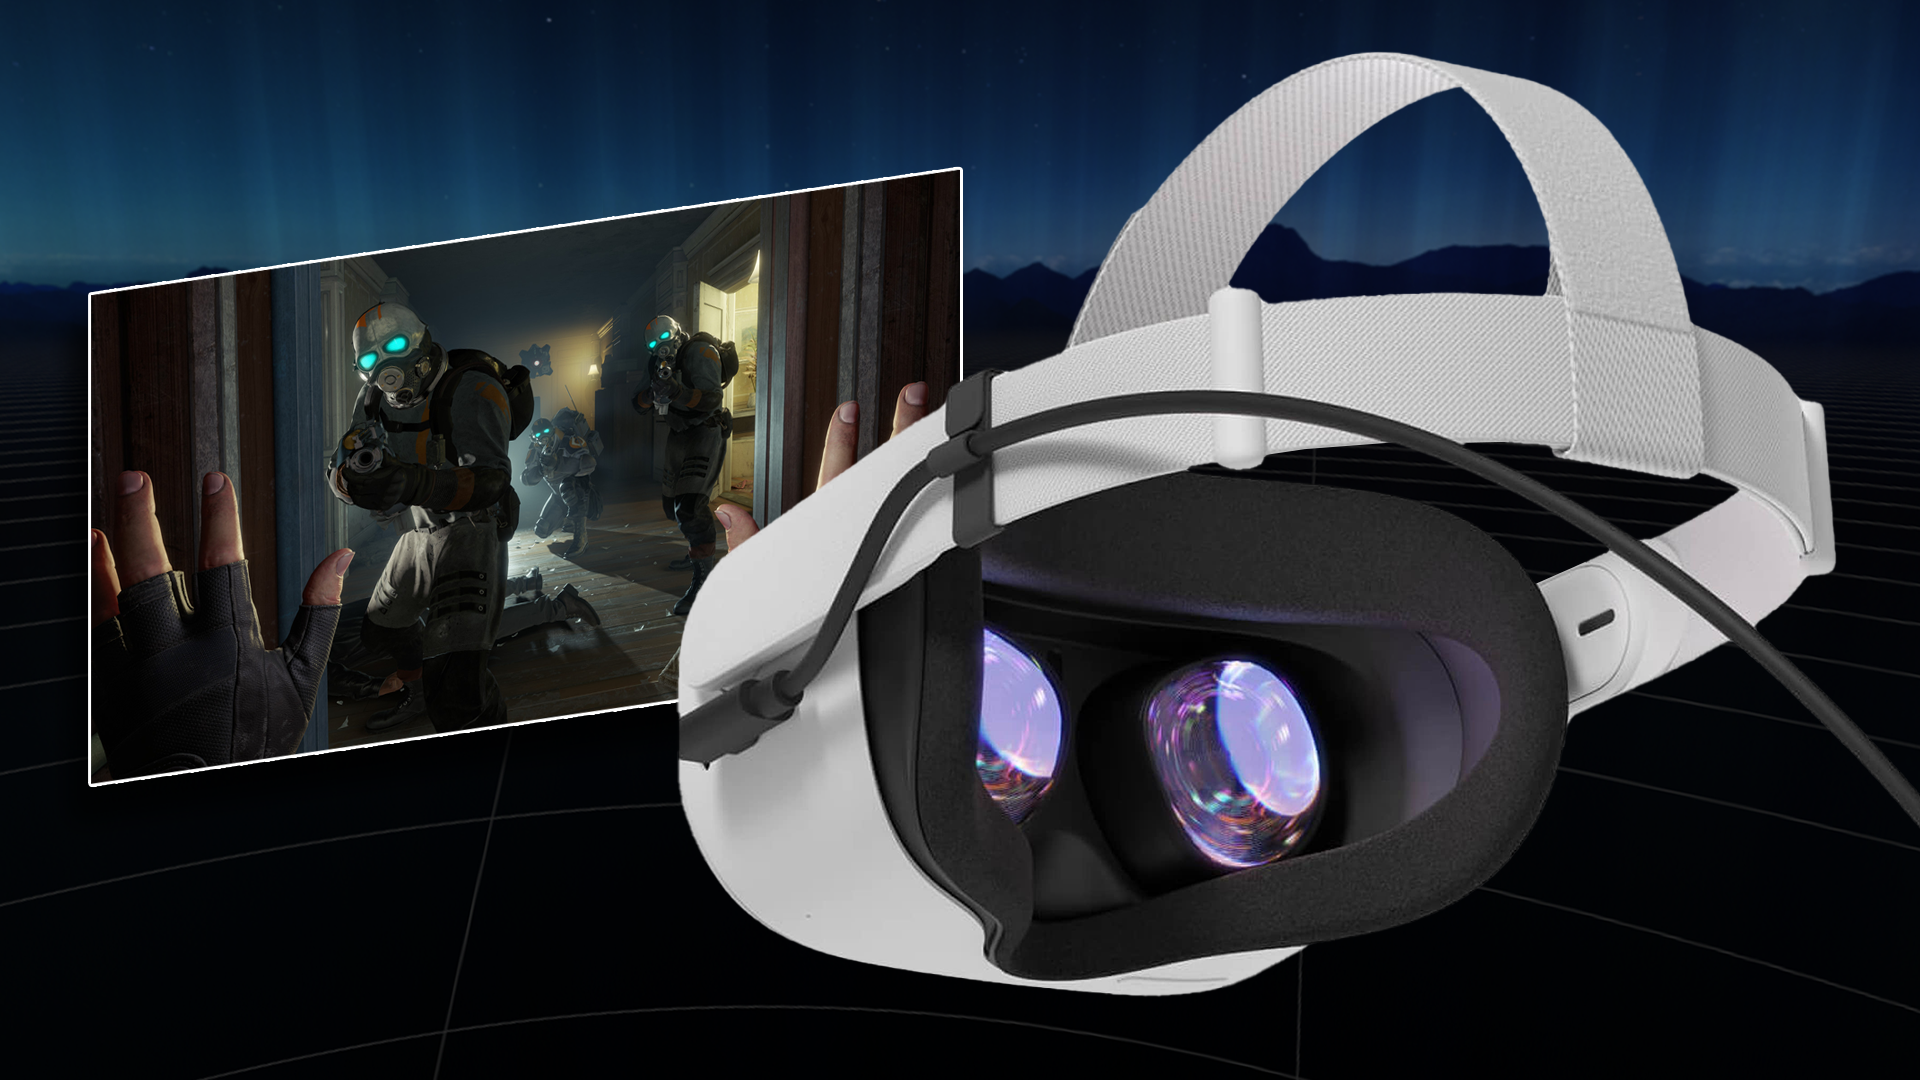
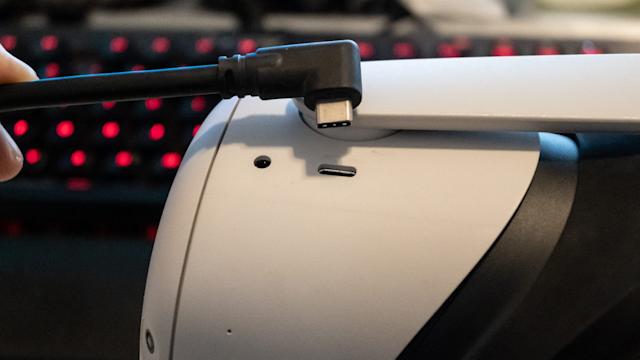
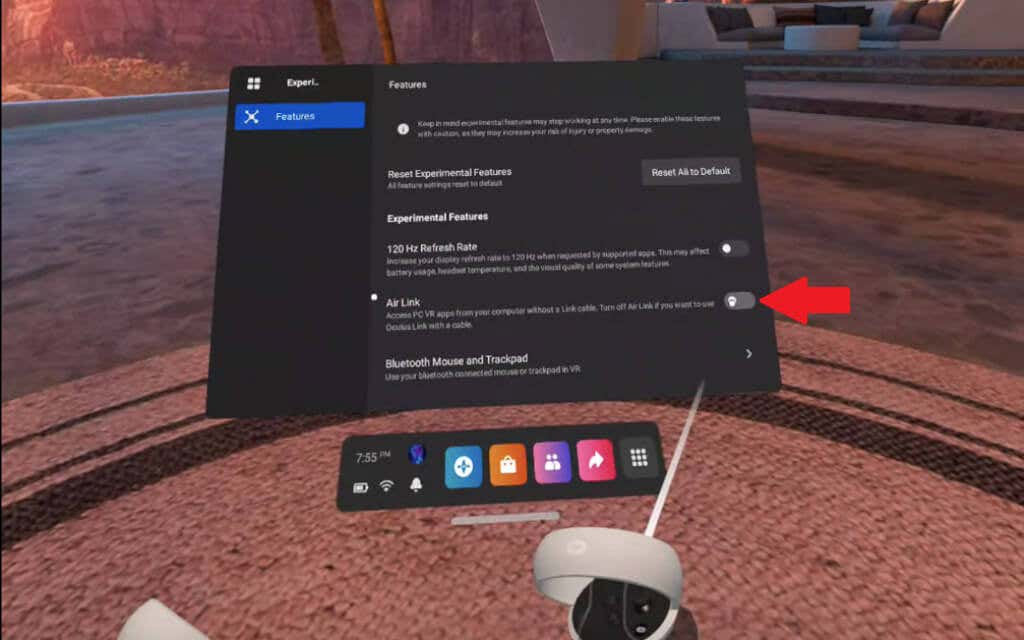
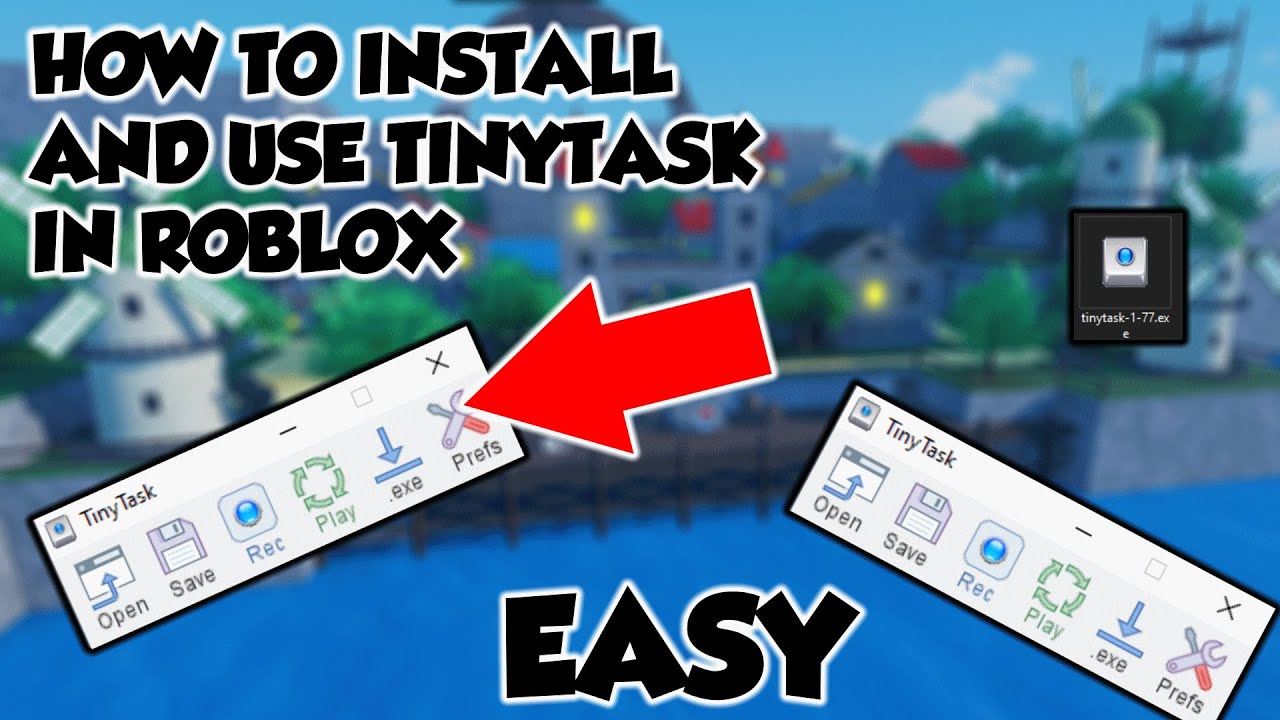


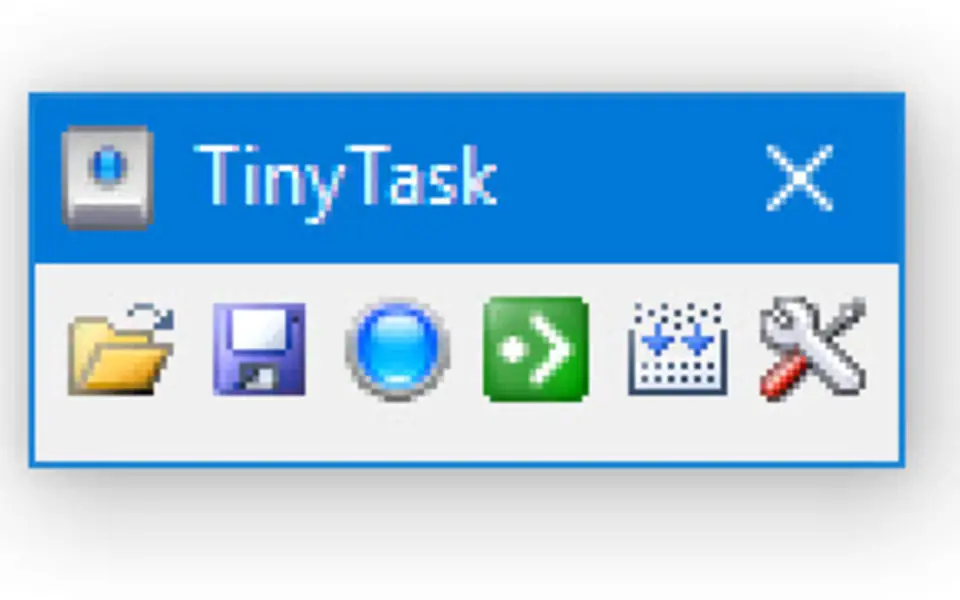

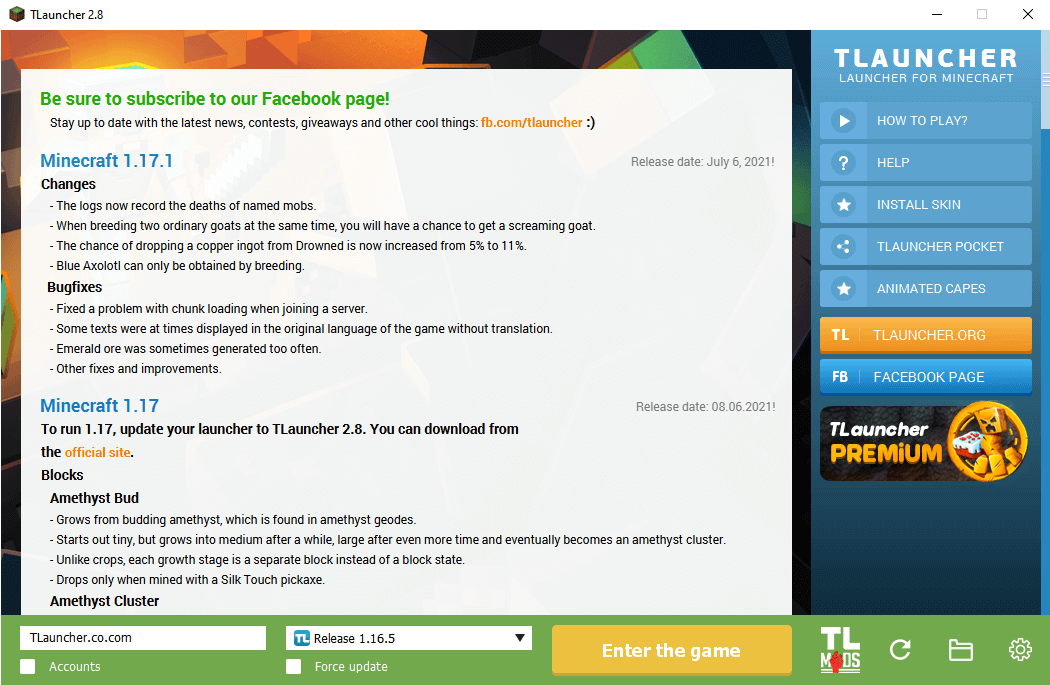
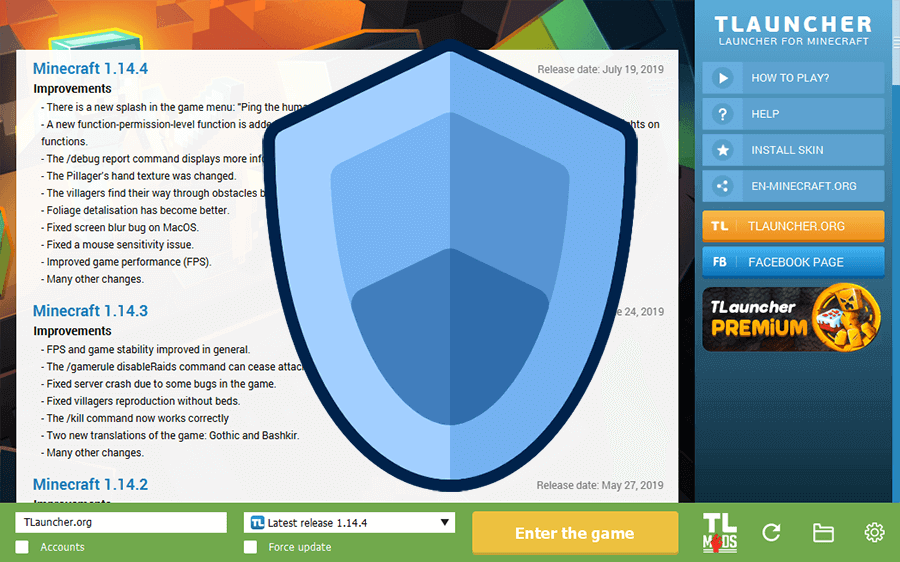
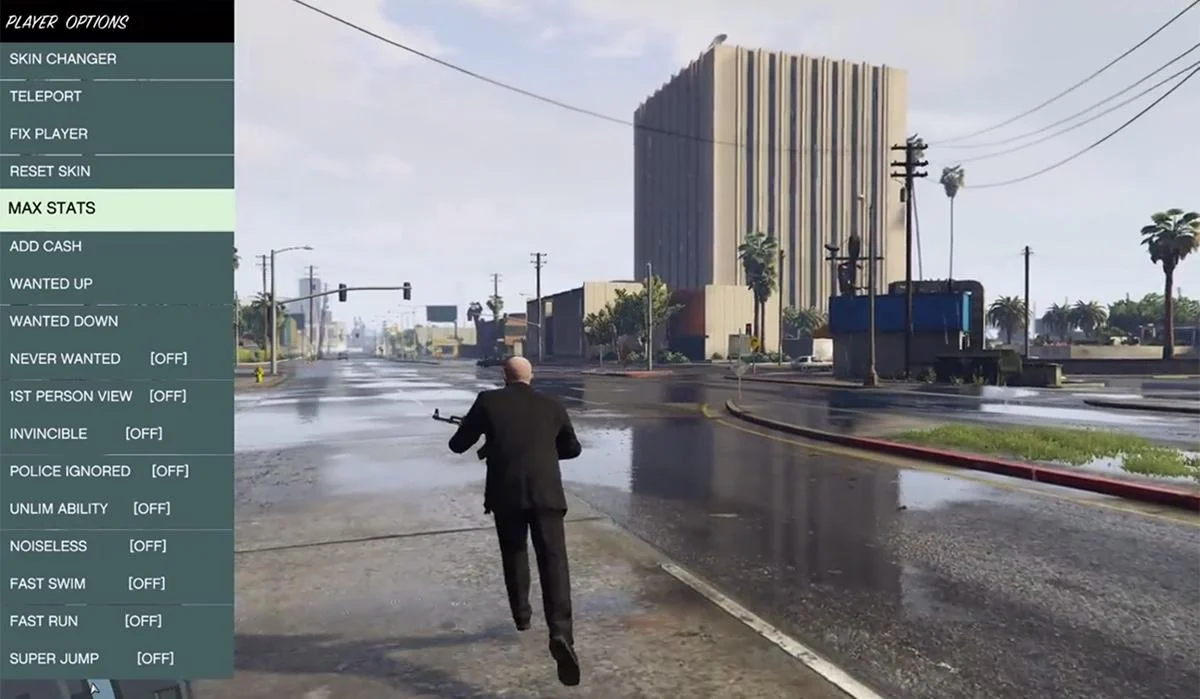

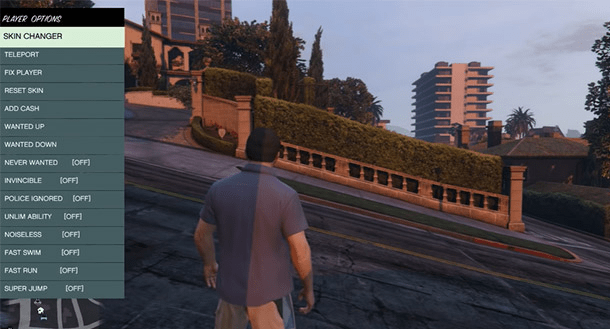


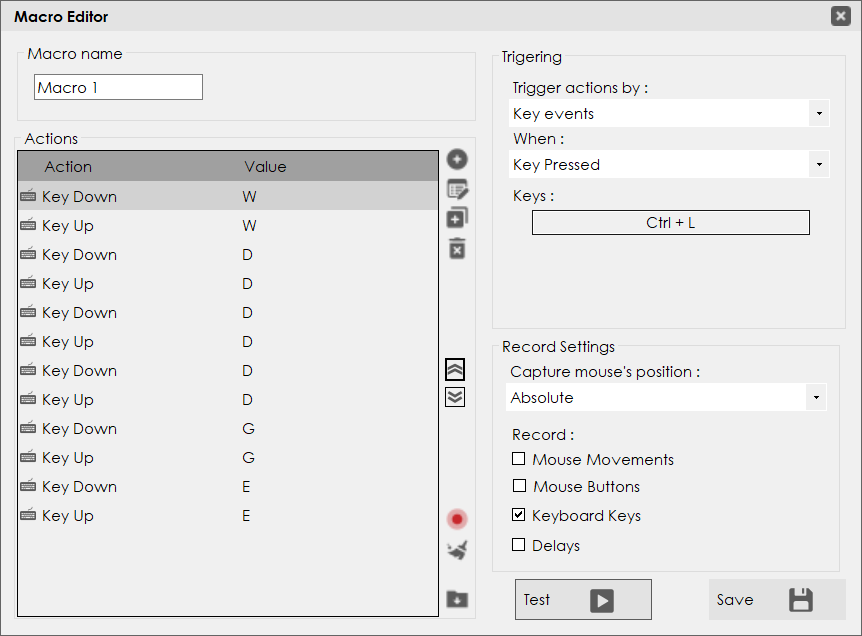

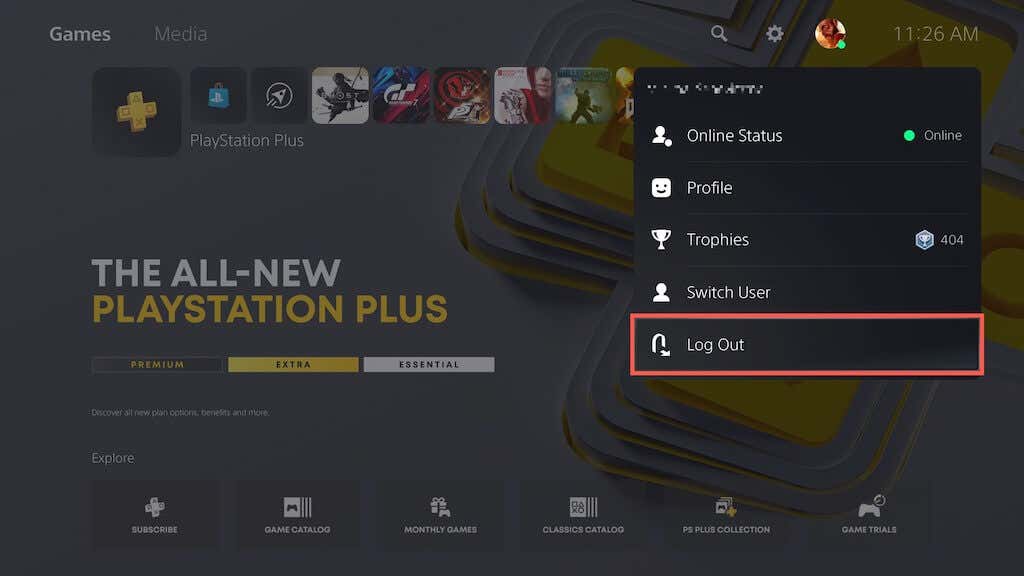
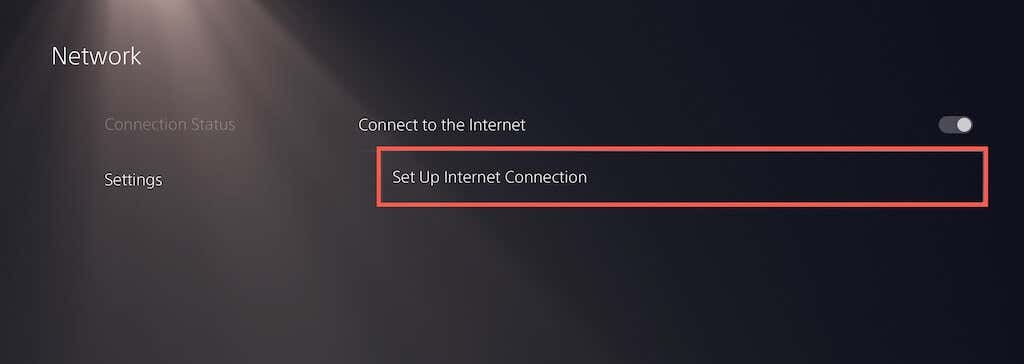
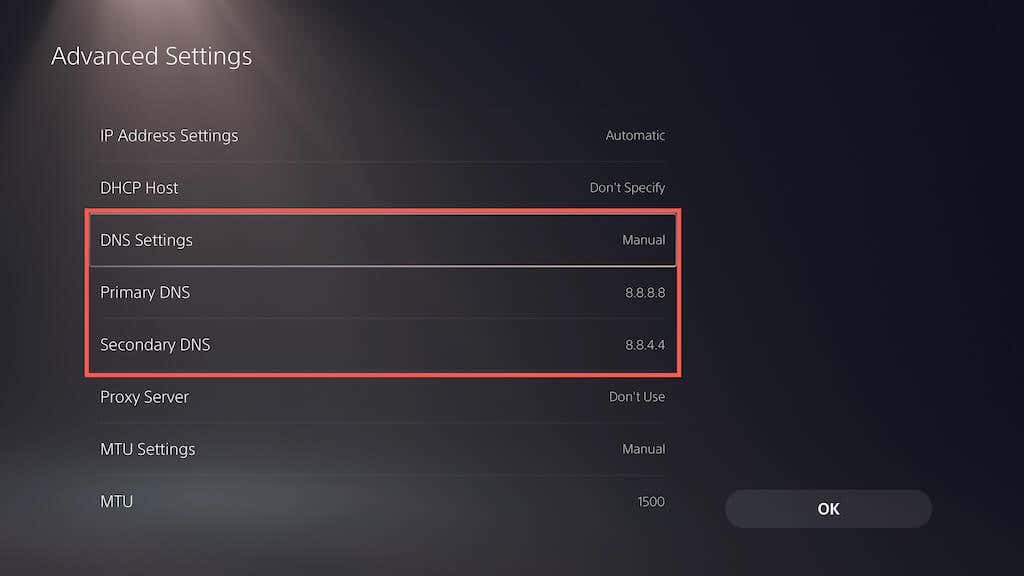
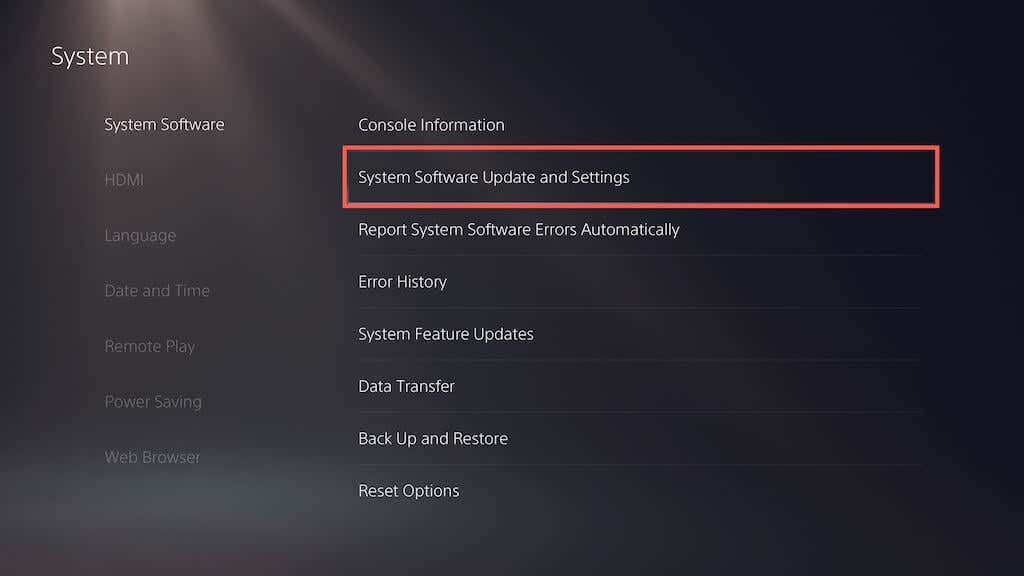

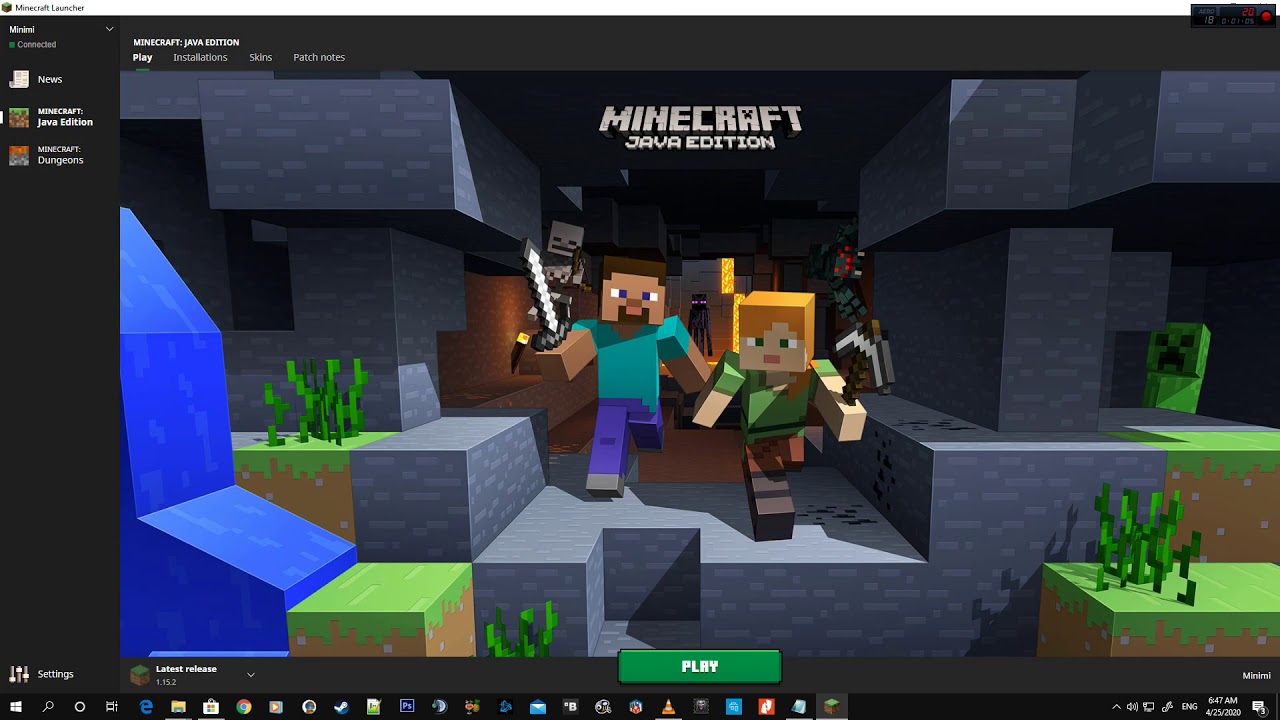
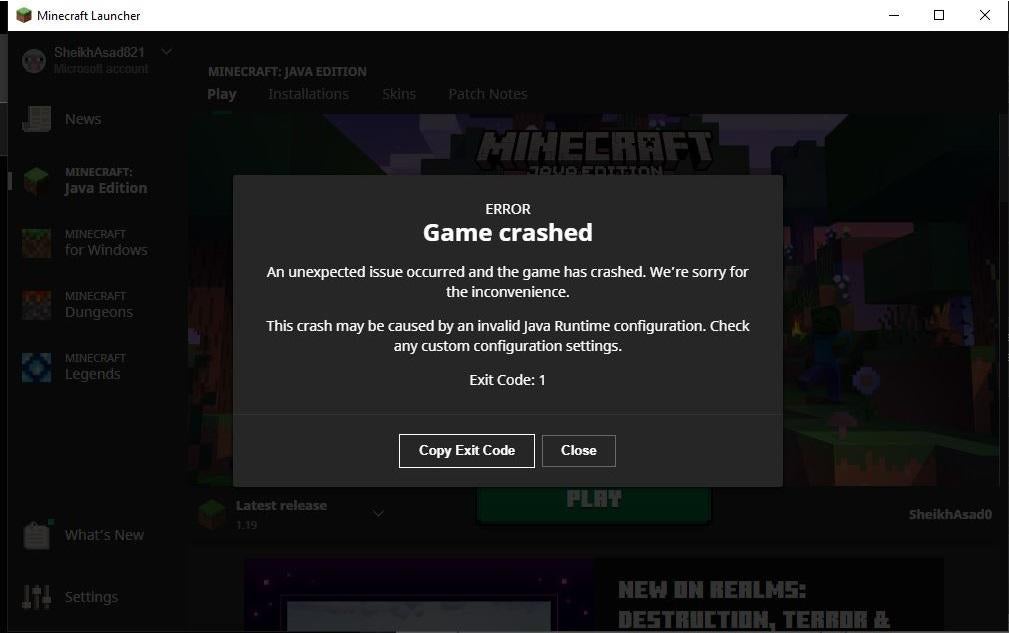
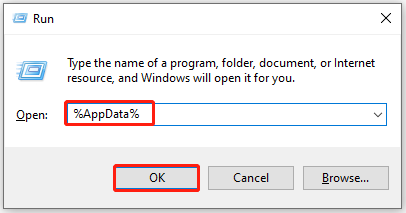
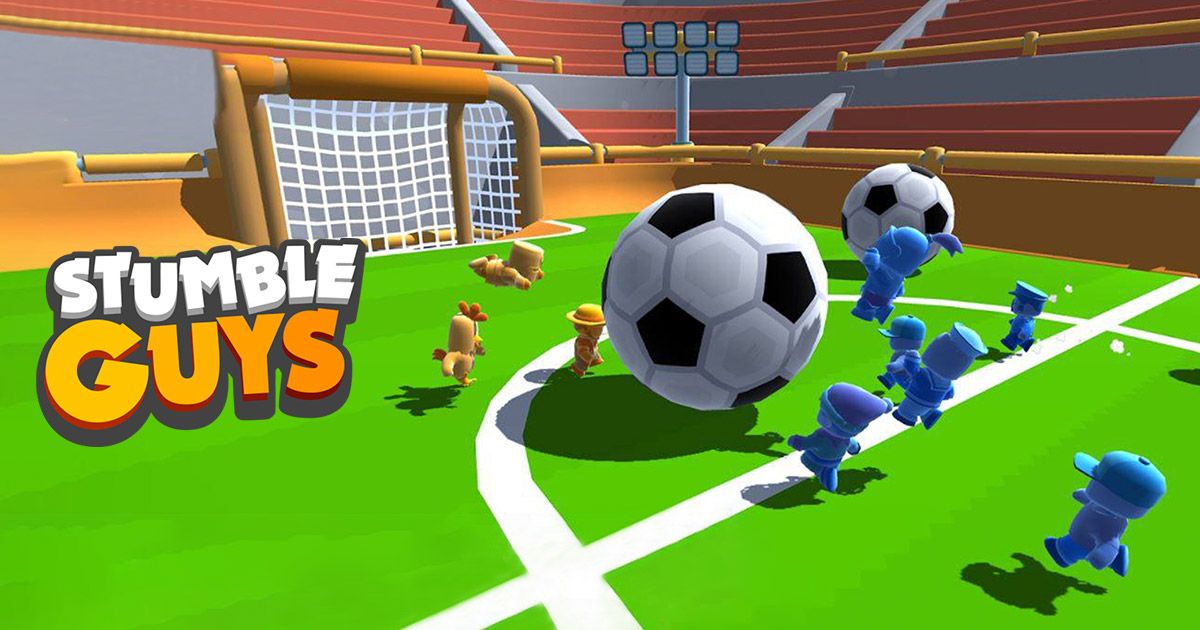
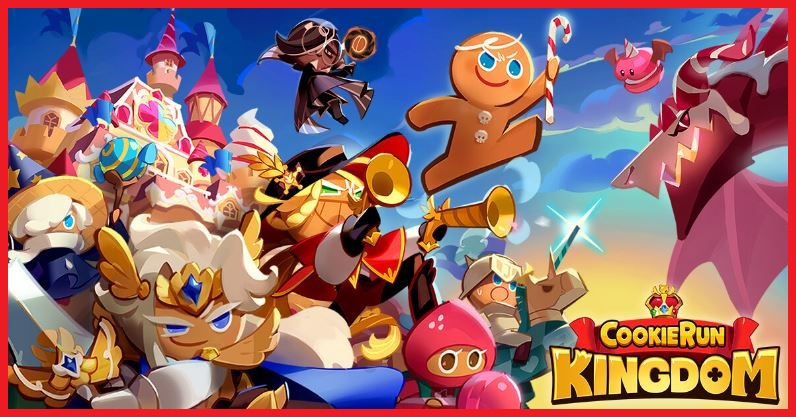
 With this, the storage of your mobile is also good as well as your time because cookie run kingdom pc and the installation process also takes a lot of time. If you play the cookie run kingdom download pc, then you will not have to face any problems like virus attacks, it will be very important for you to stay updated. You can also invite your friends or family members while playing this game, this feature makes this game even more interesting.