Norton Power Eraser uses the most aggressive scanning technology to eliminate deeply embedded crimeware and threats that traditional virus scanning is unable to detect. With this aggressive virus removal tool, you can get your PC or other devices back. Also, you can undo the results of a scan. It is one of the best applications to diagnose and remove Potentially Unwanted Programs.
The most persistent computer viruses such as scareware and fake security suites can also be eradicated through this tool. However the tool does not require installation, you can easily set up the power eraser and scan your system in no time. It also clears USB memory sticks. You only need to be careful about your critical system files as after completing the scanning procedure it always asks you what to do with those files.
Luckily, the power eraser allows you to get the file insight online database to learn more about the file that is going to be erased. Although, the tool has a restore point in case something goes wrong but make sure to double-check the information before deleting any of the files.
Now let’s learn how you can use this incredible tool for Windows 10, 8, and 7. With this step-by-step guide, you will be guided to use this tool. Later on, we move to the steps to use this tool in Windows XP/Vista. So, read this entire guide and learn the procedure of using this tool. Before diving into the next part, you need to be aware that the tool is only compatible with computers running Microsoft Windows operating system. So, if there are Mac OS X, Android devices, OS X, and iOS devices then you cannot use this tool.
Download Norton Power Eraser and Conduct a full system scan for Windows 10/8/7
- We need to first download the Norton Power Eraser.
- Press Ctrl + J button together to open the Downloads window in your browser.
- Now, just double-click the NPE.exe file.
- Click on the Yes or continue button if the User Account Control window prompts.
- It’s time to read the license agreement and hit the Agree button.
- Select Full System Scan in Norton Power Eraser window.
- After that, tap on the Run Now tab.
- In case you want to include the Rootkit scan then move to settings and choose Include Rootkit scan under Scan and Log settings.
- Restart the computer when you see a prompt.
- Just wait for the scan to complete.
Resolve the Risks
1. When the Norton eraser finishes the scan, it will show the scan results. You will see all the items that the tool considers as risks display the severity as High or Medium.
2. You can do one of the following mentioned below according to your situation.
- If the virus eraser antivirus did not detect any risks then just tap on the Done tap to exit.
- If you encounter any such files that are listed as High or Medium then the checkbox under Fix is automatically checked and it will recommend you to remove these files.
- At times, the user wants to know more about the threat. In that case, you can tap on the threat name under Primary target and view all the relevant details.
Keynote: Norton Power Eraser will take a restore point as part of the remediation if your system is configured to use System Restore.
3. Next, tap on the Fix now.
4. If the window pop up it will restart the computer then select restart now.
5. You can click on Done after the successful removal of the risk.
Steps to Configure Settings
Well, Norton Power Eraser provides you the option to set up a network proxy, adjust log settings, multi-boot check, and add the Rootkit scan.
1. To configure settings, you need to first start Norton Power Eraser.
2. Select settings from the top right corner.
3. You will see all the options on the screen such as Network Proxy settings, Rootkit scan, Scan and Log settings, and Language selection.
4. In case your network uses proxy settings to connect to the Internet then select Configure to configure network proxy settings.
5. You can do one of the following mentioned below.
- Choose the Automatically detect settings if you are not sure of the proxy settings.
- Subsequently, If you have acquired an automatic configuration script then choose to use the automatic configuration script and type that script in the URL textbox.
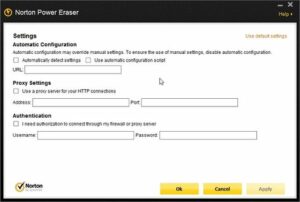
- Now, tap on Use a proxy server for your HTTP connections if you are aware of the proxy server settings. Then, enter the server address and the port number.
- In case your proxy server requires any authentication then choose Connecting to my firewall or proxy server requires authorization. After that, just type your user name and password.
6. Hit the apply button when you finish updating network Proxy settings.
7. Accordingly, enable Show only bad files to display only the bad files.
8. Norton Power Eraser does not include the Rootkit scan so if you want to add it then just enable include Rootkit Scan.
9. Now, try to configure the log settings by doing one of the following things.
- In case you want to modify the location of the log file then click on scan results, tap on change and select the new location.
- If you want to delete the log history located next to Log files and choose the Delete option.
- You can opt for the Use Default setting if you want to restore the default settings.
10. Finally, just choose the preferred language and select Apply.
Steps to Restore a fix to undo a previous repair session
If you want to restore a file that has been incorrectly removed by the Norton Power eraser then try to undo the repair session.
Keynote: You need to know that undo sessions created with Norton Power Eraser version 5.3.x.x are not supported by Norton Power Eraser Version 6.0.x.x.
1. To initiate, start Norton Power Eraser.
2. Choose Undo Previous fix in the Norton Power Eraser and hit the Run now tab.
3. In the Previous Repair Sessions window, you need to select a repair session that you want to undo followed by clicking on the Next button.
4. Adding on, select Undo in the previous Repair Session.
5. Hit the Done tab.
So, these are the steps that you can consider to configure Norton Power Eraser Tutorials for Windows 10/8/7. Now, let’s learn how you can download, run and configure the tool in Windows XP/Vista.
You May Also Like To Read: NORTON REMOVAL TOOL- WHAT IS AND HOW TO USE IT?
Download Norton Power Eraser and Conduct a full system scan for Windows XP/Vista
1. First of all, download the Norton Power Eraser.
2. Subsequently, press the Ctrl + J button to access the downloads windows in your browser and double click the NPE.exe file. Hit the yes button if the User Account Control window prompts.
3. Adding on, tap on the accept button when finished reading the license agreement.
4. Again, tap on the Scan for Risks icon in the Norton Power Eraser window.
5. Norton Power Eraser by default performs a Rootkit scan and also requires a system restart. If you see a prompt to restart the computer then just click on that.
6. In case you don’t want to include the Rootkit scan then navigate to settings and deselect the option Include Rootkit scan.
7. At this moment, just wait for the scan to complete properly.
Steps to Fix the risks
After completing the entire process of scanning in Norton Power Eraser, it displays the scan results. You will see the risky items displayed as bad that need to be removed or repaired and the items that require further review display the status as unknown.
1. According to your situation, just do one of the following things.
- If you see No Risks Found, then Norton Power Eraser did not detect any risks on your computer. Just tap OK to exit.
- In case, you see any files in the Bad names then the Remove checkbox under Action is checked automatically. You need to remove all of these files and if the Remove checkbox under Action is not checked.
- Now, if you see any files that are listed as unknown then click on the cloud icon. It will send the file to a Norton server and scan it using the traditional signature-based detection engines.
- If the cloud scan result shows Bad for any file then tap on the remove checkbox.
- If the cloud scan result shows unknown then do not select the remove checkbox as the file may need further analysis.
2. Now, ensure that the Create System Restore point checkbox is properly selected.
3. Later on, hit the tab named fix now.
4. After that, click on the Restart now tab to restart the computer to finish the removal.
5. Once removing the risk, just tap on the Done option.
Run a Scan using Advanced scan options
Norton Power Eraser gives scan options for advanced users and technicians to conduct advanced troubleshooting. Some of the following advanced scan options are available in the tool.
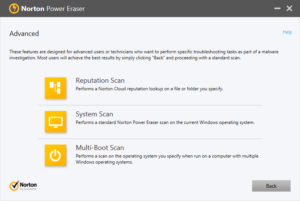
1. Reputation Scan
You can easily scan specific files and folders using Norton NPE. With its Reputation scan, you can speed up the scan. Well, only these files with the following extensions are supported for scanning.
- .exe
- .ocx
- .sys
- .msi
- .scr
- .drv
- .loc
- .dll
2. System Scan
This scan does not include a Rootkit scan and performs a standard Norton Power Eraser scan on your current Windows OS.
3. Multi-Boot Scan
With this scan property, you can conduct a scan on a particular OS in a multi-boot Windows environment. You can select the Windows OS that you desire to scan. Although this option is not available if only the current OS is detected.
To conduct the advances scan, follow the lead of these steps:
1. To initiate, start Norton Power Eraser.
2. Next, just read the license agreement and hit the Accept button.
3. Select the Advanced scans icon.
4. Click on the scan icon according to your requirement.
- Reputation Scan
- System Scan
- Multi Boot Scan
5. In the end, follow the on-screen guidelines to complete the scan.
Steps to Configure Settings
1. First of all, access the Norton Power Eraser.
2. Now read the license agreement and hit the Accept button.
3. Moreover, select Settings from the top right corner.
4. You will see several options like Network Proxy settings, Log settings, Multi-Boot check, and Rootkit scan.
5. If the network uses proxy settings to join the Internet then click on Configure to configure network proxy settings.
6. Once done with these, do one of the following things:
- When you are not sure of the proxy settings then select Automatically detect settings.
- If there is an automatic configuration script then choose Use automatic configuration script and then enter the script in the URL textbox.
- If you know the proxy server settings, then just select Use a proxy server for your HTTP connections and then enter the server address and the port number. ‘
- Tap on Connecting to my firewall or proxy server requires authentication If the proxy server requires authentication then enter the username and password.
7. After updating Network Proxy Setting, select Apply and hit the OK button.
8. If there is more than one operating system installed on the device, Norton Eraser lets you scan system files and registry files of other systems as well. You can include other operating systems by selecting Enable Multi-Boot check. Otherwise, the Multi-Boot check option is grayed out if you do not acquire any multiple operating systems installed on your computer.
9. In case, you want to configure the Log settings then conduct one of the following.
- Browse and select the new location if you want to change the location of the log file.
- Tap on Delete Log History if you want to delete the log history.
- Select Default settings if you want to restore the default settings. Keep in mind that once you deleted the log history then you can undo any previous Norton Power Eraser fix sessions.
10. You need to know that Norton Power Eraser includes Rootkit scan by default. If you do not want to include it then uncheck Include Rootkit Scan.
11. In the end, you only need to click on the apply button and then tap OK.
Steps to Restore a fix to undo a previous repair session
In case of Norton power erases a file or a registry file on your computer then you can undo the repair session to restore it by following the steps:
- You need to first start Norton Power Eraser.
- Hit the Accept button after reading the license agreement.
- Later on, select Undo Previous fix icon.
- Now, you need to select a repair session that you want to undo in the Previous Repair Sessions.
- After that, select the files that you want to restore in the Previous Repair Session and hit Undo.
- Furthermore, select Restart Now to finish the restore.
- Once you restarted the computer, Norton Power shows some files that were restored. You need to just tap on Done.
Final Word!
So, this is all about the Norton Power Eraser. You can use this tool to enhance the working capacity of your system.
Author Profile
Latest entries
 Technology2023.04.20How To Connect Roku To TV? Easy Guide To Follow
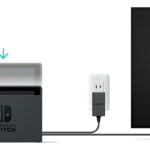
- Technology2023.04.20How to Connect Nintendo Switch to TV? (With and Without Dock)
- Technology2023.04.205 Best Barndominium Design Software (DIY & Professional)
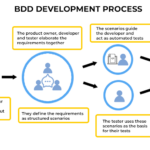
- Technology2023.04.20What Is The Relation Between Behavior-Driven Development And Agile Methodology?