Blog

there are some data after the end of the payload data

Are you receiving the message “there are some data after the end of the payload data” when you try to use the 7-Zip application an archive must be retrieved ? If so, you are not the only one, many like you have encountered this warning message till now. Considering that the process of extracting remains relatively unaffected, this is hardly a generalized error but instead just more of a radical caution message. So, can this issue be solved by any means? Is there a solution?

Yes, there are solutions to solve this error. In this article, we will provide you with multiple solutions to get rid of the warning pop-up “there is some data after the end of the payload data” issue. So, what are you waiting for, go grab the solutions now.

Reasons for the Error “Warning There Are Some Data After The End Of The Payload Data”

We have found out various reasons why this irritating pop message is occurring and disturbing you currently. The reasons are:

1. Presence of Error in 7-Zip

Viewers have highlighted that the problem is exclusively tied to the RAR compression for a specific type of data, yet somehow the developers have really no satisfactory justification for the potential problem.

2. An Archive Fault Reported by 7-Zip

The most recent versions of 7-Zip are set up to alert you to issues while dealing with specific file formats. With the most recent version, you will see this error message informing you that the archive you are trying to extract has defective sectors. Until recently,7-Zip would not detect faulty sectors from TAR files, but now it does.

 there are some data after the end of the payload data

3. The Type of the Archive Cannot be Determined by the 7-Zip Programme

The error “there is some data at the end of the payload data” may also appear on your phone screen if the 7-Zip programme persistently refuses to acknowledge a certain archive type.

Easy Fixes to“There Are Some Data After The End Of The Payload Data” Issues

Here, we will explain to you all the possible solutions for fixing the “there is some data at the end of the payload data”. Try each and every solution from the list, until you find that the warning message stops appearing in your device. 

Solution 1: Update 7-Zip Build to the Newest Edition

To proceed with this effective solution, all you need to do is follow the instructions described for you below – 

  • Open the 7-zip, go over to Help (in the ribbon bar), and then click on About 7-Zip. Once that is done, determine if somehow the build number is more recent than version 16.02.
    Update 7-Zip Build to the Newest Edition
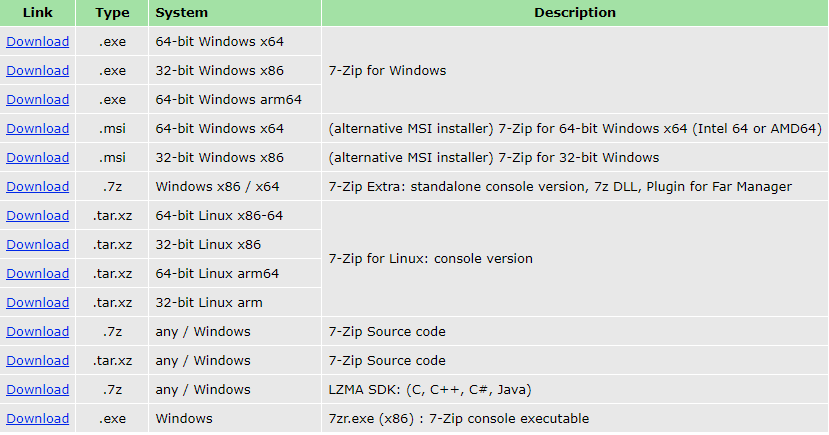
  • Secondly, you must upgrade the compression tool if the build number on your version of 7-Zip is older than or roughly equivalent to version 16.02. So, click on the Download button for 7-Zip version 18.5 on the 7-Zip download page. After that, verify that the version you download is compatible with the Windows architecture on your computer.
  • Install 7-zip by choosing a destination and hitting the Install button after launching the installation software.
  • Click Yes to restart your computer to finally finish the installation after the 7-Zip build has now been installed correctly.

After doing all this , try extracting an archive with 7-Zip after restarting your computer to see whether the warning signal “there is some data after the end of the payload data” is still appearing. If it is still appearing, you need to try out our second solution from the list. 

Solution 2: Use Universal Extractor

This is the second most ultimate solution in our list of solutions for eliminating the warning pop-up message “ there are some data after the end of the payload data ” or Amazon CS11 Error from your device. If updating your 7-Zip build to the latest edition does not solve the issue, using the Universal Extractor can definitely help you out.

  • Check out legroom.net (Universal Extractor). Once you’ve done so, click UniExtract Installer in the download part of the page.
  • To install the Universal Extractor on your Windows pc, decide to launch the installation executable and adhere to the instructions displayed on the screen.
  • Right-click the archive when the installation has been finished. After that, you need to choose UniExtract files.
  • By selecting a target directory, complete the final extraction process.

Solution 3: Change File Extension from  From.Zip to.Rar

As per the reports, most customers who have personally encountered the aforementioned error message notice have indeed been able to resolve the issue by radically changing the extension from.zip to.rar. So, there is nothing that you could not give it try for yourself to fix the issue.

  • The extensions must first be made visible. You may accomplish this by launching File Explorer and selecting View.
  • Verify that the File Name Extensions box is carefully selected. After doing so, simply check to see whether it is there.
  • Rename the archive by selecting it from the context menu when you right-click on it and extract.
  • The A.rar extension should be added after.zip. After that, click Yes to approve the action.

Frequently Asked Questions 

Q1: Compared to WinRAR, is 7-Zip better?

Ans: Although WinRAR is best suited for RAR computer files, which 7zip can also open, 7zip is superior to WinRAR since it supports more file types, is simpler and easier to use, and features right-click context full integration. RAR files can only be actually produced just using WinRAR.

Q2: Is 7-Zip a reliable program?

Ans: Using 7-Zip to compress files is secure. It allows for interruption-free compression and decompression of files. However, to avoid having a sluggish computer while using the file compression program, you really need to be completely aware of which files are required to be compressed.

Q3: How do you fix “there are some data after the end of the payload data”?

Ans: To fix “there are some data after the end of the payload data fix”, you can follow the methods below.

  • Update 7-Zip Build to the Newest Edition
  • Use Universal Extractor
  • Change File Extension from  From.Zip to.Rar

Q4: Can files be compressed with 7-Zip?

Ans: File compression and uncompression may be done using the open-source and free file archiver 7-Zip. This application can compress your data into an archive with a .7z extension if you need to reduce the amount of storage space they take up or make them more easily portable.

Q5: What is causing the zip file to corrupt?

Ans: It is indeed possible for ZIP files to have become severely damaged when being downloaded. Unreadable data may end up becoming an element of the downloaded ZIP file. This makes it challenging at times to extract the data if the download was abruptly halted, even briefly, by a power interruption or an unexpected application termination.

Q6: How does a file become 7-Zipped?

Ans: You can 7-Zip a file by following the below-mentioned instructions –

  • Open the 7-Zip File Manager.
  • Click Add after selecting the file or folder you wish to compress.
  • Once the Add to Archive window appears, confirm that the Archive format is selected to zip and click OK to continue.
  • The file will be compressed and saved in the same location as the original file as a zip file.

The Bottom Line 

Hence, that’s all about the fixing solutions of the warning message “there are some data after the end of the payload data” on your device. You really need not worry if you are facing this presently, lots of other individuals like you have faced this issue and have also fixed it within a few minutes. Each and every solution we have mentioned in the article is really very effective to get you off this issue. But, do not choose any random solution out from there to solve it as it might not fix the issue. For any further assistance, you can get back to us.

security policy prevents use of camera

In the present day, as the technical world has been developing rapidly and making work easier, the rate of technical problems has also been at its peak.  Among all the problems, “security policy prevents use of camera” is an issue that many individuals are experiencing nowadays. As per reports, whenever an individual launches his or her camera to capture some moments, a pop-up message “security policy restricts use of camera” appears on the screen, which is very frustrating. Hence, is there any solution to get rid of this?

Absolutely, there are solutions to fix this issue. In this article, we have earlier tested and selected some very easy and simple solutions especially for you. So, without any further ado, let’s get started.

security policy prevents use of camera

Reasons For The Pop-Message “Security Policy Prevents Use Of Camera”

Moreover, this “security policy prevents the use of camera” issue on your smartphone arises for multiple reasons. We have done proper research on the occurrence of this issue and we have found some very specific reasons why this “application has violated security policies” occurs. Knowing what might be the reasons for this issue in some cases is really very necessary. Hence, we thought about sharing it with you all. Just take a look at the possible reasons that are described below –

  1. The Settings on the Phone’s Camera App are Improperly Configured: Misconfigured settings either for the phone or the camera could be the root of the current camera malfunctioning i.e, “security policy prevents the use of camera”.
  2. Corrupt Data or Cache of the Camera or Security App on the Smartphone: Sometimes, you will receive a security policy pop-up like “security policy prevents use of camera” if the camera application’s cache or the data, or perhaps the relevant information of any connected applications, is being fully corrupted.
  3. Application Direct Interference from a Third Party: In some cases, the camera may not easily start and a pop-up message “security policy prevents the use of camera” appears if any third-party software on the smartphone is compromising its features and functionality.
  4. Enabled Phone’s Sensors: You might experience the “security policy restricts use of smart switch” issue when you start your camera on your cellphone if the sensor of your smartphone is turned off or is disabled. 

Resolve The “Security Policy Prevents Use Of Camera” Issue? (Easy Solutions)

The “security policy restricts use of camera” issue that you are currently facing in your smartphone is not an uncommon issue. Many individuals like you from around the world have faced this issue at times and also have got it fixed easily. Hence, you are also capable of fixing the issue out very easily. To help you out, get rid of it, we have collected some best solutions for you. Try out each and every solution given below.

Solution 1: Reboot your Android Phone

This is the first solution in our list of solutions to resolve the pop-up message “security policy prevents use of camera” on your smartphone. Rebooting your cell phone by removing the SD Card and the SIM Card is one of the easiest solutions you can apply to fix it. By doing this, refreshes the whole device and can solve this type of issue within seconds or a few minutes. Therefore, giving it a try is worth it. 

To reboot your smartphone, you can kindly follow the step-by-step guide that we have provided below –

  • First of all, turn off the handset and after that take the SIM or SD card out.
  • After doing so, switch the smartphone on charging and simply wait for it to eventually finish.
  • Now, start the phone up once it has finished charging without a SIM or SD card.
  • Once done, determine whether the camera system functions appropriately this time.

Solution 2: Remove All Data  And Cache From The Camera Application

Remove All Data  And Cache From The Camera Application

It’s critical to regularly remove the cache and data associated with your apps. The smooth operation of your app and the avoidance of unintentionally using dated data are both continued to improve by doing this. Also, the current issue you are facing can be surely fixed by applying it. Hence, to apply this solution, all you need to do is follow the steps as we have instructed below for you –

  • First of all, on your smartphone, launch the Settings application.
  • Secondly, simply select the Apps and Notifications.
  • After doing that, in the All applications section, directly choose Camera there.
  • Next to that. tap the Storage button.
  • Hence, to clear your cache and data, just click the Clear Data and the Clear Cache option.

Solution 3: Camera in Safe Mode

This issue might happen if you customize your phone in a method that interacts with the image sensors in some specific circumstances, such as by using a launcher different than the one that came with it. Therefore, using your camera in a safe mode in cases, reves this type of issue for sure. You must give this effective method a try for sure. It surely might remove the “security policy restricts use of smart switch” issue and you can operate the camera of your phone peacefully.

  • Firstly, press and hold the phone’s power button until the power menu shows.
  • Press and hold the power icon for a while until the Safe Mode pop-up appears on the surface.
  • Then, validate restarting the phone in safe mode, and once in safe mode, verify that the camera is operational.
  • In that case, restart the phone in normal mode and try to determine whether the camera problem has been resolved.
  • Next, if not fixed, slide either downward or upward on the phone’s screen to see if turning either on or off the Sensors Off option fixes the problem.

Solution 4: Update the Phone’s OS

Update the Phone's OS

The device’s operating system update may help you in this circumstance to resolve this issue or any other closely connected associated problems. To execute this solution to fix the issue, all you need to do is to follow the instructions that we have provided below –

  • Open the System by using the Settings application on the phone.
  • Select the Software Update from the About Phone menu.
  • After doing so, check for the Updates. Then, download and install each and every Operating System update that is readily available for the phone.
  • Finally, start your smartphone immediately after that.

After following all the mentioned steps, open up the camera and immediately check whether the pop-up message “security policy prevents use of camera” issue has been finally removed or not. 

Solution 5: Uninstall the Third-Party Applications

This is one more brilliant solution to fix the “security policy prevents the use of camera” issue that is currently appearing on your smartphone. If a third-party application has been installed on your smartphone, the camera may exhibit this malfunction or even other problems too though. Therefore, in this case, you may remove the security policy that forbids the usage of the camera by completely eliminating any incompatible third-party applications from your device. 

To apply this solution, just follow the step-by-step instructions that we have provided below –

  • Locate the Settings application on your phone.
  • On the menu, choose Applications and Notifications.
  • Go to the See all applications option.
  • Choose the application you would like to delete.
  • Next to that, choose Disable or Uninstall.

Solution 6: Turn Off the Secure Wi-Fi Features Camera App

You might not be aware that if the Camera app is set up to utilize secure Wi-Fi, the camera on your smartphone may not open and the pop-up message “security policy restricts use of camera” or another warning message may show up on the screen. 

Thus, to turn off or disable the camera application from the secure wifi feature, you need to follow the instructions:

  • Open the Connections from the Settings menu on the phone.
  • Go ahead and press Advanced after choosing the Wi-Fi connection.
  • Open Secure Wi-Fi and then click on the  Apps.
  • Uncheck all applications connected to the camera or related to the camera, and then restart your phone.

Solution 7: Factory Reset your Smartphone

Factory Reset on your Smartphone

This is the last solution in our list of solutions to get the pop-up message issue “security policy prevents use of camera” completely resolved. If none of the above solutions in the list worked for you, try this solution. It will really make you get rid of the issue and make you free to use your camera to capture your happy moments with no further trouble. Moreover, this solution can help you resolve any Android issues from Security patches to Android Auto not working problems.

Note: Remember to make a backup of any highly essential photographs, feature films, personal conversations, as well as other essential items collected and stored on your smartphone before proceeding with this sort of approach.

  • Access Backup & Reset, and enter Settings on the phone.
  • Open the Reset Device and choose Factory Data Reset.
  • To reset the device, touch the Erase Everything button now and wait until it’s finished.
  • Now, create a second Gmail account on a computer that is not connected to the existing email ID if the problem continues after the factory reset.
  • Reset the phone to factory settings once more, and then, as you set up the device, check to see if the camera problem has been fixed using the new Gmail ID you generated.

Frequently Asked Questions 

Q1: Why does the security policy restrict use of the camera in my camera app?

Ans: If the camera application, phone app, or security device’s cache and data are prone to corruption, this could be the cause of the camera’s security policy issue; hence effectively removing those items may very well correct the problem.

Q2: How can you resolve the “security policy prevents use of camera” issue from your smartphone?

Ans: 

  • Reboot your Android Phone
  • Remove All Data  And Cache From The Camera Application
  • Camera in Safe Mode
  • Update the Phone’s OS
  • Uninstall the Third-Party Applications
  • Turn Off the Secure Wi-Fi Features Camera App
  • Factory Reset on your Smartphone

Q3: How can You give someone access to my camera?

Ans: 

  • Go to the home screen of your Android device and launch the Settings app.
  • Select Apps & Notifications.
  • Select the icon for the web browser you were previously using by tapping it (in this case, Google Chrome).
  • Select Permissions.
  • Turn on the camera permissions. 

Q4: Why are my microphone and camera being blocked by Chrome?

Ans: It is indeed probable that you haven’t granted your browser the ability to access your cameras and microphones. If you can’t just switch off your microphone or camera, you will see a red cross adjacent to those icons in your bottom navigation toolbar.

The Bottom Line 

We understand that encountering the “security policy prevents use of camera” issue when you launch your phone’s camera is really very irritating. Therefore, we have provided the best solutions in this article. Do not thereby choose any random solution for fixing the issue as that solution might not fix or that might be the reason. Try each and every solution from the first to the last until you see that the issue has been totally removed from your device. If you still have any confusion or if you still cannot get rid of the issue, reach back to us directly for instant solutions. 

snapchat won't open

Have you also opened up Snapchat only to experience complete and utter frustration? Everything seems to be working just fine while your phone is closed, but as soon as you hit the app, nothing happens and Snapchat won’t open or just keeps crashing. Panic starts to set in, as memories of all those pictures you took this morning that probably should never resurface again start coming back. You tried everything from switching off and on our phones to reinstalling the app but nothing seemed to work. 

Well, Snapchat has become an integral part of our lives; a place to document and share special moments. But when it stops working suddenly, it can be really disheartening. It doesn’t have to be so bleak, however — with a few simple fixes listed below, your snap sessions can be up and running again in no time! 

Why Snapchat Won’t Open | 5 Reasons

From slow internet connections to outdated versions, there are a few common reasons why won’t Snapchat open or freeze or not launch at all.  

1. Poor Internet Connection 

One of the most common reasons people run into difficulty with their Snapchat app is because of poor internet connection. A slow Wi-Fi connection or an unreliable cellular signal can both cause problems when trying to launch the app and access its features. 

2. Outdated Version of the App 

Another common issue with apps like Snapchat is that it may not be updated to the latest version available in the App Store or Google Play Store. This can cause your app to run slowly or even crash completely when you try to launch it.  

3. Low Storage Space 

Low storage space on your device can also lead to problems with opening and running apps like Snapchat. 

4. Corrupted Data/Cache Files 

Sometimes corrupted data files or cache files can also prevent an app from loading properly on your device as well. 

5. Unsupported Device 

If you are using an older model phone that isn’t supported by the latest version of Snapchat (or any other app for that matter), then it won’t load properly either due to compatibility issues between the two products. Hence, you could experience Snapchat wont open issues.

6. Too Much Data Usage

If you have been using too much data while using other apps or browsing online, then this could cause issues with opening up Snapchat as well! To check the data usage for this month, go into Settings > Data Usage and take a look at the data usage (and by which apps). If necessary, consider reducing background data usage for certain apps or limiting yourself from browsing online while connected to WiFi networks until the next billing cycle starts anew!  

7. Outdated Phone 

Before you check solutions for why wont Snapchat open repeatedly, check if your phone is outdated, If yes, it might not be able to support the latest version of the Snapchat app. This is especially true for older Android models running operating systems before a certain version. To find out which operating system your phone is running, go to Settings > About Phone > Android Version. You can even check the version of your model in iOS as well.   

Fixing Snapchat Won’t Open Issues with the Best Methods

Fixing Snapchat Won’t Open Issue with Best Methods

1. Check if Snapchat’s Servers are Down

Before attempting to fix the issue of Snapchat not opening for you, you should take the time to determine if this is a server-side issue. The easiest way to do this is to visit the @snapchatsupport Twitter page and see if they’ve mentioned any outages or technical problems. This will help save time as it can be very frustrating to try and troubleshoot a problem that’s due to an external source, rather than something you’ve done yourself. That being said, if there are no reports on the account, then you can proceed with diagnosing and fixing your individual problem.

2. Close Other Applications

By closing other apps running in the background, you can reduce the amount of system resources and memory being used, leaving more available for Snapchat. You’ll need to access your phone’s app switcher to do this – usually done by a double-tap of the home button – then simply swipe away any running applications. While this might only provide a temporary fix, it can help improve your overall device performance and reliability for in-app experiences like Snapchat.

3. Restart Snapchat 

Restarting Snapchat can often troubleshoot many issues, as a simple reboot of the application is sometimes all that’s needed to get things running again. Users have reported, however, that in certain cases a bug may be causing the issue and preventing it from opening, so giving the app a quick restart should be your first course of action in trying to solve this problem. If you find that simply restarting the app doesn’t do the trick, then move on to more involved diagnostics and repair methods.

4. Force Close Snapchat

Force Close Snapchat

Sometimes an app that won’t open or is freezing can be easily resolved by force closing the application. To force close Snapchat, there are different instructions depending on the device you’re using.

  • On iOS devices such as iPhones, force closing is done by swiping up from the bottom of the screen or double-clicking the home button to pull up the App Switcher. You must then swipe up on Snapchat to close it out.
  • In Android devices, you would go to Settings > Apps & notifications > App info (See All Apps) and click on Snapchat in order to close it out. Once you’ve force closed the application and restarted it, your issue should be fixed and you can return to using Snapchat normally.  

5. Check for Updates

If you are experiencing the Snapchat app won’t open issue, one of the first steps would be to check for updates. Keeping your apps up-to-date is essential for effective functioning; outdated versions may be causing your issues. Many times, by simply updating the app, you’ll have a running and functional performance without having to jump through more complex hoops.

Check for app updates on Android:
  • Click on the Google Play Store.
  • Tap on Snapchat.
  • If an update is available, all you need to do is tap it and you will be automatically upgraded to the newest version of the app! 

This ensures that you always have access to the latest features and bug fixes your apps may have included with their latest release. So make sure to check back as often as possible!

6. Check Permission Settings

In most cases, the issue can be solved simply by changing your permissions settings. On Android devices and iPhones, go to your device’s settings and search for ‘Snapchat’. This should bring up all related app permissions, such as access to photos, camera, etc. Check these off if they’re not already enabled, then try opening Snapchat again – more often than not this should solve the problem. Make sure if any of these were disabled before that you only use trusted sources when re-enabling those permissions so that your data is safe.

7. Clear Cache

Clear Cache

Clearing your cache may be the best way to fix an issue where the application won’t open issues arises be it for Snapchat or for Android Auto not working & others. 

Steps to do this on Android –

First, open the Snapchat app and select ‘Info’ from the menu. Scroll down to ‘Storage’, which will then give you a few options – one of which being ‘Clear Cache’. Click on this and it will then clear all stored data, making sure that your application is working correctly. 

On iPhone –

First, open the Snapchat app on your device and select your profile picture in the top left corner. Next, tap on the gear icon to access the Settings menu. Scroll down until you find Account Actions. Then select Clear Cache and confirm to complete the process. 

8. Make sure you have an Internet Connection 

If you run into issues while trying to open and use Snapchat, one of the first things you should check is whether your device has an internet connection. Without an internet connection, it can be impossible to access any online service or feature! Make sure your device is connected to a Wi-Fi network or that you have enabled mobile data services so your device will be able to communicate with the web. If all else fails, restart your internet modem and router. This simple step can oftentimes fix the issue! After verifying that you have a strong internet connection, try launching Snapchat once again – if all goes well, you should be able to start using it!

9. Reinstall App

Reinstall App

If Snapchat won’t open no matter what you do, the best solution is to reinstall it. You’ll have to delete it before you can install it again. The process is slightly different depending on your device: 

If you have an iPhone – 
  • Simply press and hold the home screen app or any app icon until all your apps start tilting.
  • Tap ‘Remove App’ and confirm the deletion. Subsequently, go to the Apple App Store and search for Snapchat. Once you’ve identified it selects ‘Install’ to reinstall the app. 
For Android

Android users just need to long-press the app icon until some command options pop up. From there, select  Uninstall. Head over to the app store of your choice and download the latest version of Snapchat. That should have it running smoothly in no time!

10. Restart the Mobile

If you’re having trouble getting Snapchat to open on your mobile, a restart is often the quickest and simplest way to get it running again. To make sure that restarting your device is performed correctly, start by ensuring that no apps are running in the background or any files are being downloaded; then turn off the Wi-Fi connection, if applicable.

  • Afterward, turn off your phone by pressing the power button. Some devices may require you to hold the button down for several seconds and swipe the option that comes on the screen.
  • Once you’ve done that, wait 10-15 seconds before turning it back on again.
  • Finally, connect to Wi-Fi and sign into Snapchat as usual with your credentials. Restarting your device should restore its connection with social networks like Snapchat and should resolve any issues you’re having with being unable to open it successfully.

11. Log Out and Log Back In

Log Out and Log Back In

If you’ve tried restarting your device and still have not had any luck getting Snapchat to open, then the next thing to do is log out and log back in. To accomplish this, open the Snapchat app. Then select the gear icon located in the top right corner of the screen. From there select Log Out and give it some time to fully disconnect your account from all other devices. Once you have logged out, close the app completely before reopening it again. Finally, log back into your account using your ID and password information.

Upon successfully logging in, your snaps should start loading again on their own – if they do not load automatically, simply refresh your feed manually until each entry appears on the screen.

Some Last Words

With Snapchat being an integral part of daily communication, it is essential to get any issues resolved as quickly as possible. Thankfully, by following any one of the 11 solutions above, you can quickly and easily get your Snapchat working again. Each solution is simple, efficient and worth trying as a potential fix. If one doesn’t work, simply move on to another one without a sense of discouragement. So take some time to test out these solutions, find which one works best for you and get ready for an uninterrupted Snapchat experience!

FAQs

Q1. What to do when Snapchat won’t open Frequently?

The Snapchat wont open issue could be because the device you are using isn’t compatible with Snapchat, due to cache, outdated apps, or because your internet connection is weak or unreliable. If you are having this problem, try these steps: 

  • Make sure your device is compatible with Snapchat. Check the App Store or Google Play for compatibility requirements. 
  • Check that your internet connection is strong and reliable (restarting your router may help). 
  • Try deleting and reinstalling the app if all else fails. 

If you have tried all of the above steps but are still facing the Snapchat app not opening issue, then there might be another issue at play. It could be due to an issue on their end. There are often server-side issues that can cause apps like Snapchat to not work correctly. If this happens, then all you can do is wait for them to fix it. In the meantime, you might want to check out some other social media apps in the meantime! 

Q2. My Snapchat won’t open after I Update It? 

It is possible that there may be a bug in the new version of Snapchat that prevents it from working properly on certain devices. To fix this issue –

  • Try uninstalling/reinstalling the app on your device. This should solve any compatibility problems between the app and your device’s specific software/hardware configuration.
  • Additionally, if you are using an older device such as an iPhone 5s or lower, these devices may not have enough processing power to run newer versions of apps like Snapchat. In this case, try updating your device’s operating system (iOS for iPhones and Android for Android phones) if possible to see if that fixes the problem. 
  • Lastly, make sure you have access to Wi-Fi when installing/updating apps. Downloading them over cellular data can often lead to errors and corrupted files. It prevents them from working properly on your device.  

Q3. Snapchat App Not Opening Even After Performing Solutions? 

If all else fails and none of the methods seem to work for you, then it’s time to contact customer support directly via their website or through social media channels like Twitter & Facebook so they can better assist you with troubleshooting this issue further!

Make sure that when contacting support staff members include detailed information about what has been done already in an effort to resolve this issue (including screenshots) as well as any other pertinent info such as what device & OS version are currently being used etcetera. This will ensure that they can provide more tailored assistance based on each user’s specific situation rather than generic advice which may not actually apply in every case.  

Youtube To MP3 Converter

When it comes to selecting the best from a thousand choices, then one is more likely to get confused. The same is the case with the Youtube to MP3 converter. Youtube is the broadly used social media platform where people create content, and a lot consume that. However, enjoying it throughout the day is a bit hassling. It comes with certain limitations, such as you can not use it in the background and stable internet to avoid buffering. Thus, we need yt to MP3 converter to avoid latency and save time. With this article, we will be guiding you with the top 10 picks of the best Youtube to MP3 converter and everything that you need to know. Keep reading further for seamless music and podcasts.

Youtube To MP3 Converter

How to Use MP3 Converters?

Using MP3 converters is a pretty easy process that anyone can do from their level of comfort. To do so, you will just need to have enough storage space and a stable internet connection. There are many converters available on the internet to convert Youtube videos to MP3 or convert your own video to MP3. It depends on you what software you choose to complete the downloading process. Although we have listed our top picks of MP3 converts in the following section of the blog. Here let’s check what steps you need to perform to get entertainment from MP3.

  1. Go to the official website of whatever software you want to use.
  2. Now, you can locate a typing bar where you need to paste the line of your video.
  3. Press next to make a step further into the process.
  4. Select what type of quality and file you need. Select that.
  5. Click download to get the desired file.

You can check your downloads to locate the downloaded file. However, you can move this file from this location to wherever you want it to be.

Benefits of Youtube to MP3 Conversion Tools

No doubt! Youtube is a worldwide platform that facilitates everyone’s needs at every time. It always has something for everyone. However, using Youtube is quite easier, but the downloading option is not there, and anyone can never surf on Youtube all the time without a constant wifi connection for it. Thus, let’s check all the benefits of using MP3 converters.

  • Provides Youtube users with a more satisfying experience: If you have used Youtube before, you must know that you can not use Youtube music videos in the background of any task. Thus, downloading audio will help you to have a more delightful experience.
  • Saves time: It can save you time as you won’t need to wait for ads and buffering of slow internet. Thus, you can enjoy any of your favorite podcasts and music without playing them online and wasting your internet. Moreover, you can avoid buffering as well.
  • Saves space on your device: If you download videos from Youtube, then you must be facing a lack of storage space after having some videos. Contrarily, if you download an MP3 on your device, then it won’t ask for much space. This way, you can stop your system from having issues that a system faces when the storage space is full.
  • No limits to downloads: You can download unlimited  MP3 files without any restrictions from Youtube. Moreover, you can have thousands of MP3 files on your devices without even compromising much with the storage space of the device.
  • Original sound quality: The sound quality you will come across after completing the download is unmatchable. However, MP3 is a format that is available worldwide.
  • Allow users to enjoy audio anywhere and anytime: If you have MP3 prior saved on your device, then you can enjoy your music and podcasts anytime, anywhere, without even worrying about the internet and its speed. 

Youtube To MP3 Converter — Top 10

If you are stuck in choosing the converter, then don’t worry, as this section is specially designed for you. In this section, we are going to look at the top 10 converters of the year. This way, you can simply choose the best and most suitable converter for yourself. So without further ado, let’s get started with it. 

1. VideoProc Converter: Our First Choice 

VideoProc Converter

An ultimate solution to convert Youtube to MP3 is right there at your service. Why are we saying this? Too simple, as this comes with a bunch of benefits and features. You can download any MP3 from there, no matter where the video is available. It can convert your Youtube video, Facebook videos, and twitch videos to MP3. Not only limited to downloads but to compressing and editing as well with highest of the quality. There are various other aspects too that you must look at. 

Pros
  • Easy User interface and 47x real-time fast download.
  • You can download from 1000+ online sites.
  • Comes with  level-3 GPU acceleration.
  • Provides you with 370 input codecs.
  • Gives you more than 420 output formats.
  • In-built features like editing, recording, converting, and downloading.
Cons
  • The only con to this is, It is only limited to the system. No mobile version is available for VideoProc Converter. 

2. YTMP3

YTMP3

Another ultimate solution to your need is here. This tool is very easy to use, and you can download your MP3 videos in no time. Its speed is the only pro for why we have put it on the second in our list.  If you love fast pace, then this will definitely suit your needs. Its easy formatting and sufficient file sizes make it much more convenient to use. Well, let’s look more into it by diving into its pros and cons.

Pros
  • Real-time fast download
  • Reliable and efficient
  • Easy user interface 
Cons
  • Ads are pretty frustrating and can delay the downloads as well.
  • No batch download format.

3. 4K Download MP3 Converter

4K Download MP3 Converter

Next is a 4k download MP3 converter in the list, which provides you with reliable and efficient options. It comes with a number of features from which you can benefit. This software supports a ton of websites, such as Youtube, Vimeo, VEVO, and Soundcloud. However, it provides you with high-quality downloads, and also you can download any file with a drag-and-drop process. Thus, one must try this. Here we are providing more about it with its pros and cons.

Pros
  • Easy downloading process. 
  • Professional application 
  • Quality downloads
  • In-built playing option for your downloads.
  • Supports many different downloading formats.
  • The feature of ‘smart mode’ allows you to download any file precisely.
Cons
  • You will have to download the software separately. If you are looking to download many options, then this software will be worth downloading.

4. Free Youtube Download

Free Youtube Download

Here we have another ultimate source for Youtube to MP3 convert downloads. This software is quite easy to use and comes with various built-in features. It’s a great software for those who want to download a lot of files on the go. The ultimate con of using this website is that you can not use this website content longer than 3 minutes. However, if your video is shorter than that, you must go with this. Let’s check its pros and cons to get more insight into it.

Pros
  • Sleek and simple design.
  • You can choose the quality and format of your downloads
  • Downloads can be queued.
Cons
  • You can download videos only from Youtube.
  • You won’t be able to download a video for more than 3 minutes. 

5. Wondershare UniConverter

Wondershare UniConverter

The most reliable and efficient option to convert Youtube to Mp3 from our list is here. Wondershare UniConverter helps you to download in thousands of formats with tons of supporting websites. In this fast-paced world, everyone loves to do things within the time saver mode. Similarly, this software is going to save you a lot of time. If you work with codecs and different formats, then this would be the best fit for you. However, you can use this software for editing purposes as well. Let’s sum up this software with its pros and cons.

Pros
  • Easy user interface and sleek design.
  • Fast and speedy downloads.
  • In-built editing features.
  • 1000+ supported formats.
  • You can access any website.
Cons
  • The only pros, there are limitations with free versions, but the paid one will provide you with all the access.

6. Converto

Converto, yt to mp3 converter

Converto is a web-based MP3 converter that can help you to download any MP3 in real-time, and you can download it within a few clicks. This web-based website is very straightforward; you just need to paste the link and click enter to download the MP3. Thus, you can download any music in any format. However, If you are a new bee in this field, then it can be a very good start for you. Let’s have a deeper insight into it with its pros and cons.

Pros
  • No ads pop-ups filled in the interface.
  • Fast and online downloads.
  • The design is simple and sleek.
Cons
  • Features are limited because of their simple structure.

7. 320 Youtube

320 Youtube

320 Youtube is one of the most reliable and fast-paced downloading software for yt to MP3 converter. You can download your MP3 with 320 kbps downloading speed. However, the downloading process is pretty easy and fast, so you can download your MP3 in no time. You may find the interface a hotchpotch first with an unpleasant welcoming interface, but eventually, you will find it fine. Let’s see its pros and cons.

Pros
  • Simply converts MP3 with full efficiency.
  • Easy downloading process: You just need to write 320 before the link on Youtube and paste it in the typing bar, and the downloading will start and complete in no time.
Cons
  • Unpleasant user interface.

8. Y2mate 

Y2mate, best youtube to mp3 converter

Y2mate is another helping hand that can help you to download MP3. One of the best Youtube to MP3 converter on our list is here. It is another utterly web-based converter that can download any MP3 in no time and without even compromising the quality. The best part of using this software is that it will not spam you with ads. However, downloading from this can be a bit tricky as it will need some keywords to find the video. Let’s look more at its pros and cons.

Pros
  • Popular audio formats are available.
  • No pre-registration is required. 
  • Works on every browser.
Cons
  • Not much preferable for android users.
  • Only works with Youtube.

9. Ontiva

Ontiva

You can simply convert Youtube to MP3 with Ontiva without much hassle. This is a web-based converter that you can use for free. Ontiva is an excellent option for fast downloads as you won’t need to do any pre-registrations. As it is a web browser so you will not need to download any other software. Because of its anonymous downloading process, it is safe to use. However, it supports various formats.  Let’s look at more of its pros and cons.

Pros
  • Ontiva is free to access and use.
  • You can download unlimited files.
  • Easy to use interface and overall design.
  • Supports all the popular formats. 
Cons
  • Only limited to Youtube converts.

10. MP3 Download

MP3 Download, youtube to mp3 converter

Last but not least & one of the most worthwhile converters on the list. MP3 Download is added to the list because of its great features. This converter comes with a classic design and a simple user interface. A user can simply get into it without any guidance. Moreover, it has a search option as well, which other websites lack. In addition, it has the feature of playing the file you are going to download to ensure the quality and your liking. Let’s check more of its pros and cons further.

Pros 
  • It is easy to use.
  • Users can access all the features on a single screen.
  • Comes with search features as well.
  • Convert in a number of formats within a single click.
Cons
  • The only con to this converter is that it is only limited to MP3 downloads. You can not download any content in a video format.

Is it Safe To Use MP3 Converters?

MP3 converters are a great way to convert your audio files into the popular MP3 format. But is it safe to use them? Here, we’ll take a look at the safety of MP3 converters and how you can ensure that your data is secure and protected when using them. 

The Pros of Using an MP3 Converter 

MP3s are one of the most popular file formats out there, so it makes sense that you would want to convert your audio files into this format. Not only is it widely used, but it also offers excellent sound quality for its size. Plus, with an MP3 converter, you don’t have to worry about compatibility issues between different types of media players – all you need to do is upload your file and let the converter do its job. 

The Cons of Using a Youtube to MP3 Converter —

One potential downside of using an MP3 converter is that they often require you to upload your audio file in order to convert it. This means that if you’re not careful, you could be sending your private information or copyrighted material to a third-party website without knowing it. Additionally, some converters may contain malware or other malicious software that could harm your computer or device if downloaded. 

How To Stay Secure When Using An MP3 Converter?

If you decide to use an MP3 converter, there are a few steps you should take in order to stay secure: 

  • First and foremost, make sure that the site or application is legitimate and trustworthy by researching reviews from other users. 
  • Additionally, you should always read the terms and conditions before uploading any files – this will help ensure that your private information isn’t being shared with third parties without your knowledge or consent. 
  • Finally, make sure that any converters you’re using are up-to-date with the latest security updates as these can help protect against hackers, malware attacks, and other cyber threats. 
Read More: THE TOP SOLUTIONS TO FIX DISNEY PLUS ERROR CODE 14

Frequently Asked Question

Q1. What is the best Youtube to MP3 converter?

There are a number of converters online. We have provided you with the list of the top 10 picks. However, the best, in our opinion, is VideoProc Converter; it comes with a number of features and benefits.

Q2. How to convert Youtube to MP3

If you have chosen a trusted converter from our list, then it will be easier for you to convert. After selecting the one for you, Copy the link of the Youtube video that you want to convert; now paste it into the typing bar coming in the interface of the converter. Click enter to download.

Q3. Is it illegal to download videos from Youtube for personal use?

No, downloading videos from any third-party converting site is legal till the time you are using it for your personal use. However, you must not download it and post it on your media handles. Then, it can go illegal. 

Q4. When you convert Youtube videos to MP3, do they lose sound quality?

No, if you convert your video with a trusted converter, then there is no chance of losing the quality of the audio. For selecting a trusted converter, you can check the above list and select any one converter. 

Conclusion

We covered almost everything about Youtube to MP3 converters. However, we have provided you with the list of the top 10 MP3 converts. You can use any one of them to download your MP3 files, but you must not forget to be cautious while using any of the software. You must read all the precautionary measures to prevent any kind of further hassles. Moreover, if you have any questions or suggestions in your head, then feel free to connect with us anytime.

disney plus error code 14

Disney Plus is a streaming service that provides a diverse selection of movies, television series, and documentaries. It is a popular service among consumers, although it, like any other streaming service, may sometimes have technical difficulties. One such problem is the “Disney Plus Error Code 14” error message, which might occur while attempting to access Disney Plus material. This error often comes off with a notice informing the user that the material is presently unavailable and that they should try again later.

Numerous factors, such as server problems, network connection problems, or even problems with the user’s hardware and account access owing to incorrect password submissions, might be to blame for this message.

If you encounter such a problem and are seeking cures and solutions as to how to eliminate it, you have come to the right spot. We will explain how you may reset the course correction for the error code 14 Disney Plus on your streaming services.

disney plus error code 14

What is Error Code 14 that Displays on Your Disney Plus?

Error Code 14 is an error notice that displays while attempting to access Disney Plus content. It typically indicates that the material is temporarily unavailable and that the user should try again later. This error may occur due to a number of factors, including server faults, network connection issues, or problems with the user’s device and login credentials input. It is crucial to remember that Disney Plus Error Code 14 is a rare occurrence that does not affect all Disney Plus subscribers. If you run across this mistake, there are a few measures you may do to attempt to fix it.

Depending on the device you’re using, the Error Code 14 notification might take many variants. Here are a few examples:

“Error Code 14: Unable to connect to Disney+”

“Disney+ Error Code 14: Unable to play title”

“Disney+ Error 14: Unable to access content”

It is crucial to remember that the message you see will differ based on your device and the content and program you are attempting to access. The reason and possible treatments for Error Code 14 are largely the same regardless of the particular message.

What Causes Disney Plus Error Code 14 that impacts the Streaming?

There are several potential causes for the Disney+ error code 14. Some common causes include:

  • Server issues: To distribute material to consumers, Disney Plus depends on a network of servers. If these servers are having problems or are offline for maintenance, an Error notice may appear.
  • Network connectivity problems: If your internet connection is down or your device is unable to connect to the Disney Plus servers, the Error notice may display.
  • Device issues: The Error message may display in certain situations owing to problems with the device you are using to access Disney Plus. This might be due to a software or hardware issue with the device.
  • Regional restrictions: Due to licensing constraints, certain Disney Plus content may be unavailable in some locations. You may see an Error Message Code 14 warning if you attempt to view this material from a restricted location.
  • Credentials issues: When you input the credentials while signing up, it shows Disney plus error code 14. This might occur as a result of incorrectly entered login credentials via one of the devices you are attempting to access. Because Disney Plus permits numerous accesses from various devices, you have surpassed the allowable number of devices, and one of your devices has incorrectly inputted passwords/emails.

You should remember that the particular reason for the Error Code 14 message might vary and is not limited to the reasons mentioned above. In certain circumstances, the reason might be a mix of factors or a particular problem with your device or account; and on most occasions, the credential issues impose restrictions on your access.

How to Fix Disney Plus Error Code 14?

How to Fix Disney Plus Error Code 14?

Please note that the following instructions may differ based on your device and the nature of the fault you are encountering. However, these methods are quite useful and, in general, they represent the first level of troubleshooting processes to resolve the problems of Disney+ error code 14:

Check Server Issues and your Network Connection

Server issue is a major problem when you encounter issues like amazon app cs11 error, Disney plus error 14, etc. Check first whether there is a server problem on the company’s end. If this is the case, you will need to wait for the server to resume properly. You must check the email for updates, or you may confirm with the support staff.

Also, ensure that your device is linked to a reliable and robust Wi-Fi network; otherwise, you may suffer inconsistent streaming.

Check Device Performance

Occasionally, poor streaming functionality on your device may be caused by device synchronization difficulties. Therefore, it is preferable to switch the device to see if it is running well on a different device. Apart from this, there may be difficulties with the installed apps on this device. Therefore, you may do simple troubleshooting procedures such as turning off and then on your device. Then, shut the app and relaunch it to see if the fault remains or still the Disney plus error code 14 appears. If the issue continues, it is

Imperative that you replace the device.

Clear the App’s Cache

On some devices, you can do this by going to the device’s settings menu and, selecting the app, then selecting “clear cache.” However, the general steps are:

  • Close the Disney Plus app on your device.·        
  • Go to your device’s settings menu.    
  • Navigate to the “Apps” or “Applications” section. This may be located in a different place, depending on your device.     
  • Find the Disney Plus app in the list of installed apps and select it.
  • Look for an option to clear the app’s cache. This may be called “Clear Cache” or something similar.   
  • Select the option to clear the cache. This will help you to fix error code 14 Disney plus in addition to other troubleshooting steps.

Fix Login and Credential Issues

Fix Login and Credential Issues

Before you may begin utilizing the streaming service, you must correctly activate your account. You must use the right email address, and you must verify your email address since Disney Plus often sends verification emails. You may verify the accuracy of your email address by logging into the Disney Plus website.

Sometimes, it is necessary to forcibly authorize all devices to log out of the app and then allow new devices to be authorized. Follow these instructions to force all devices to log out of the Disney Plus app:

  • Open the Disney Plus app on the device you want to use to log out of all devices.
  • Go to the “Settings” menu, which can usually be accessed from the main menu or by clicking on your profile icon.
  • Scroll down to the “Account” section and select “Sign Out of All Devices.”
  • You may be prompted to enter your Disney Plus account password to confirm the action.
  • Once you have entered your password, select “Sign Out” to confirm.
  • This should log you out of the Disney Plus app on all devices. 

Keep in mind that you will need to log in again on each device you want to use to access Disney Plus, and for this reason, you are following these steps to fix Disney plus error 14.

Additionally, you may reset the password at times. One of your devices is not syncing with the password; thus, you must reset the password so that all of your devices have the same one. Therefore, use the following procedures:

  • Go to the Disney Plus website and select “Sign In” in the top right corner of the page.
  • Click on the “Forgot Your Password?”
  • Enter the email address associated with your Disney Plus account and select “Continue.”
  • You will receive an email with instructions on how to reset your password. Follow the instructions in the email to reset your password.

Alternatively, you can also try resetting your password through the Disney Plus app on your device. To do this:

  • Open the Disney Plus app on your device.
  • Go to the “Settings” menu, which can usually be accessed from the main menu or by clicking on your profile icon.
  • Scroll down to the “Account” section and select “Sign In.”
  • Enter your email address and select “Continue.”
  • Select the “Forgot Your Password?” link.

You will receive an email with instructions on how to reset your password. Follow the instructions in the email to reset your password. This will certainly help you to fix Disney plus error 14.

Frequently Asked Questions

How do I fix error code 14 on Disney Plus?

You can follow the below-given steps to fix the Disney+ error message.:

  • Close the app and then reopen it to see if the error persists.
  • Shut down your device and then turn it back on again.
  • Make sure that your device is connected to a stable and strong Wi-Fi network.
  • A clear cache by going to the device’s settings menu and selecting the app, then selecting “clear cache.”
  • Make sure that you have the latest version.
  • Check the updates on the Disney Plus website or social media page.
  • Try using a different device.

Why do I keep getting error code on Disney Plus?

There are a number of possible reasons why you may be experiencing Disney plus error code 14. Some common causes of errors on streaming services include:

  • Internet connectivity issues: If your device is not connected to a stable and strong Wi-Fi network, you may experience errors while streaming.
  • App or device issues: There may be a problem with the Disney Plus app itself or with your device’s compatibility with the app.
  • Server issues: Sometimes, errors can be caused by problems on the streaming service’s end, such as server outages or maintenance.
  • Credential and login issue: You may be entering the wrong credentials (or any one of the devices).

Why do I keep getting error code on Disney Plus?

If you have tried the general troubleshooting steps available online or the ones we provided above and are still experiencing error code 14 Disney plus, it may be helpful to contact Disney Plus customer support for further assistance. The customer support team may be able to provide additional troubleshooting steps or help you resolve the error.

Conclusion

As you can see, these are the generic yet efficient troubleshooting techniques for Disney plus error code 14. If you follow the procedures outlined above and do your own study, you can promptly and flawlessly resolve the error code issue. If the issue continues, you may ultimately contact the customer care staff.

Finally, it is essential to verify that no firewalls are preventing access to Disney+; this will guarantee that there is no interference with the app’s compatibility on the device. Therefore, identify the underlying cause and rectify the difficulties appropriately.

android auto not working

In the contemporary world, millions of individuals pretty much daily use Android Auto all around the world. Also, many of you were also not aware of it. This is due to the fact that Android Auto makes it much simpler to carry out mobile tasks by allowing you to complete nearly all of them directly on the dashboard of your car, almost as if they were one system. Examples include having your favorite music, GPS, and other programs running there. Even though this is really pretty fascinating and incredibly helpful, users occasionally encounter “android auto not working” potential problem notifications. What usually causes this error to actually happen? Are you a user who is presently encountering just the same potential problem? If so, you do not need to worry.

With us, you will come to know what android auto is (if you are not aware of it) and along with that we have provided multiple solutions that you can use to fix the “android auto keeps disconnecting” issue. So, do not wait anymore; start reading further.

An Overview on Android Auto

android auto keeps disconnecting

Android Auto is a specific type of smartphone application. The most well-known Google is the company that created this program. This application was launched for the public in the year June 25, 2014. This program promises to display features and functionality from an Android device, for instance, a smartphone, on the information and multimedia head unit on the dashboard of a vehicle. 

Once an Android smartphone is commonly associated with the car’s head unit, the system may show some Android apps on display, including GPS mapping and guidance, playing music, Text messaging, calling, and Internet browsing. Both button-controlled and touchscreen head units are supported by the system. To eliminate reckless driving, hands-free operation via voice commands is a possibility and is strongly advised.

Reasons for The Error “Android Auto Not Working”

If you are a user of Android Auto and currently experiencing the error “ android auto keeps disconnecting” issue, you might be in a confusion about why this error occurred all of a sudden to you. However, you need not worry. We know that you are mostly not aware why this appeared. Well, we have researched the “android auto not working” issue and found out some possible reasons why it occurs. Knowing about the reasons for this issue is really very important. Therefore, take some time to know about the reasons which are provided below –

  • The poor or unstable connection between the vehicle as well as the mobile phone.
  • As a result of a completely corrupted or extremely outdated program.
  • Because of malfunctioning software or cached application data.
  • Android Auto is indeed not completely compatible either with a smartphone or a vehicle.
  • The Android Auto application has been seeking to connect to an incorrect car despite having been configured with several vehicles.

Resolve Error “Android Auto Not Working” | Top Solutions For You

Waiting for the solutions since the start of reading the article? Well, you need to wait any longer. In this section of the article, we will discuss with you the solutions for solving the issue that you are currently encountering. Each and every solution we have mentioned here is useful. Try all of it until you get to see that the error has gone off.

Solution 1: Reset Your Smart Device

This is the first and the easiest solution to getting rid of the “android auto disconnects” issue that is currently disturbing you. The time-tested solution could very well work for you. Restarting your device fixes any issues caused by any of these transient problems which interfere with the system. Essentially simply because it is the clearest and most straightforward solution for your problem, this should be at the top of your priority list. However, restarting your device is just something we highly recommend. 

You must press and hold the Power button on your Android phone in order to reboot the device. Once your device has properly rebooted, just choose the “Restart” option available there.

Solution 2: Update the Android Auto App

This is the second most essential and easiest solution to resolve the “android auto not working” issue. If you are using Google’s Android operating system, you might want to periodically check the PlayStore for updates. Maintaining updated is vital if you want your software to function at its best. Monitoring for program updates is crucial since outdated patches start to include bugs over time.

However, to update the Android Auto application, you need to follow the instructions we have mentioned below – 

  • First of all, on the phone, access the Menu of the Google Play Store.
    Update the Android Auto App
  • Click on My Apps & Games and then click the Installed tab.
  • Open Android Auto by moving the cursor down.
  • If an update is available, simply click the Update button now.

Solution 3: Validate the App’s Permissions and Notification Access

You can allow the permission required on the Android Auto application by following the below-mentioned instructions properly –

  • First of all, pull down the notification shade and choose the gear symbol in the Settings app on your smartphone.
  • Go to the Applications Manager.
  • Choose “Android Auto” and then “Permissions.”
  • Here, you must make sure that each option is turned on. But in case they aren’t, turn them on individually.
  • Click on the gear icon under the Apps menu, which is located in the top right corner, at this point.
  • Simply click on the “Special Access” option after scrolling down and finding it.
  • Make sure Android Auto is turned on by clicking on Notification Access and then clicking.

Solution 4: Remove the Android Auto App’s Cache and Data

This is another effective solution to get rid of the issue. Well, your device uses to cache data, which is data that has been temporarily stored, to process information more quickly. However, when cache memory becomes overloaded, it is crucial to clean it since it may create several issues and use a significant amount of RAM, interfering with too many functionalities. Hence, to clear the cache and the data from the Android Auto Application, you need to follow the instructions we have mentioned below –

  • First of all, select Application Manager from the Settings menu on the phone.
  • At this point, launch the Android Auto app and simply select Force Stop.
  • Following that, confirm closing the Android Auto app and opening Storage.
  • Once you have tapped the Clear Cache button, go ahead and see if the Android Auto problem has been fixed.If not, repeat the process of clearing the Android Auto’s cache and then press the Clear Data option.
  • Verify that you want to erase the Android Auto app’s data now.

Check to see whether the Android Audio keeps disconnecting problem has been completely addressed after completing all of these methods. If removed, then it is completely fine, and you do need to move forward to another solution on the list.

Solution 5: Reinstall Android Auto Application

To uninstall and reinstall the Android Auto app on your smartphone, carefully adhere to the instructions provided & fix the android auto not working error easily.

Reinstall Android Auto Application

  • On your Android device, navigate to Settings and select Apps or App Manager.
  • Click the Uninstall button after choosing Android Auto.
  • Complete the Android Auto App deletion, and then restart your phone.
  • Reinstall the Android Auto application program after restarting.

Solution 6: Turn off the Phone’s Wi-Fi Switching

Android Auto may well get disconnected or show some related error from the car’s unit if somehow the user’s phone is initially set up to be using Wi-Fi switching since it becomes stuck, allowing the passage from the servers as a direct result of the Wi-Fi switching. Therefore, give this method (turning off the phone’s wifi switch) a try so as to fix this issue quickly. 

  • Select Wi-Fi in Settings by opening the phone’s menu.
  • End up choosing Wi-Fi Preferences immediately, then deactivate Intelligently. Choose the strongest WiFi.
  • Examine whether the Android Auto keeps disconnecting problem has been resolved after that.
  • Alternatively, turn off the option to switch to mobile data. The Wi-Fi Preferences section is for when a wireless internet connection is slow.

Note: This solution works well for the iOs users and you can fix all the related errors like iMessage Needs to be Enabled to Send This Message, and Airplay not working on Samsung TV

Solution 7: Re-add Connected Cars Instead of Ignoring Them

Re-adding the forgotten linked automobiles to the list of possibilities is the last reasonable solution for the issue of “android auto not working”. Your smartphone’s Android Auto software enables you to forget about linked automobiles and break your connection with them. This will simply allow you to connect the phone with the vehicle’s head unit once more. 

Hence, to proceed with this useful solution, you will need to follow the steps:

  • Launch the Settings app and click the search icon.
  • Select the suggestion that appears after performing a search for Android Auto.
  • Hence, your current location is the Android Auto settings page. Select Previously linked vehicles by tapping on them.
  • Next to that, the top-right area of the screen’s three dots menus should indeed be carefully selected.
  • Select Forget all automobiles from the menu now.
  • Choose Connect an automobile from the previous menu by returning there. In order to attach your phone to a car’s head unit, adhere to the on-screen recommendations.

Frequently Asked Questions 

Q1: How Can I Make Android Auto Operate?

Ans: Simply install the Auto app from the Google Play Store on your phone to get Android Auto operating. Afterward, use the USB cord to connect to a vehicle. Make absolutely sure your automobile is in park before powering it on. In order for Android Auto to access the features and applications on your Android mobile device, you must first provide permission.

Q2: Can Android Auto be used without a USB?

Ans: Even though Android Auto can be operated without the need for a USB, the initial setup will still necessitate one. Your Android device may very well wirelessly connect to your preferred applications after being actually linked to your car through Bluetooth.

Q3: Do cars and phones both embrace Android Auto?

Ans: With the help of Android Auto, your phone may be used to control the entertainment system in your car. To effectively reduce fiddling with a smartphone while driving, it can reflect the phone’s screen onto the display screen in the car. This enables drivers to manage their phones using voice recognition or the touchscreen interface.

Q4: Can You upgrade to wireless Android Auto in my car?

Ans: It is indeed becoming more and more simple to add wireless Android Auto compatibility to your car if it doesn’t currently have it through aftermarket accessories. Using a USB dongle is the quickest method for upgrading a car that has already enabled the wired version of Android Auto to wireless Android Auto.

Q5: How can I stop Android Auto from running?

Ans: The interface in your car, which varies based on the model, is the easiest and quickest way to disable Android Auto. In most cases, turning off anything that is connected to your automobile, especially Android Auto, may well be accomplished by navigating to the Applications area of Settings.

Q6: How do Android Auto and Android mirroring vary from one another?

Ans: The full coverage unit display is within the app’s complete control while using MirrorLink, simply giving it the ability to display any information. Android Auto, in contrast, restricts the kind of apps that can be installed to those that simply play audio tracks, use text messaging, and also don’t take over the full screen.

The Bottom Line

Looking back at the last few years, understanding how to troubleshoot Android Auto not working errors has been an important skill for all Android users. Because of the complexity of some issues, many users turn to third-party resources and tools or tech experts to resolve their issues. While these solutions can be costly, they aren’t always necessary. The seven simple and easy solutions outlined in this article are practical and often effective ways to get your Android device running smoothly again in no time at all. With a bit of patience and trial-and-error, you can easily fix even the most stubborn Android Auto not working errors right from the comfort of your own home.

Amazon App CS11 Error

Millions of people in the world depend on Amazon to place their orders, and yet recently, many of them are running into technical issues with the app. Specifically, some shoppers have been troubleshooting an Amazon app CS11 error popping up when they try to use the application on their Android or iOS devices. It can be incredibly frustrating for any shopper to be stopped right before they are about to finish their purchase – has this ever happened to you? 

A feeling of frustration can comes with the “CS11” error code as it can prevent us from accessing the great deals available on Amazon!  Don’t worry, you don’t need to be a tech expert to fix this issue. We have compiled an easy-to-follow guide that will help you put this aggravating problem behind.  

Through easy step-by-step instructions and helpful advice, you will be able to quickly address this issue and get back to snagging those bargains faster than you can say “Amazon Prime”! So don’t give up when the cs11 error appears – just work through this guide and your app will soon be working like a charm!

What Causes the Amazon App CS11 Error?

Amazon App CS11 Error

Although this error can be frustrating, understanding what causes it and how to fix it can help prevent it from happening again in the future.  Here are four major causes that can lead to CS11 Error in Amazon app – 

Amazon Server Outages 

The first cause of the CS11 error Amazon app is that there could be an issue with Amazon’s server outages which are responsible for hosting the app and its content. If this is the case, then there is not much you can do other than wait for their team to address the issue or contact them directly for assistance. 

Outdated Amazon App 

Another common source of Amazon app CS11 error is that your version of the Amazon App might be outdated or incompatible with your device. This can happen if new updates have been released but you have not installed them yet. It could also mean that your device is running an older version of Android which may no longer support the latest version of the app. To fix this, make sure you are always running the latest version of both Android and the Amazon App to ensure compatibility and avoid any potential issues like this one. 

Corrupt Installation of The Amazon App 

Corrupt installation files are another potential cause for this error. This could happen if something went wrong during installation, such as a power outage or interrupted internet connection, which caused some of the files to become corrupted or damaged in some way. To solve this problem, uninstall and reinstall a fresh app from Google Play Store to replace any potentially corrupt files with clean ones. 

Restrictions from The Network Firewall 

Finally, another possible cause for the CS11 Error Amazon app is restrictions from your network firewall settings or any other security measures that may be blocking access to certain services on your device or network connection. To resolve this issue, check your firewall settings and make sure that all necessary ports are allowed access through your firewall in order for apps like Amazon to connect properly without any issues.  

9-Step Methods To Fix Amazon App CS11 Error iOS and Android

From basic methods to advanced ones, check out 9 solutions that can potentially fix the Amazon app CS11 error instantly:

  • Try A Different Device

If you are receiving an Amazon app CS11 error iOS or Android, one of the first steps to fix it is to try a different device. This could help rule out any hardware or software errors on your current device and may offer a different perspective on the issue. This can be especially helpful if the error occurs after an update is installed or another change was made to your device. 

In some cases, the Amazon error CS11 can be triggered by limitations on certain devices or because of compatibility issues. Trying out a new device can confirm that the issue lies with something other than the existing device, so it’s always worth considering before doing a more in-depth investigation into possible solutions.

  • Update the Amazon App

Update the Amazon App

Updating can help resolve Amazon app CS11 error iphone and Android along with other technical issues. If your app is lagging or if it’s not able to communicate with the Amazon servers, an update could be exactly what you need for a smoother experience. 

Head over to the Apple App Store or Google Play Store and look for any pending updates for the Amazon App. Tapping ‘Update’ should be enough to do the job. With the latest version of Amazon App on your device, you can expect a much more reliable user experience.

  • Force-Quit Then Relaunch the Amazon App

Besides CS11 error, if you are having any other trouble with your Amazon app such as lagging issues or connectivity problems, there is an easy fix: force-quit and relaunch the app.  

  • To force-quit, go to the home screen of your mobile device.
  • Tap and hold onto the amazon app icon for a few seconds until it starts shaking.
  • And lastly press the red minus sign. (On Android, simply hold the app for a few seconds and select uninstall from the options).

Once you relaunch, you should be able to use the App again with no trouble. All this takes only a few minutes – much faster than recalibrating your device or performing any other complicated technical operations. 

  • Correct Your Phone’s Date and Time

Correct Your Phone’s Date and Time

Verifying your device’s date and time settings can help to fix Amazon CS11 error iOS and Android along with some other minor errors.  

By going into the Settings app for both iOS and Android platforms, you can verify (or adjust) your device’s date and time from the System > Date & Time (Android) or General > Date & Time (iOS). 

You can disable the “Set Automatically” switch and enter the current day, date and time manually. Do not forget to re-enable it after fixing the error so that your Phone’s date stays up-to-date in real-time.  

  • Clear the Amazon App Cache

Clear the Amazon App Cache

Resetting the Amazon App cache is one of the proven methods to fix Amazon app CS11 error and you can also fix ESPN Error 1008. It involves deleting the temporary files of apps that are stored in your device’s storage. This process helps in clearing out the components, which prevent your app from running successfully.  

  • Android users can quickly clear their cached data through Settings > tap ‘Apps’ > ‘See all apps’ > select ‘Amazon’ > click ‘Storage & Cache’ > hit ‘Clear Cache’. 
  • iPhone users will need to uninstall and reinstall their Amazon app in order to reset the cache.  

When resetting is complete, try running the app again and check if it works. You can also use an ‘Android system cleaner’ or an ‘antivirus’, as they can identify problems that can cause this error and help in resolving them quickly and effectively.  

  • Update Your Phone’s System Software

Updating your phone’s system software is a great way to stay up-to-date with all of the newest features available. It can also be beneficial in resolving errors, such as the Amazon App cs11 error. Often this problem can arise due to outdated software, so updating your phone is key to its optimal performance. You may even find that after the update, some of your apps begin running faster or with fewer bugs than before! 

  • For iOS – Open Settings > click on General > hit Software Update.
  • For Android- Open Settings > tap System > Software Update.
  • Uninstall and Reinstall the Amazon App

Uninstalling and reinstalling the Amazon app is an effective solution for fixing the pesky Amazon app CS11 error on your device. The steps are: 

  • If you have an iOS device, simply long-press the Amazon icon, click on Remove > Delete App to uninstall it. To reinstall, go to the App Store and search for ‘Amazon.’ 
  • For Android users, hold and drag the Amazon app to the Trash icon. Then open up the Google Play Store and search for ‘Amazon shopping’ to reinstall. Now your Amazon app should work without any issues!
  • Restart Your Android or iPhone

One potential Amazon CS11 error fix is to restart the device –

  • On iOS devices, first open the Settings app and click on General and then Shutdown. Then, drag the Power icon to the right to turn off the device and wait for the screen to darken. Hold down the Power button again and release it after a few seconds, or until you see the Apple logo appear on screen.
  • For Android devices, hold down both the Power button (also the Volume Up button (on some devices), then click on Restart to reboot it. 
  • Reset Your Phone’s Network Settings

If you are experiencing issues with the Amazon app and suspect it may be related to your phone’s network settings, try resetting them. 

  • On an iPhone, open Settings app, choose General, and then navigate to Transfer or Reset iPhone > Reset > Reset Network Settings.  

Reset Your Phone’s Network Settings

  • On Android devices, the process is similar: open Settings, select System, click on Reset, and then select Reset Network Settings. 

It may take a few minutes for your device to reset these settings and reconnect to the internet, so please remain patient. Oftentimes when an app won’t work properly due to a device’s network configuration these steps will do the trick and get you back on track in no time!

Some Last Words

Amazon is one of the most popular and convenient shopping platforms out there, but that doesn’t mean it’s error-free. If you are seeing the Amazon app CS11 error code, don’t panic! 

We have studied this common error and found a variety of working solutions that are easy enough for anyone to understand. From simple steps like clearing your cache to advanced methods like resetting all settings, there is a solution for everyone. So take a deep breath, relax, and begin exploring our comprehensive list of tested techniques that can help get your Amazon experience back on track!

FAQs

Q1. Why does my Amazon account say CS11?

If your Amazon account has recently displayed the code CS11, then it’s likely due to an outdated app or network setting. It is therefore important to first check that your phone is compatible with the latest version of the app, as this could be the source of the issue. Additionally, it could be a result of undefined network settings on your device – out-of-date proxy settings can cause this problem, so if they are not properly configured they should be updated immediately. If you believe none of these issues are at hand, then it may be a problem more directly related to the actual app itself which may require further investigation in order to resolve.

Q2. How do I fix CS11 error on Amazon app?

There are some tried and tested methods that should help you resolve the issue:

  • First, make sure your Amazon app is up to date; if it isn’t, be sure to update it. 
  • Next, try force-quitting and relaunching the app. 
  • If that doesn’t work, check your phone’s date and time – ensuring they are set correctly might solve the problem. 
  • Resetting the cache of your Amazon app as well as updating your phone’s system software can also do wonders. 
  • If needed, try restarting or resetting your network settings on your Android or iPhone device. 
  • Finally, uninstall then reinstall the app itself. 

Q3. Why is Amazon giving me an error message?

It’s completely normal to experience an error message when shopping on Amazon, but the root cause isn’t always clear. These types of messages may come from a variety of causes like transient network outages, bugs within the Amazon app, or hardware problems with your mobile device. 

The best way to troubleshoot “Sorry, something went wrong” errors is to check your internet connection and then close and restart the Amazon application if you are still experiencing issues. Have patience—it often takes a few tries before you can get everything working again!

airplay not working on Samsung TV

The term “ Airplay” in today’s world is very popular among the users of Samsung Television. Owners of Samsung TVs may well broadcast a limitless amount of content into the TV directly and immediately from their device. But, is airplay not working on Samsung TV? Are you currently not able to ? 

Well, we understand that facing all this is really very frustrating. Hence, don’t lose hope. This issue is faced by many other users like you and is not a very uncommon issue. We have solutions with us so as to help you out in getting recovered from it.

Read with us and get the “Samsung TV not showing up on airplay” fixed. No more waiting, start reading.

airplay not working on Samsung TV

Possible Reasons For The Apple Airplay Not Working On Samsung TV

There might be various reasons why your “airplay unable to connect to Samsung TV”. We have already mentioned that this is not an uncommon issue and many along with you have faced the airplay not connecting to Samsung TV issue and have reported it. Hence, knowing what may be the causes might help you identify and know what may be the reasons. Let’s take a look at the possible reasons for this issue. 

  • No updates were made to the host device.
  • A bad connection to a network.
  • On the Samsung TV, the auto protection time function is enabled.
  • Airplay might be eventually turned off.
  • Incompatibility of Samsung TV with Airplay.

Fix “Airplay Not Working On Samsung TV” Issue (6 Solutions)

Feeling very frustrated due to the “ airplay not connecting to Samsung TV” issue? Well, we understand your problem. Don’t worry. We have researched many issues like Guided Access not working, iMessage enabled, and “Samsung TV airplay not working” is also one of our well-researched and we dug deep enough to resolve these issues. So, we have found out some very easy and simple solutions for you.

Solution 1: Reboot your Samsung Television

The first resolution on our list to fix the “Samsung Airplay Not Working” problem is, obviously, this one. Even though it might seem simple, rebooting the Samsung TV can resolve indeed many technical glitches and ongoing problems. The problem you are currently experiencing, “airplay not functioning on Samsung TV,” may also be resolved in conjunction with that. Moreover, a large number of those who were having this problem claimed that it was resolved when they used this simple and easy method.

The one and only thing you have to do is disconnect your Samsung TV, wait one full minute, and then just connect it back immediately. Press and hold the Television power switch button on the TV for 30 to 40 seconds while it’s disconnected. This can be done to turn off the TV’s remaining power and eventually cause a soft and smooth reset.

Reconnect the TV’s power and try AirPlay once again after waiting 50–60 seconds to check whether it actually works or not. Try again after restarting your Apple product if it continues to not operate. Therefore, you should consider our second solution from the listing after attempting this one several times previously if it still does not resolve the “airplay to Samsung TV not working” ongoing issue.

Solution 2: Turn Off The Bluetooth

Hence, this is the second most effective method in our list to solve the “airplay not working on Samsung TV” issue. There have been numerous instances where Bluetooth and AirPlay have indeed conflicted. Well, if you are thereby experiencing this “ airplay unable to connect to Samsung TV” issue, just simply turn off the Bluetooth from both devices. By doing so or applying this specific method you may get rid of the issue quickly. If still, the error occurs or still if you are facing this issue, try out the next solution from our list. 

Solution 3: Turn Off the Samsung TV’s Automatic Protection Countdown Timer

This is another ideal solution to solve the “ Samsung TV airplay not working” issue. This frustrating issue might appear if you have turned on the automatic protection countdown timer of your Samsung TV. Therefore, you indeed need to disable or turn off the automatic protection countdown timer so as to solve the issue of “ airplay not working on Samsung TV”. 

Turn Off the Samsung TV's Automatic Protection Countdown Timer

To apply this solution, we have provided you with a step-by-step guide to make your work easy and simple. Follow as we have instructed below –

  • First of all, in the TV’s settings menu, go to General and then choose System Manager in the right corner of the screen of the window.
  • Secondly, turn off the  Auto Protection Time at this time.

After doing all this, check whether the issue has been removed or not. In many cases, this solution worked out effectively and many of the users got it resolved too. If this solution has not fixed the issue yet, try out the next method from the list. 

Solution 4: Ensure That All Devices Are Connected to the Similar Network

You might not know but, each device must be plugged into the same kind of network for AirPlay to function effectively. AirPlay will not continue to function when either the Television or an Apple device is not connected to a stable Wifi connection. Your devices might potentially be linked to two distinct networks even though they are closely linked to the exact same router because of the fact that even more recent routers contain double-band engines and transmissions. But although having two networks enables various devices to run each with its own capacity, the underlying issue is that this may periodically effectively prevent the two devices from interacting with one another. 

As a result, you must follow the steps listed below to ultimately determine if they are connected to the same network –

  • First of all, by using the remote, just choose Source.
  • Secondly, the gear icon is located in the bottom left corner. Use it to access the Settings menu.
  • After that, select General from the menu.
  • Finally, choose Network Status after choosing Network. This may be compared to the location of your device’s connection key indicator.

Solution 5: Update the Router’s Firmware

: Update the Router's Firmware

Follow the steps as we have instructed below to get the router’s firmware updated –

  • First of all, navigate to the web portal for your router, then log in with your login information as needed.
  • Now go to the Administration section in the Configuration window of the router..
  • Check for current updates for the router by accessing Firmware Upgrade, Router Update.  

Solution 6: Turn Off the Firewall just on the Host Device

This solution is the last one from our list, which is really very effective in removing the “airplay not working on Samsung TV” issue totally. If the firewall has been activated or enabled, at times it prevents AirPlay from operating in the correct form. Thus, turning off the firewall in cases solves this type of issue. Also, many individuals have reported that doing this has solved the “airplay unable to connect to Samsung TV” issue. Hence, you must also give it a try.

Follow the step-by-step instructions given below:

  • Launch Preferences on your Mac and select Security and Privacy.
  • Choose Firewall after which you’ll need to input your admin password by clicking the padlock.
  • Now, in the Firewall Options window, ensure certain Block All Incoming Connections is not enabled.
  • Verify to make sure that the Automatically Allow Built-in Software to Receive Incoming Connections checkbox has been checked off, and then see if the Airplay problem has been fixed.
  • Whether it still did not make sense, determine whether the “Airplay Samsung TV not working” problem is resolved by turning off the Mac’s Firewall.

Last Say

Airplay not working on Samsung TV may sound like a big problem, but there are easy solutions that you can try at home. By following the troubleshooting steps above, you should be able to fix the issue in no time. If you have any other questions or need help with anything, feel free to reach out to us. We’re always happy to help.

Frequently Asked Questions 

Q1: How come my Airplay isn’t working?

Ans: Check that all of your AirPlay-capable gadgets are working and connected to the same WiFi network, running the most recent software, and are up to date. Reboot the AirPlay or screen mirroring-compatible gadgets.

Q2: Does AirPlay make use of Bluetooth or Wi-Fi?

Ans: To broadcast audio and/or video from a suitable iDevice to a solitary Airplay-enabled audio or audio/video transmitter or from iTunes to additional audio or audio/video recipients, with the option to manage individual quantity for each of the multiple units, Airplay utilizes a currently existing WiFi network.

Q3: Why is my Samsung TV not mirroring my iPhone?

Ans: Make sure your Apple device and Samsung TV are connected to the same Wi-Fi connection first. Afterward, turn on AirPlay on each device. Disabling the Samsung TV’s firewall can assist if that does not work. You can test an operating system update for the Samsung TV if it doesn’t resolve the issue.

Q4: How can I tell whether my Samsung TV is AirPlay 2 compatible?

Ans: Go to Settings, then on General, then search for the “External Device Manager” option to see if your TV supports AirPlay 2. If you observe an AirPlay 2 subsection, your Television is completely incapable of using the function. Moreover, the Airplay procedure might also be different for OLED Vs UHD TV, so make sure that you are using a TV that is compatible with Airplay. 

Q5: How can my iPhone AirPlay be reset?

Ans: Apple TV or your AirPlay device should be restarted; you might need to turn off the power. Press the Side button while holding down either of the Volume buttons, then glide to power off to restart your iOS device. A single streaming attempt ought to be the only thing occurring at any one moment. Some third-party applications obstruct AirPlay.

Q6: For AirPlay to work, what input on my TV is required?

Ans: Use a VGA or HDMI connection to attach the adaptor. A television or computer monitor input should be connected to the cable. The iPhone should switch on after being plugged into the adapter’s Lightning connector. Switch to the input you just connected the cable to by using the TV’s control panel or remote control.

red light on motherboard

A red light on motherboard might alarm you if you do not know the reason behind it. Most of us see this red light usually because of some issue in the system. If you see a red light on your motherboard, you will want to jump on to resolving it without having complete knowledge. This can be dangerous and can take a lot of time. But do not worry, we got your back!

In this article, we will help you resolve this issue but before that, we will learn what this means and what is triggering this motherboard red light.

What Does The Red Light on Motherboard Mean?

red cpu light on motherboard

A motherboard is like a center for all operations of your system. This is why even a minute issue can cause trouble to the entire system. Having said that, the motherboard is not only a hub of all operations but is also equipped with ways you can eradicate issues. This means, in case any error occurs and you are performing steps to eliminate it, the motherboard will be responsible for resourcing your resolving operations. 

A red light is mostly an indication that an issue has occurred and it needs your attention. This can be a minor or major issue. In some cases, you will also hear a beeping sound along with a blinking red light. Regardless of everything, this will indicate that a problem has occurred and it needs your immediate attention. 

Initially you will not know how serious the situation is but as you look into its depth, you will realize its seriousness. It can occur due to defects in hardware or due to wiring issues or some other alarming issue. In most cases, you will see the red light as you turn on the computer. However, if such a thing happens, your computer will either not start or if it is starting, there will be no display. 

What Triggers A Motherboard Red Light?

Each and every issue that occurs is triggered by one or the other factor. Below are the list of reasons why you might be facing this problem:

Motherboard 

We might be looking for the problem all over when the real reason is right in front. This means that the very first thing that should come to our mind is that maybe the issue is arising not because there are different defects but because the motherboard is defective or has faults. In simple words, you may come across this problem when the motherboard itself is faulty.

CMOS Battery is Drained

CMOS, i.e. complementary metal oxide semiconductor is a physical part of the motherboard. It is a hub of setting configurations and run by a battery attached. However, when this battery drains out, CMOS will stop running properly and therefore, a red light issue might occur.

Defected Hardware

You might be facing this issue because of a defect in hardware or the entire hardware is damaged. Therefore, you can check all your system hardware if you face such a problem.

Misplacement of Graphic or Central Processing Unit

You might be facing the problem of red light because either your central processing unit or your graphics processing unit is not placed properly over the motherboard. This will lead to several problems, let alone, a red CPU light on the motherboard. 

Power Cable

The red light on the motherboard can arise when your power cable is not connected properly or is probably damaged. Another thing that might be wrong is a connection issue with your power cable. These are three possible power cable defects that will lead to this issue. 

Your CPU is Overheating

When you operate your system for a longer period, not only your CPU but your entire system will heat up. Since the central processing unit is the hub for all operations of the computer, you will see the redlight when it will heat up. 

Your Basic Input/Output System Is Causing Problem

CPU red light on motherboard can occur when an issue arises with your basic input/output system, i.e. BIOS. BIOS is responsible for booting your operating system and loading all the hardware devices on your computer. Therefore an issue in it will raise the red light. 

Hard Drive

Another issue that is triggering the red light on motherboard is an ongoing problem with the hard drive. This problem can be a defect in the hard drive, a virus, or even an overflowing of the hard drive. The best way to deal with it is to either get your hard drive checked or replace it.

How To Read A Red Light On Motherboard?

red light on motherboard

When you look at the motherboard, you will see there are four red lights and all are labeled. Each red light indicates different issues. Let’s learn how you can read the red lights.

  • CPU Red Light

When you see the CPU light on, it is a direct indication that the processor is malfunctioning. Since the CPU light indicates malfunctioning of the processor, you will notice that the system is not turning on. 

Any issue with your central processing units like a fan not working properly or an issue in the pin socket can cause the CPU light to emit. The problems with the central processing unit lead to the failure to connect the CPU with the system. 

Basically, failure to establish a good connection between the system and the CPU will lead to this light turning on. You must take care of the problem, whether it is overheating or fan failure. 

  • DRAM Red Light

The DRAM Red Light emits because of issues related to RAM. Random Access Memory is a storage unit of your computer. This light will turn on when the RAM of your computer is either overflowed or corrupted. 

The RAM can be corrupted or damaged because of several reasons like viruses or malware. Moreover, when the RAm is not set up or installed properly, the light will emit. 

  • GPU Red Light

The GPU red light emits when the graphics processing unit is causing problems. The GPU helps in all the graphics-related work. However, when there is some issue with you, the light will turn on.

This indicates that the GPU might not be connected properly or is overburdened. It can also indicate that the GPU is corrupted and needs your immediate attention. moreover, when the GPU connection is loosened, the light will turn on.

  • BOOT 

Any issue arising due to BOOT will turn on this lead. Since BOOT will help in boosting the operating system, you will notice that the system is not turning on. BOOT is really important in order to ensure the smooth running of the computer.

The red light will emit mostly when the motherboard fails to identify BOOT on your system. However, there are other factors as well. Like, for when the BOOT is not connected properly or is corrupted. The BOOT connection is loosened causing the light to turn on.

How To Resolve The Red Light On Motherboard?

We have already discussed that the red light only emits when a certain issue needs immediate attention. Therefore, below are some resolution methods or troubleshooters for red CPU light on motherboard.

Method 1: Examine The PSU

PSU is short for power supply units. All the energy that your entire system is operating on comes from this very place. The power supply unit has all the connectors attached to it including the one that supplies power to the motherboard. 

Examine The PSU

If the issue is rising from the PSU itself, then you might encounter a red light. However, in order to resolve it, firstly, check if all the connectors are attached properly. A better option is to disconnect all the connectors and then connect them properly. However, if the problem still persists, here’s what you need to do:

  • Start with unplugging all the connections.
  • Then from the system’s case, de-attach each and every PSU cable that is connected to the motherboard and the hardware.
  • Now all you have to do is remove the PSU and attach it to a properly working system.
  • If everything goes well and good, there is another issue causing the red light to turn on. If not, replace the PSU and connect the fixed one properly into the system.

Method 2: Reattach The Storage Drives

Reattach The Storage Drives

There are mainly two types of storage drives, i.e. Solid State Drives (SSD) and Hard Disk Drive (HDD). issues like when the motherboard cannot properly detect the storage drives on your system can lead to the above mentioned problem. However, this red light issue can be fixed simply by ensuring that the connection between your motherboard be it  A520 or X570 motherboard, and SSD or HDD is strong enough. Here’s how this can be done:

  • Firstly disconnect the power cables.
  • Open the system’s case and remove the SATA cables connected to the storage drives.
  • Clean the ports, the drives, and the cable with a cotton or soft brush, carefully.
  • Once done, place all the cables back into their original and correct ports.

Method 3: Fix The Hardware Defect

Any defect in the hardware or the entire damaged hardware can cause this issue. However, it can be resolved. First of all you will need to figure out which hardware is defective and what is the defect. Secondly, you will have to verify whether the defect can be resolved or not. 

If not, then you do not have any other option than to replace the part. However, if the defect can be fixed, get it fixed. There can be chances that you do not find any defect or damage. In such cases, check all the wires. Ensure that none is loosened and all wires are connected in the correct ports and all are properly fixed. 

Having said that, the hardware-causing issue can be resolved by either fixing the damage, replacing the part, or simply by checking for loosened connections.

Method 4: Fix CMOS Battery

Fix CMOS Battery red light on motherboard

The complementary metal oxide semiconductor or CMOS is the house to all settings configuration and it is operated by a battery. However, when the battery is damaged or drained, the red light turns on as an indication that this issue needs to be resolved. 

You can deal with this situation if you simply replace or reset the battery. Follow the steps below if you want to reset the battery:

  • Start by removing the CMOS battery.
  • Leave the system like this for around 10 to 15 minutes.
  • Now reseat the battery back to where it was connected.
  • Alternatively, use a CMOS jumper located just beside the battery on the motherboard to reset the BIOS.
  • Locate the jumper and detach it for a few seconds and connect it again.
  • If the issue persists, remove the battery and replace it with a fresh and working one.

Method 5: Amend The Placing of GPU and RAM

We have already discussed that when RAM or the Graphics Processing Unit is not seated or connected properly, you will come across such issues. However, in order to resolve it all you have to do is ensure that both RAM and the GPU is seated properly where they are supposed to be. 

In case you have two RAMs in your system, you are gonna have to check both of them here’s how:

  • Disconnect all the power connections, to avoid getting an electric shock.
  • Open the case of the system and locate the ports of RAM on the motherboard.
  • Deattach the RAM or RAMs from those ports.
  • Now with a soft brush or cotton, clean both the slots and the RAM/RAMs properly and carefully.
  • After you finish cleaning, connect and place the RAM or RAMs correctly. 

Method 6: Check Power Supply Cable

The red light might be emitting due to problems caused by the power supply cable. Therefore, check the cable and make sure it is connected properly. Even after this if the problem persists, you should consider replacing it.

This is because a damaged cable will not provide sufficient power to the motherboard. Failure to get sufficient energy the motherboard will show you the red light. Therefore replace the damaged power supply cable with the right one. 

Make sure you get the correct cable with on damage and connect it properly. Also, ensure that the power cable is not cheap or a fake one because then you might end up encountering a motherboard red light.

Method 7: Reboot or Upgrade BIOS

When your basic input/output system starts giving you a hard time, you can encounter a red light on the motherboard. BIOS is responsible for booting your operating system and loading all the hardware devices on your computer. Therefore any issue with it might cause hindrance with the entire system. The motherboard warns you of the problem via the red light. 

Reboot or Upgrade BIOS

Here’s how you can deal with it:

  • Restart your computer.
  • As soon as the BIOS boots, press F12/F2/Del/Esc.
  • You’ll see the load defaults option, hit it.
  • Without making any changes, just hit the save and exit option.
  • Hit on ok. Your system will then reboot.
  • With this, BIOS will be reset.

Method 8: Simmer Your CPU Down

The most common reason for the CPU red light on the motherboard is the overheating of the CPU. The Central Processing Unit overheats when you use the system for a longer time without any breaks. Therefore, the system might shut off and as a result, you face a red light problem.

In order to resolve this problem, you will need to cool off your CPU. You can do this by limiting the use of it and shutting down the system entirely and plugging off the power cable as well, for around ten minutes. Next, follow the steps below:

  • Disconnect the CPU from the system.
  • Put it on a hard surface and open its case.
  • Use cotton or a brush to clean off the fan.
  • Ensure all the cables are properly connected between the fan and the motherboard.
  • Also verify if the fans are working properly and smoothly, if not, replace them.

Method 9: Change The Motherboard

Change The Motherboard

If you have tried all the methods of troubleshooting but the red light is still booted up, this probably means that the motherboard is damaged. The best solution is to replace it with one that is free of flaws. Detach the motherboard and switch it with a perfectly working one.

Conclusion

A red light on motherboard is an indication of an underlying issue that is hindering your system and needs immediate attention. If the issue is not resolved, you might not be able to operate your system. Therefore, in the above article, we have discussed everything about this red light. You will learn what it is and how it is triggered. Moreover, you will also learn how you can resolve if stuck in a similar problem. We hope that you were able to resolve this issue with this guide.

Frequently Asked Questions:

Q1: What does the red light on motherboard mean?

A: The red light on motherboard is an indication that something is wrong with either hardware, wiring or another part of your system. When you see the red light, you will also notice that your system is not booted. You will not be able to operate your computer properly if you do not find the underlying problem that the red light is indicating.

Q2: Why is my CPU showing a red light?

  • CMOs battery is drained
  • CPU is overheating
  • Hardware is damaged.
  • Power supply cable is not connected properly or damaged.
  • RAM or GPU not seated properly.
  • CPU fans not working.
  • BIOS is causing problems.
  • Motherboard is defective.

Q3: How do I fix the red CPU light on motherboard?

  • Replace the motherboard.
  • Fix or replace defective hardware.
  • Cool down your CPU.
  • Reset or replace CMOS battery.
  • Reset BIOS.
  • Check the PSU and the power cables.
  • Connect your storage drives again.
  • Place GPU and RAM properly.

Q4: Why is there a red LED light on the motherboard after I installed RAM?

A: When the RAM that you have installed is either not connected properly or is not seated correctly, the red light will turn on, on the motherboard. This is to indicate to you about the issue so that you can fix it right away. Therefore, make sure you put RAM in the right slot and connect it tightly (not loosened), RAM is not damaged and is compatible with your system.

ESPN Error 1008

Well, in today’s world, there are very few people who are not familiar with the most popular and reputed sports streaming platform, ESPN. Even though it is known to be a very reputable platform, it timely brings out some errors to the users. One error type among them is known to be ESPN Error 1008. Are you also the one, who is currently experiencing this error issue on your device? If you are the one facing, don’t worry. This is not an uncommon issue that has appeared only to you. Along with you, many other users have also been complaining about this “ESPN app startup error 1008”.

So, to make you get rid of this frustrating error, we have some brilliant solutions for you. You can try each and every solution we have provided in this article until you get away from this error completely. So, what are you waiting for? Let’s get started without wasting a second.

What Might Be The Reasons For The Occurrence Of The ESPN Error 1008?

espn error code 1008

We have previously reported in the post that users of the ESPN app really encounter numerous error codes overall time. As one of the most typical error codes, “ESPN startup error 1008” is personally experienced mostly by the vast majority of users. There are a number of potential causes for this frustrating and disappointing error message on your computer or smartphone, despite the fact that there are no known causes for ESPN app regular customers to experience the underlying issue. Hence, knowing about all the factors is important for the users. Take a look at the factors we have mentioned below –

1. App Seems to Have Become Outdated

This error issue “ESPN error code 1008”  may also display if the ESPN software hasn’t really been updated since a while ago. The programmers update a program more often to properly address numerous problems. Furthermore, if you employ an outdated application on your device, complications like this might tend to arise.

2. Existence of a Potential Virus

The most harmful sources of RAM are viruses. Systems can be greatly impacted by the presence of viruses, which makes it challenging for Streaming service providers like ESPN to broadcast online content quickly and smoothly. In light of this, you may encounter the “ESPN app error 1008” in the presence of any malware.

3. Internet Connectivity Issues

You might encounter this error code when your laptop or smartphone’s Internet connection is very slow, unstable and dangerous or if it has been interrupting your innate ability to interact with the ESPN application. 

4. Corrupted ESPN Application’s Setup

Well, this also can be the cause of this error. Many professional experts have also pointed out about it. Well, if the installation of the ESPN application is fundamentally flawed as well as the loading of crucial smartphone/ computer application components malfunctioning on the device, as a consequence, the ESPN app may additionally exhibit the strong warning code “ESPN plus error 1008”. 

What are the Solutions To Get Rid of the “ESPN Error 1008” Issue on your Device?

Well, this is now the right time to move forward to the solution part of getting rid of the error message “ESPN error 1008” appearing on your device.  So, there is nothing to wait anymore, just dig into the solutions below quickly. 

Solution 1: Simply Restart Your Device

Simply Restart Your Device (espn plus error 1008)

This is the first and one of the most effective solutions in our list of solutions for the error “ESPN error 1008”. Well, you can get your device’s processes functioning once again by restarting it. You may thus just restart your device (smartphone or computer) and then feel free to check to make sure that the ESPN application is fully operational now, removing the error “ESPN plus error 1008”. 

If applying this solution does not work and the error is still appearing on the screen, try out the second method provided in our list of solutions. 

Solution 2: The ESPN App’s Cache and Memory Should Indeed be Deleted  

The ESPN App's Cache and Memory Should Indeed be Deleted  

Well, this is the second most essential solution in our list so as to get rid of the error message “ESPN error 1008” from your device. If there are any corrupted files on your cache or the storage of your ESPN application, this error might occur. Hence, removing the cache and the memory of the ESPN application can definitely erase this irritating error. As per reports, many users have also claimed to get rid of this error after performing this solution on their devices. 

Hence, to know how you can remove the cache and the storage of the ESPN application(Android device), follow the step-by-step guide that we have instructed for you below –

  • First of all, simply open the Settings menu on your android device/phone, and next to that choose Application Manager there.
  • Afterward, just locate the ESPN application and then press on it to access the settings.
  • Select the  Force Stop option. After that, affirm that you would like to forcibly stop the ESPN application.
  • The ESPN application will now be launched, so make sure it is functioning properly on your device.
  • To force the application to close and open the Storage, simply repeat the same steps from one to three (if actually necessary).
  • You just simply select the clear Cache button, and after then select Clear Data.
  • To acknowledge whether data of the ESPN application has been removed or not just restart your device (phone).
  • After doing all this, now activate the ESPN application on your device and then sign in with the necessary credentials. 

Hence, the error message “ESPN error 1008” might now be totally erased from the device. After doing so, if the error is still appearing, then the issue might be this, hence, you then need to try the next method mentioned here.

Solution 3: You Need To Update Your ESPN Application

This is the third solution in our list for removing the error message “ESPN error 1008”. Well, if you are not currently using the latest updated version of the ESPN application, this error may pop up in your device and will make you not able to open it or stream on it. Hence, if you update the ESPN application to its latest version, you might get rid of this error or some other related errors too. 

Well, updating the ESPN application on your device is really a very easy task to do. Still, we have provided step-by-step instructions for you so as to apply this method properly. Just follow as be have instructed below – 

  • First of all, open the Google Play Store on your phone and then enter “ESPN” into the search field.
  • Once ESPN is open, just click Update if any updates are available for you.
  • After doing so,  hold off for some time till the update has been deployed.

Solution 4: Log Back Into the ESPN Application

Log Back Into the ESPN Application

This is another most effective solution for the error message “ESPN error 1008” that you have been currently facing. Well, in most of the cases, logging out and after that again logging it back to a particular application can simply fix any related issue there. Hence, you can really try this method also here and also, and many users have reported that doing so, has also removed the error message “ESPN app startup error 1008” completely. You can really give it a try surely. 

We have provided a step-by-step guide below for applying this method to solve the issue. Hence follow it properly –

  • First of all, simply start the ESPN application on your device and after that navigate to Settings.
  • Now, choose Logout of ESPN Account, and then select Confirm to exit the ESPN application.
  • Next, exit the ESPN application when you are finished, and then take it from your list of recently used applications.
  • Afterward, open the ESPN application and sign in by using your professional credentials as required.

Hence, the error message “ESPN startup error 1008” might get removed finally. After applying this method, if the error message is still appearing on your device, try out the next method that we have provided.

Solution 5: You Need to Reinstall the ESPN Application

If none of the above-mentioned solutions have worked out in solving this specific error, you can try out by reinstalling the ESPN application. The most recent data will be downloaded from the Play Store using this particular method, ensuring that all of the files are compatible with the current. Moreover, this simple technique will permanently remove everything that is application-related information previously present on your device. 

Well, we have provided for you some instructions on how to reinstall the ESPN application from your device and get rid of this error. Follow as we have instructed below –

  • First of all, launch the Settings application on your Android device (smartphone), and after that, tap in the Application Manager icon.
  • Secondly, launch ESPN now, then just select Uninstall there.
  • Restart your smartphone and verify the complete removal of the ESPN app.
  • Reinstall the ESPN application and follow the process with a restart.

This time the error message “ESPN error 1008” must have been deleted totally from your device.

Read More: 7 SOLUTION TO FIX PS5 KEEPS TURNING OFF ISSUE PERMANENTLY

The Bottom Line 

These all are the solutions for the error message “ESPN error 1008” appearing on your device. Try each and every solution from the first to the last until you find out that the issue has been completely resolved. Also, don’t pressurize yourself for experiencing this error, many people have faced the same and also got it resolved afterward. If you still have any issues or if the problem is still appearing on your device, you can contact the customer service of the ESPN application directly. 

Frequently Asked Questions 

Q1: Does wiping the cache completely remove the apps?

Ans: In addition to the temporary cache files, this will also remove any user data kept by an app. But even though the app will be reset, it will not be removed. Therefore you’ll have to sign in once more and make any necessary privacy settings.

Q2: Why does error 1008 continually appear on my ESPN?

Ans: There may be a number of causes behind ESPN’s persistent mistake claims. ESPN may not be working since your streaming device’s broadband connection is presumably not functioning effectively. The ESPN problem 1008 has had several underlying reasons, but some of the most commonly known are as described in the following –

  • App Seems to Have Become Outdated.
  • Existence of a Potential Virus.
  • Internet Connectivity Issues
  • Corrupted ESPN Application’s Setup

Q3: How do I repair an unexpected ESPN error?

Ans: You can repair an unexpected error caused in your ESPN profile by trying out the below-mentioned solutions properly. Have a look on it –

  • Look into your internet connection.
  • Activate the ESPN app again.
  • Analyze ESPN+ to see whether it is unavailable.
  • Start the computer again.

Q4: Can game progress be deleted after data clearing?

Ans: Destroying game data could perhaps lead to the destruction of any in-game accomplishments or significant progress.

Q5: What sets ESPN and ESPN+ apart from one another?

Ans: Anyone with a laptop, an internet provider, and a postal address within the appropriate service location can access ESPN content and use the free ESPN app. In contrast, ESPN+ is more of an addition to the ESPN app. Because it makes unique premium content available to paid subscribers.

you are not currently using a display attached to an nvidia gpu

Are you currently encountering a pop-up message on your computer screen saying “ you are not currently using a display attached to an nvidia gpu”?

Well, this error notice warning may initially appear even after you have been operating with the NVIDIA GPU for many years probably. Also, many other users have also reported the appearance of this error message on their devices (desktop computers as well as laptops) whenever they make a conscious endeavor to attempt to enter the NVidia setting menu. Hence, does the appearance of this typical error on your device indicate that you are going to experience a critical set of circumstances with the graphics card in the coming days? Can you get rid of this particular error permanently? Is there any remedy for it?

Well, you are lucky enough. Don’t worry anymore. There are several remedies to get away from this error on your device. This article is totally for you. Try out each and every solution explained here until you get to see that the error message “ you are not currently using a display attached to an nvidia gpu laptop” disappears permanently. Don’t wait anymore, dig into the article.

you are not currently using a display attached to an nvidia gpu

Reasons For “You Are Not Currently Using A Display Attached To An Nvidia GPU” On Your Device

Well, this particular error “you are currently not using a display attached to an nvidia gpu” pops-up on your desktop or laptop screen due to several reasons. Knowing about the possible reasons for this issue pop-up with the Nvidia configuration menu is indeed pretty much essential well before progressing to the solution section of the article for actively working it out. Well, now let’s examine some of the potential reasons why this error may well have occurred on your personal device.

  • Your Central Processing Unit’s (CPU) electrical components might not be correctly positioned.
  • Your computer’s power levels are insufficient, or it is running on lower power consumption, and therefore you are unable to fully utilize the powerful and influential NVIDIA GPU resources and infrastructure.
  • The NVIDIA GPU connector is not correctly and consistently connected directly to your monitor’s main port. The potential problem might well be brought on by a completely broken cable or maybe even a sloppy connection.
  • Through the use of numerous GPUs specifically linked to your computer, SLI (Scalable Link Interface) easily and frequently enhances your computer’s performance. 
  • The operating system processes as well as the drivers you have indeed probably set up on your computer system might be fundamentally incompatible.

What Are The Methods To Fix the “ You Are Not Currently Using A Display Attached To An Nvidia GPU” On Your Device” Error Completely?

However, unlike what you might be thinking, the error message “you are not using a display attached to an nvidia gpu” is not actually a major issue. In most cases, it is only a warning telling you that you have your monitor connected to the incorrect graphics card or that another component of your computer may be taking power from the GPU. Well, do not give up. We have some troubleshooting advice for you below to help you resolve this issue or any related kind of issues.

To remove this warning message from your Windows 10 or 11 personal desktop or laptop, consider trying each and every method provided by us below.

Note: Double-check that each of your device connections is configured correctly and consistently just before you immediately begin the possible approaches.

Method 1: Make Sure the Correct GPU Display Port is Linked to Your Monitor Connection

Make Sure the Correct GPU Display Port is Linked to Your Monitor Connection

Well, this is one of the most basic and easy methods to get rid of “you are not currently using a display attached to an nvidia gpu” error on your personal computer. This is primarily intended for desktop users with integrated graphics-capable CPUs. This is not hard but, as easy as connecting your display wire to the display port of the proper GPU. A classic error is to connect the display wire to the motherboard as opposed to the GPU card itself though. The display utilizes integrated graphics, therefore the separate graphics card is completely disregarded. Once you complete the task of checking, now open and check whether the error “you are not currently attached to an Nvidia GPU” has been removed or not. 

Well, if it gets removed then definitely it is great news and you do not need to continue with the other methods. If not, you can try the other methods we have provided in the article.

Method 2: Verify the Device’s Battery Performance

Secondly, this is an effective solution. Well, you might feel awkward on what is related to the battery for solving the “you are not currently using a display attached to an nvidia gpu” error issue, but there is a relation. If your windows desktop or your laptop is running in low battery, the following error might definitely pop up on the screen. 

Hence, charge your computer’s battery to the full. This might make you get rid of this issue, fortunately. Still, if this method does not solve the error and is still appearing, do not worry. We have other solutions ready for you below. Simply try them out.  

Method 3: Update the NVIDIA Drivers

Well, in our list of the solutions, we have this very effective solution for you. If you are constantly running out of current or fundamentally incompatible NVIDIA drivers, this error message “you are not currently using a display attached to an nvidia gpu”can certainly appear. To determine whether the problem has been resolved, you should indeed plan to upgrade your NVIDIA drivers. Well, here is the step-by-step instruction on how you can update the NVIDIA drivers on your computer. Follow each and every step properly –

  • First of all, click the Windows key on the device.
  • Secondly, type GeForce into the search box and choose the NVIDIA GeForce app..
  • Choose the NVIDIA GeForce application.
  • Now, access the Drivers tab by going to the app’s upper left corner. If an update is available, select Check for Updates from the menu and then choose Download.
  • After that, wait calmly until it downloads to your computer.

Update the NVIDIA Drivers

  • Click the Express Installation option. In order to continue, click the Yes button.
  • Once you have finished doing it, click the Close button there.
  • Hence, a new update may be available right now, so click Check for Updates once again to find out.

Method 4: Fresh Install for Your Drivers

This is another effective solution to get rid of the “ you are not currently using a display attached to an nvidia gpu” error from your device. Well, the following error may be somewhat caused by a malfunctioning or fundamentally incompatible NVIDIA driver that has been currently installed on your computer running on windows. Hence, a fully fresh install of the drivers can be performed. In most cases, these methods really worked 100{50afa256e6562afb2cd7837d8db3fd71ce947f26b53ffff72a77bb9141ae121a} and got the issue resolved within a few minutes. Therefore, to apply this method correctly on your device, just follow the below mentioned step-by-step instructions properly:

  • First of all, on your computer keyboard, hit the Windows logo key and R simultaneously. 
  • Secondly, enter devmgmt.msc into the box, and then press enter.
  • After that, find the Display connectors link, then simply click it (Graphics card, Video card). 
  • Next, right-click the NVIDIA product you want to edit. Afterward, choose Uninstall.
  • Click Yes to confirm uninstalling the program.
  • After doing that, start your computer again.
  • Next, on your computer keyboard, immediately hit the Windows logo key and R simultaneously. After that, enter devmgmt.msc into the box, but then just press The enter button.
  • To have Windows reinstall the driver for your machine, select Action > Scan for Hardware Changes.

Reboot your computer once all of the above-mentioned procedures have indeed been completed. After doing so, just check to see whether the error indicating you are not currently using a display attached to an nvidia gpu” has indeed been fixed totally.

Method 5: Disable Automated Driver Updates

Hence, this one more method you can give it try to fix the “ you are not currently using a display attached to an nvidia gpu” irritating pop-up error from your windows desktop or laptop. Well, if the NVIDIA Graphics drivers are updated automatically on the device, the following error issue might occur. Hence, you really need to stop or disable the automatic update process of NVIDIA Graphics driver. 

To do so, you need to follow the step-by-step instructions carefully, as we have mentioned below –

  • First of all, to begin with, press the Win.
  • After doing so, type View advanced system settings into the search bar, and then just select Open.
  • Now, just select Device Installation Settings by clicking the Hardware tab’s button.
  • Select No and then click to the Save Modifications.

you are not currently using a display attached to an nvidia gpu

  • Hence, click OK in the System Properties box so as to finish up the procedure.

Well, this method might solve the error “you are not currently using a display attached to an Nvidia GPU laptop” from your device totally.

The Bottom Line

Well, these are all its solutions. In this article, we have provided for you five simple and easy methods to help you get rid of the error “you are not currently using a display attached to an NVidia GPU” permanently from your device (desktop as well as a laptop). Do not make your mind to choose a random solution out from here because that might not solve the issue. Try each and every solution we have provided in the post, until the pop-up error message completely fades away from your device. We hope those solutions will definitely erase the error. If those still do not work and if it still continues to appear, you can reach out to us anytime.. 

Frequently Asked Questions 

Q1: Can I use GeForce Experience to replace the Nvidia GPU?

Ans: Absolutely, users can always use GeForce Experience to reinstall the Nvidia GPU. Now, simply run GeForce Experience. safely navigate to drivers and choose the drivers you genuinely wish to update. Next to that, reinstall it by varying Different parameters from the menu.

Q2: Can a Computer system be actually started without a GPU?

Ans: Your PC will not function properly if you do not have an APU or GPU. For the visuals to be processed, your computer needs a device. In the absence of both a totally specialized GPU or an APU, it won’t even power up and commence the startup process.

Q3: Can GPU be harmed by HDMI?

Ans: As long as you don’t physically harm the card’s HDMI port by connecting it incorrectly. This scenario shouldn’t typically harm a graphics card because HDMI enables hot plugging.

Q4: Can a GPU support a CPU that is excessively flimsy?

Ans: A similarly strong CPU is necessary for the GPU to function effectively and is not a stand-alone device. You can get CPU bottlenecking problems if you increase the GPU without also updating the CPU.

Q5: Is it possible to use Nvidia while disabling Intel HD Graphics?

Ans: Although it is possible to turn off the built-in Intel graphics, there is really no benefit in doing so. Your GPU will start working on your visuals the moment you plug it in and attach an HDMI. If you want to, simply go to the device manager and select display options; both GPUs should appear.

liquid detected in lightning connector

Are you one of the many iPhone users that have recently noticed liquid detected in your lightning connector? If so, we have good news for you. This is a simple yet often overlooked issue that can be easily fixed with some quick steps. While not an uncommon occurrence, dealing with a wet charging port on any device can be uncomfortable and seemingly daunting as moisture may cause internal hardware damage if left unattended. 

In this comprehensive blog, we will discuss the solutions you can apply when liquid detected in lightning connector shows up in your iPhone. These methods can be performed without special tools or expensive repair services! So, read on to learn more about why this happens and what methods work best when fixing it yourself.

Liquid Detected in Lightning Connector in iPhone: Causes

Take a detailed look at some of the most common causes of liquid damage in an iPhone’s lightning connector. Also go through the tips on how to prevent further damage. 

  • One most common cause of liquid damage in an iPhone’s lightning connector is water exposure. Whether it’s from rain, sweat, or even humidity, any form of moisture can enter through the ports. It can corrode the components inside your device. This corrosion can lead to permanent damage if not addressed quickly. 
  • Another potential cause of liquid entering through the lightning connector is condensation. This happens when warm air with moisture contacts a cold surface such as your phone or its case. As the air cools down, it begins to release its moisture. The moisture can then seep into areas like your phone’s lightning connector port. 
  • Finally, another potential cause of liquid damage in an iPhone’s lightning connector could be from accidental spills or splashes while using the device near a sink or bathtub. Even one drop of water could potentially cause major problems with your liquid detected iPhone. So, address it immediately

Steps to Fix Liquid Detected in Lightning Connector in iPhone

While some types of liquid damage can be fixed with relative ease, fixing liquid detected in your iPhone’s lightning connector can be more challenging. The good news is, there are steps you can take to repair this issue and get back up and running again. Let’s go over what needs to be done. 

Step 1: Shut Down Your Device Immediately 

Shut Down Your Device Immediately (iphone liquid detected)

If you notice liquid in lightning connector or that your phone has been exposed to liquid, shut it down immediately. This will prevent further damage from occurring. Plus it may stop any short circuits that could occur if the phone remains powered on. 

Once it has been shut down, remove the SIM card tray if necessary. Then dry off the outside of the device with a towel or microfiber cloth. Do not attempt to turn the phone back on until all of the visible water has been removed from its surface. 

Step 2: Open Up Your Device 

Once all of the visible water has been removed from your device, it’s time to open it up so you can access the lightning port and begin cleaning out any residual moisture that may still be present inside. To do this, you’ll need a set of tiny Phillips-head screwdrivers and some tweezers for accessing small screws and connectors within the device. 

Remember that you should never attempt to use any type of metal tool when making repairs on an electronic device as it could cause short circuits or other types of damage. Once everything is unscrewed, carefully remove the back panel of your phone and locate the lightning port on its motherboard.  

Step 3: Clean Out The Lightning Port 

Clean Out The Lightning Port 

Now that you have located the lightning port, use a cotton swab dipped in 91{50afa256e6562afb2cd7837d8db3fd71ce947f26b53ffff72a77bb9141ae121a} isopropyl alcohol or distilled water to gently clean out any debris or moisture that may have accumulated within its crevices.  

Make sure not to apply too much pressure when using these cleaning solutions as they can easily cause further damage if used incorrectly. Then use a soft brush (such as a toothbrush) to scrub away any remaining dirt or grime before allowing everything to air dry for at least 24 hours before reassembling your device.  

Step 4: Force Reset Your iPhone

Force Restart 

Finally, if all else has failed, try resetting your iPhone by holding the volume up button together and then releasing it. Thereafter press and quickly release the volume down button. Now press and keep holding the side button until you see the Apple logo appear on the screen and then release them both simultaneously once that happens. This may also help to fix Imessage not working on iPhones & connectivity issues related to liquid damage in some cases. 

Precautions Tips to Avoid Liquid Detected in Lightning Connector  

There are precautions you can take to reduce the risk of liquid entering your iPhone’s Lightning port. Let’s look at a few ways you can protect your device from this issue.  

Clean Up Spills Immediately

The first step is to always clean up spills immediately when they occur. Liquids like coffee, soda and other beverages contain sugar and other substances that can corrode electronic components. It can lead to permanent damage if left unchecked for long periods of time. You should also take care not to leave liquids on any surface your iPhone rests on. This is because there is a chance that it could seep into the Lightning port. 

Use Cases & Covers

Investing in cases and covers for your device is another great way to protect it from liquid damage. Cases should be made of waterproof material. They effectively block water from seeping into the ports or buttons of your phone. Covers are also important because they provide additional protection from drops and bumps that could potentially damage the Lightning port itself.  

Check for Warning Signs

It’s important to check for warning signs that indicate liquid damage has occurred in your iPhone’s Lightning connector. Warning signs include yellowish residue around the port, corrosion on pins inside the port or a strange smell coming from the device itself. If you notice any of these issues, it’s best to get your device checked by an Apple-certified technician as soon as possible.   

Last Say

So, there you have it – easy ways to fix the problem of liquid detected in lightning connector on your iPhone. If you followed these steps and are still having trouble, please feel free to reach out to us for assistance. We are always happy to help our readers troubleshoot their technology problems.

Frequently Asked Questions

Q1. Why Does My Phone Keep Saying Liquid Detected in Lightning Connector ? 

The reason your phone keeps saying liquid detected in lightning connector is that the lightning port has liquid sensor protection built-in. This means that when liquid enters the port, it triggers a warning message that alerts you to the presence of liquid. The sensor also prevents further damage by disabling charging until the port has been dried out. 

Q2. What To Do If Liquid Is Detected in A Lightning Connector? 

If liquid has been detected in the lightning connector then there are several steps that you can take to try.

  • Down Your Device Immediately 
  • Open Up Your Device 
  • Clean Out The Lightning Port 
  • Reboot/Reset Your iPhone

Q3. How long does the iPhone Liquid Detected Issue Last?

iPhone liquid detected can last several hours, depending on how much liquid was exposed to the device. The more liquid that has come into contact with the device, the longer it will take to completely dry. Generally speaking, a reasonable amount of time to wait between being notified of an iPhone liquid damage and knowing that it is fully dry would be around 24 hours.

windows 10 install

Windows 10 has been out for a while now, and many people are wondering if they should upgrade. Microsoft made it very easy to install, but there are still some things you need to know. In this post, we’ll walk you through every step of windows 10 install. so that you can do it yourself without any problems. So, whether you’re upgrading from an older version of Windows or doing a fresh install, we’ve got you covered! Let’s delve in!

how to install windows 10

Windows 10 Install by Creating Installation Disc or Drive

To begin How to install a Window 10 we have to start by creating an installation drive. 

Blank USB Flash Drive

how to install windows 10 from usb

To answer how to install windows 10 from USB, we will need a blank USB flash drive. A blank DVD would do just as well. The USB flash drive must be a minimum size of 8GB. 

The USB drive or the blank DVD will act as the bootable device having the Windows 10 installation drive. 

Product Key

The product key is a must. Direct purchases from Microsoft via the user’s Microsoft account will result in the product key being linked directly. The install product key is linked to the user’s account in the former case. 

In case of buying from a third-party retailer, the user will have to use a 25-key code. These are the product key codes. 

If you’re without the product key there are still ways how to install a Window. This can similarly happen if you’re performing an installation on a new hard drive.  

To start with the Windows 10 install process via the windows 10 update assistant, link the Windows 10 digital license to the Microsoft account. To perform the task, Click Settings, then go to Update and Security and Activation. 

Update and Security and Activation.

There might be a scenario you find in this particular step of Windows 10 installation. Windows is already activated with a digital license. Click on Add an Account option then. Once done, link the Microsoft Account.

There might be another scenario of a Windows 10 upgrade. In many cases, there is no need for the product key to perform the upgrade of Windows 10 installation. 

Download Process

Go to the official Microsoft site to do a Windows 10 install. Click on the Download tool now option. You will find this right in the middle of the page in a blue-shaped box. Once done, double-click on the installation file on your computer. Select, thereafter YES and allow the installer to run. 

Then click on Accept License when the box appears. 

Installation Media

Select Create Installation Media from the Windows 10 startup folder and click on OK. Doing so you have made sure a Windows 10 install disc or drive has been created.  

In the case of Windows 10, install the upgrade right-click on the Upgrade this PC now option. You will need to then follow the appearing instructions. 

Now you know not only how to install Windows but you have completed the install Windows 10 process. 

Update Details

Then comes the process of updating the details following your system. In the case of Windows 10 install it in the system you’re using. The default options are fine. 

While Windows 10 is installed on a different system and you need to update the details. This must be compatible with the computer including architecture. 

Type of Installation 

We have come almost to the end of how to install a Window. Now choose the type of installation to install Windows 10 in your system. ISO file if you’re using a DVD. Do next. 

how to install a window Installation Media

Flash Drive & ISO File 

Create Windows 10 installation media. This is to be done according to the device you have chosen for the Windows 10 installation. 

The flash drive option is simple. Simply select the option then click next. The windows 10 installation files will install themselves. When done, select Finish. 

While for an ISO file, wait for the download to finish. This Windows 10 download via this process is time-consuming. When finished, select the Open DVD burner option and select the DVD burner. Then select Burn. 

Windows 10 Install Boot

  1. Enter the device you have completed the installation media in.
  2. Now is the time to boot the system into the BIOS. 

There might be a situation to install Windows 10 with the system not being prepared to boot. Such scenarios mean Windows 10 installation media not working. We need to then reboot the system. 

After that, press the keyboard key compatible with the system you’re using to enter Setup or BIOS. 

Keys for the popular brands include, 

  • Dell: F2 or f12
  • HP: ESC or F10 
  • MSI: DEL 
  • Lenovo: F1, F2 or Fn + F2 
  • Acer and Asus: F2 or Del 
  • Sony: F1, F2 F3
  1. Then go to the boot tab or the Boot Options. Whatever is showing in your system, select the device to boot from. Choose the Removable device for the USB flash drive option and CD ROM Drive for the ISO option.  
  2. Keep on pressing the + key and wait for the boot option to become first. If the + key is not working push the CD-ROM Drive or Removable device as the top menu. Click on F5 instead. 
  3. Save and exit the settings then. F10 is often the most common shortcut key. To Save and Exit and restart the system.

Windows 10 Installation    

  1. Select Next when prompted. 
  2. Thereafter Select Install Now.
  3. You have to now Enter the Windows 10 key and right-click on it, If You’re without the key, click on the Skip option. This will be present at the bottom right corner. 
  4. Finally, follow the popup instruction appearing on the screen. While doing Windows 10 install upgrade. The system will let you choose between a custom install and performing an upgrade on the current operating system. 

Selecting an upgrade will restore your data and files. 

Windows 10 Full Installation is Now Complete

So, that brings me to the conclusion of my article. Hopefully, the detailed steps in order have been easy to follow. Window 10 installation is an easy few steps way of completing the whole installation task. Once done, your system will run smoother. 

Frequently Asked Questions:

Q.1) How to install a Windows 10 on Laptop? 

To perform laptop Windows 10 easy install you will be required a 5GB free space of any USB flash drive. Format the drive and set the partition as active. The USB drive will Format. So make sure there aren’t any important files in it. Then Copy Windows Setup into the USB flash drive. Complete the installation process. 

Q.2) What is Windows installation media?

Windows installation can be performed using a media installation device of a USB flash drive or a blank DVD drive. 

Q.3) How to install Windows 10 on a new pc?

To perform the Windows 10 install on a new PC, open the system. Then press the key to open the BOOT system. When done click on the option to boot the system from the installation media device. Once the setup starts follow the on-screen instructions.

Why is My Guided Access Not Working

Recently, you decided to let your friend borrow your iPhone, with the assurance that he would only be able to access the content you allowed. To make sure of this, you enabled Guided Access on your device, as you had done so many times before. But before long, you noticed that your friend had been accessing other apps and functions. You wondered how they were getting around the security—and then it came to your mind; the guided access not working properly!

Losing control of your privacy can feel like a nightmare and it can take hours out of your day, trying to figure out why the device isn’t limiting what can be accessed. So, what should you do? Fear not, all hope is not lost! We have written a comprehensive guide on diagnosing and resolving common issues with the Guided Access feature, so your data remains safe and sound – no matter who browses it. But before that, let’s first understand what exalt guided access is. 

What is Guided Access?

Guided Access is a feature available on Apple devices, such as iPads and iPhones, that enables you to stay on one task. This means you can lock your device into an app so you don’t have the temptation of switching to a different app or navigating away from the task you are doing. You can do this by limiting access to only certain features within that app. For instance, with Compass apps or notes apps, the home button can be deactivated so that the user cannot just exit the program. Guided Access really helps in keeping users focused on their tasks and prevents them from getting distracted by other apps on their devices.

Fixing Guided Access Not Working on iPhone or iPad

1. Force Restart 

Force Restart (guided access not working)

Whenever guided access on your Apple device isn’t working as expected, you’ll want to try and force restart the device. You can do this in one of two ways depending on the device you are using.

If it’s an iPhone 8 or later, press and release the volume up button or press and release the volume down button quickly after. Afterward, press and hold the side button until the Apple logo appears. 

For earlier model iPhones (and iPads), you may have to press and hold both the top buttons and the Home button at the same time simultaneously until the Apple logo appears. This process works by closing all open applications which help prevent applications from causing any more potential issues with guided access not working.

2. Re-enable Guided Access Feature 

There are chances that Guided Access may not work due to a technical glitch in its own operating configurations. In such a situation, experts recommend disabling and enabling the Guided Access feature. Here is the process on an iPhone.

  • Open the iPhone Settings and go to Accessibility.  
  • Disable Guided Access without leaving the screen. 

Disable Guided Access

  • Force restart your iPhone (you can find instructions on how to do this in the first solution above). 
  • Re-enable Guided Access and check if it’s working normally. 
  • If the issue persists, try disabling Guided Access again, force restarting your device, then re-enabling it once more. 
  • If that still doesn’t work, navigate to the Accessibility Shortcut Settings and uncheck everything except Guided Access. Then Disable Guided Access one more time, force restart your device, then enable it once more and check if everything is back in order. 

3. Factory Reset your iPhone

The process is quite straightforward, but before going through with it you will want to make sure that you have a backup of all of your important data and files, just in case something goes wrong during this process.

  • To start the reset, simply navigate to Settings.
  • Scroll down to General.
  • Tap on the Reset button located at the bottom of the page. 
  • Next, select Erase All Content and Settings.

Factory Reset

  • Enter your passcode, confirm that you wish to delete everything, and then wait while your device proceeds with the reset. Depending on how much data you have stored on your device this could take some time. Once done, though, your device should be restored as new.

4. Update iOS

If you are having difficulty with Guided Access ain’t working on your iOS device, the first thing to do is make sure your iOS is up to date. Updating your device can often resolve minor issues like liquid detected iPhone issue. To check for an available update –

  • Go to Settings > General > Software Update.

Settings > General > Software Update.

  • It will show you if there is currently any software that needs to be updated.

Just as a precaution before going ahead with updating iOS, check that the device has enough charge to last through the process, it is connected to a functioning Wi-Fi network for downloading new data and a backup of all data has been created and stored. This way, whether or not updating the OS ends up solving the issue in Guided Access, all content remains safe.

5. Open From Control Center

If you are experiencing guided access triple click not working issue, one potential cause could be that the side button on your device is not working properly. In this case, you can enable guided access in the Control Center. The steps are:

  • Open Settings and navigate to the Control Center. 
  • Scroll down until you see the option Guided Access, then click on (+) to add it. 
  • Once this is done, open an app and swipe down and open the Control Center. 
  • From there, click on the Guided Access icon to access the features. 

6. Reset the Keyboard Dictionary

If a third-party keyboard connected to your Apple device is causing your Guided Access to not work, resetting the keyboard dictionary can potentially solve the issue. Here are the steps necessary to complete this step on an iPad.

  • Open Settings.
  • Click on General.
  • Choose the option Reset
  • Hit on Reset Keyboard Dictionary.

Reset Keyboard Dictionary to Fix Guided Access Not Working

  • Now you may be asked to confirm that you want to reset the iPad’s keyboard dictionary.
  • Once done, check if the problem is resolved. If it is not, check if you have paired a Bluetooth mouse to the iPad and use it to fill in the passcode and disable and re-enable Guided Access Mode.

7. Change the Passcode of Guided Access

If you are still experiencing the guided access not working issue and none of the troubleshooting steps have worked, then the next thing you should do is change the passcode for Guided Access. This will prompt a full reinitialization of the authorization modules, potentially solving the issue. 

  • First, restart your device. Then access Settings.
  • Navigate to Accessibility > Guided Access > Passcode Settings. 

Accessibility > Guided Access > Passcode Settings. 

  • From there, change the passcode and check if Guided Access has successfully been reinitialized. 
  • Keep in mind that you need to open both Passcode Settings of the iPhone to ensure a successful reset. After making your changes, run a quick test to see if everything is back up and running as normal.

Some Last Words

We hope this blog post has helped address the problem of guided access not working on your iPhone. As we said at the beginning, there are many potential causes for this issue, so it’s important to try all seven of the solutions we listed. Once you have tried them all, you should be able to enjoy using your phone without any problem. 

FAQs

Q1. Why is my guided access not working on my iPhone?

Guided Access is a feature of iOS which allows users to limit their device to a specific app. This can be beneficial for children and those with certain disabilities, as it helps them stay focused on the task at hand. 

If you are having trouble getting Guided Access to work on your iPhone, there are several potential causes. It could be something as simple as not enabling the feature in Settings; alternatively, if you have already enabled it, it might be due to an incompatible app or software update. You can also check for any restrictions placed in /Applications/Restrictions that might be impeding Guided Access usage. 

Q2. Why is guided access not starting?

You as a user can experience guided access not working issues due to multiple reasons, such as improper configuration, outdated software, an issue with the hardware, or a bug in the operating system.  

Q3. How do I turn off guided access if my home button doesn’t work?

If you are facing a home button not working issue and need to turn off guided access on your device, then turning off guided access may take some time. 

First, open an app and then press the side button (typically located at the right-hand side at the bottom) three times. This will open up the guided access settings. Then, use your finger to circle areas of the screen in order to disable it. It is important that this process is followed precisely otherwise it may not work properly.

Q4. How do I manually turn on guided access?

Turning on Guided Access manually on an iPhone is a simple process that can help you increase your device’s security and allow for more user control. To activate the feature, access the Settings app, then scroll down to the Accessibility option. You can then select Guided Access which will bring up several options that can be adjusted to your desired specifications.

imessage needs to be enabled to send this message

If you are an iPhone user and recently updated your phone, you might be facing an issue where you cannot send iMessage, and a notification saying iMessage needs to be enabled to send this message pops up. Well, the iPhone still needs to address this issue. So in this article, we will tell you about some simple ways to resolve this problem immediately. Let’s get started. 

Top 7 Ways to Fix iMessage Needs to be Enabled to Send This Message

Top 7 Ways to Fix iMessage Needs to be Enabled to Send This Message

In this section, we are going to introduce you to 7 easy peasy ways to resolve the issue of messages not working on iPhone. 

1. Reboot Your iPhone 

First of all, you should try to reboot your iPhone. Restarting your device solves half of the problem. In order to reboot your device, follow the step-by-step procedure given below.

  • Hold the Power button for some 4 to 5 seconds. 
  • A slider will open, asking you if you want to shut down your device. Shut down your phone through that slider. 
  • Wait for around 1 to 2 minutes. 
  • Now press the Power button again for 4 to 5 seconds and your phone will restart. 

2. Check the Server of the iPhone

Check the Server of Your iPhone

If restarting your phone did not work then there might be some issue with the iMessage server. Check the iMessage server if it is working or not, and to do so, you will have to follow the procedure given below. 

  • Go to Google and type Apple System Status
  • A System Status page will open, find the iMessage dot, and see if it is green or not. 
  • If that dot is green, then there is no issue with the server. 

3. Reset Your Network Settings

Resetting your network settings work with many issues like Guided Access not working, iMessage problems & more. Follow the steps below for guidance. 

  • Click on the Settings icon and then look for Messages. 
  • See if the Messages toggle is off or on. 
  • If it is on then turn the Messages toggle off. 
  • No again click on the Settings icon and then click on the General tab. 
  • Scroll down a bit and you will find a Reset option, click on it. 
  • Now click on Reset Network Settings, if it asks for the passcode, enter the passcode. 
  • Now again go to Settings and now turn on the Messages toggle. 

4. Try to Disable and Enable iMessage

Try to Disable and Enable iMessage (messages not working on iphone)

If there is some technical issue with your phone then you can also try to disable and then again enable iMessage on iPhone. This technique has worked for many iPhone users. 

  • First of all, click on the Settings icon and now tap on Messages
  • Look for the iMessage toggle, and see if it is on or off. 
  • If it is on, then turn it off once and then turn it on again. 
  • Now try to send the message again. 

5. Turn on the Factory Settings

Are you still facing the issue of messages not working on iPhone? If yes, then you might need to set your phone to factory settings. This will turn off your iMessages and you will be sending all the messages as SMS and not iMessage. 

But this will delete all your phone’s data, be it photos, videos, messages, contacts, and basically everything that your phone has. So keep this as a last option and make sure that you take a backup of your device before turning your phone to factory mode. To turn on the factory settings, you will need to follow the procedures given below. 

  • Click on the Settings icon and then tap on General. 
  • Now scroll a bit and you will find the Reset option. 
  • Click on the Reset tab and then click on Erase All Content and Settings
  • Now it will ask for your passcode, enter your passcode for confirming the action. 

6. Try Using SMS Instead of iMessage

In case all the other functions of your phone are working correctly then there might be some issue with the iMessage only. To fix this, you can use SMS instead of iMessage until iPhone resolves this issue. In order to turn off iMessages and use SMS instead, you can follow the steps given below. 

  • Click on the Settings icon on your phone.
  • Now go on Messages and turn on Send as SMS as well as iMessages.
  • After this, you will again need to go to Settings and now look for Cellular
  • Click on Cellular and then turn off Cellular Data
  • Now go to Settings again and Turn off the Wi-Fi
  • Go to the Messages application and try to send the text again. 
  • If the message box is blue then it is going as an iMessage. Click on the message and hold it for 2 to 3 seconds until a notification saying “Send as Text Message” shows up. 
  • Click on the pop-up and as soon as you do this, the message box will turn green. You can send 2 to 3 messages repeatedly to check if all the messages are going as SMS only. 

The only issue with this resolution is that you will have to repeat these steps for every contact, which can be a bit lengthy. 

7. Delete the Unsent Conversation or Message

Delete the Unsent Conversation or Message

If none of the above things worked for iMessage needs to be enabled to send this message, then you can try to delete the unsent messages and then send a new text. Follow the steps given below to do the same. 

  • Click on the Settings icon on your phone. 
  • Now go to the Messages option and turn iMessage off. 
  • Now delete the unsent messages and then send new messages. 
  • If this did not work for you then you can also delete the whole conversation and then start a new conversation with the same contact. This will definitely resolve the issue. 

Final Say: iMessage Needs to be Enabled to Send This Message

We are sure that one of the above solutions will definitely resolve the issue of iMessage needs to be enabled to send this message. But make sure that you keep the Factory Mode option as the last resort. Because this will delete all your phone’s data. If you need to set your phone to factory mode then take a backup of your device first and then turn on the factory settings. 

FAQs: Frequently Asked Questions

Q1.  Why is my iPhone not sending text messages? 

There can be many reasons why messages not working on iPhones. The issue can be with the iMessage server as well as your mobile network. Go to Apple System Status and check if the iMessage server is working or not. 

If the iMessage server is working then the issue can be with your phone or network. You can try all the fixes that we have discussed above to solve this issue. One or the other will definitely work for your phone. 

Q2. How to Enable iMessage?

In order to enable iMessage on iPhone, first of all, you will need to go to the Settings option. Click on Settings and then go to Messages. Now turn the iMessage toggle on and this will enable iMessage on your iPhone. 

Q3. How to turn on iMessage? 

In order to turn on iMessage, you will need to go to the settings and then turn on the iMessage toggle by clicking on Messages.